Category Archives: Tutorials

Chains

CSS: How to Make an Anchor Not Clickable in HTML

When building web pages, there are times you might want an anchor link (<a>) to be visible but non-functional. Perhaps you’re still working on that section of your website, or the link is for decorative purposes only. Whatever the reason, making an anchor not clickable is simple with a few CSS rules.

The Code Snippet

Let’s start with a quick code snippet that makes an anchor tag unclickable:

<a href="#" class="inactive-link">Unclickable Link</a>

Then, in your CSS, add the following styles:

.inactive-link {
    pointer-events: none;
    cursor: default;
}

A Use Case for This Approach

Let’s say you have a navigation menu, but one of the pages is under construction. You still want the link to be visible for design consistency, but don’t want users to interact with it. Here’s an example:

<nav>
  <ul>
    <li><a href="/home">Home</a></li>
    <li><a href="/about">About</a></li>
    <li><a href="#" class="inactive-link">Contact (Coming Soon)</a></li>
  </ul>
</nav>

Conclusion

With just a couple of lines of CSS, you can make any anchor tag unclickable. It’s a quick and effective way to manage inactive or placeholder links on your website. Try this technique next time you need a link to be visible but non-functional!

zoom plastic letter toy

CSS Only Animation: Zoom on Hover

In today’s quick tip, we’ll dive into creating a dynamic ‘zoom on hover’ effect that adds an interactive touch to images on your web pages. By incorporating the provided CSS, your images will elegantly scale up when hovered over. This effect, achieved with minimal code, is a fantastic way to enhance your website’s visual appeal and engage your visitors.

DEMO: Zoom on Hover

HTML

<img class="zoom-in" src="YOUR-IMAGE-PATH"/>

CSS

.zoom-in { transition:transform .2s; }
.zoom-in:hover { transform: scale(1.2); }
Abstract background with swap icon

CSS Only Animation: Image Swapping on Hover (Logo Swap)

Explore how to enhance your website’s interactivity with this simple guide on implementing a logo or image swap effect upon mouse hover. Ideal for web designers and developers, this tutorial includes step-by-step instructions, complete with HTML and CSS code snippets, to seamlessly integrate this dynamic visual cue into your web project. Perfect for adding that extra flair to logos or images on your site, learn how to create a more engaging user experience with ease.

DEMO: Swapping Logo/Image on Hover of Mouse

my-first-logomy-second-logo

HTML

<div class="swap">
	<a href="https://wedesignorange.com">
		<img class="main" src="YOUR-MAIN-IMAGE" />
		<img class="hover" src="YOUR-SWAPPING-IMAGE" />
	</a>
</div>

CSS

.swap { height: 200px; width: 200px; position: relative; }
.swap img {
	position: absolute;
	top: 0;
	right: 0;
	left: 0;
	bottom: 0;
	transition: opacity .9s;
	width: 100%;
	height: 100%;
	object-fit: contain;
}
.swap img.hover, .swap:hover img.main { opacity:0; }
.swap img.hover:hover { opacity:1; }
image scrolling

CSS Animation: Image Scrolling on Hover

In the ever-evolving world of web design, adding interactive and visually appealing elements to your website can greatly enhance the user experience. One exciting way to achieve this is by learning how to create an image scrolling effect on hover with CSS animation. With just a few lines of code, you can transform a static image into an engaging and dynamic component that draws the viewer’s attention. So, let’s dive in and discover how to make your website come to life with CSS image scrolling on hover!

DEMO: Mouse over to see the scrolling animation

sleekycase.com website

HTML

<div class="container"> 
	<img src="YOUR-IMAGE"> 
</div>

CSS

img { 
	object-fit: cover;
	object-position: top;
	transition: ease-in-out 4s;
	width: 450px;
	height: 300px;
}
img:hover {
	object-position: bottom;
}
Hamburger Menu Icon

HTML-CSS-JS: Simple Hamburger Menu Expandable

“How to create an expandable hamburger menu?”

DEMO: How It Looks

HTML

<header class="header">
  <div class="header__menu menu">
    <div class="menu__icon"> <span></span> </div>
    <nav class="menu__body">
      <ul class="menu__list">
        <li> <a data-goto="#home" href="" class="menu__link">Home</a></li>
        <li> <a data-goto="#section-1" href="" class="menu__link">Section 1</a></li>
        <li> <a data-goto="#section-2" href="" class="menu__link">Section 2</a></li>
        <li> <a data-goto="#section-3" href="" class="menu__link">Section 3</a></li>
      </ul>
    </nav>
  </div>
</header>

CSS

body {
	background-color: black; font-family:sans-serif; 
}
header a {
	color: #111 !important;
	text-decoration: none!important;
	font-weight: 200;
	font-size: 2.2rem;
	line-height: 1.2;
	display: block;
}
.header__menu {
	position: fixed;
	top: 34px;
	right: 30px;
	z-index: 10;
}
.menu__icon {
	z-index: 5;
	display: block;
	position: relative;
	width: 50px;
	height: 22px;
	cursor: pointer;
}
.menu__icon span, .menu__icon::before, .menu__icon::after {
	left: 0;
	position: absolute;
	height: 20%;
	width: 100%;
	transition: all 0.3s ease 0s;
	background-color: white;
}
.menu__icon::before, .menu__icon::after {
	content: '';
}
.menu__icon::before {
	top: 0;
}
.menu__icon::after {
	bottom: 0;
}
.menu__icon span {
	top: 50%;
	transform: scale(1) translate(0, -50%);
}
.menu__icon._active span {
	transform: scale(0) translate(0, -50%);
}
.menu__icon._active::before {
	top: 50%;
	transform: rotate(-45deg) translate(0, -50%);
}
.menu__icon._active::after {
	bottom: 50%;
	transform: rotate(45deg) translate(0, 50%);
}
.menu__body {
	position: fixed;
	top: 0;
	right: -99%;
	width: 34%;
	height: 100%;
	background-color: rgba(255, 255, 255, 0.8);
	padding: 100px 30px 30px 30px;
	transition: right 0.3s ease 0s;
	overflow: auto;
}
.menu__body._active {
	right: 0;
}
.menu__list > li {
	flex-wrap: wrap;
	margin-bottom: 30px;
}
.menu__body ul {
	padding-left: 1rem;
	list-style: none;
}

JavaScript

Link the below external Javascript into the bottom of your HTML.

<script type="text/javascript" src="https://blog.identitydesign.us/js/hamburger.js"></script>

With having the hamburger menu on your navigation, your website could look more sophisticated and clean.

AOS-Customization-Thumb

Customize Animations on AOS (Animated On Scroll) Library

“How to customize animations on AOS Library?”

AOS Library (by michalsnik) is a great way to trigger animation while scroll for your website design. Here’s how to customize animations using AOS library.

Add CSS to your website header

<link rel="stylesheet" href="https://unpkg.com/aos@next/dist/aos.css" />

Add JS at the end of body tag

<script src="https://unpkg.com/aos@next/dist/aos.js"></script>  
<script type="text/javascript">
AOS.init({   
});
</script> 

HTML

<div class="box" data-aos="my-animation-1">1</div>
<div class="box" data-aos="my-animation-2">2</div>
<div class="box" data-aos="my-animation-3">3</div>
<div class="box" data-aos="my-animation-1">4</div>
<div class="box" data-aos="my-animation-2">5</div>
<div class="box" data-aos="my-animation-3">6</div>
<div class="box" data-aos="my-animation-1">7</div>
<div class="box" data-aos="my-animation-2">8</div>
<div class="box" data-aos="my-animation-3">9</div> 

CSS

/* Default Style of Boxes */
.box {
  width: 250px;
  height: 250px;
  margin: 2rem auto; 
  text-align: center;
  display: flex;
  justify-content: center;
  align-items: center;
  font-family:sans-serif;
  font-size: 5rem;
  color: #FFF;
}
 
/* Before of Animation 1 */
[data-aos="my-animation-1"] {
  transform: rotate(0deg);
  background: black;
  opacity: 0; 
}
/* After of Animation 1 */ 
[data-aos="my-animation-1"].aos-animate {
  transform: rotate(360deg); 
  opacity: 1; 
}
	
/* Before of Animation 2 */
[data-aos="my-animation-2"] {
  background: black;
  transition-property: background; 
}
/* After of Animation 2 */
[data-aos="my-animation-2"].aos-animate {
  background: cyan; 
}
	
/* Before of Animation 3 */
[data-aos="my-animation-3"] {
  transform: translateX(-100%);
  opacity: 0; 
}
/* After of Animation 3 */
[data-aos="my-animation-3"].aos-animate {
  transform: translateX(0%); 
  background: purple;
  opacity: 1; 
}

DEMO: How It Looks

1
2
3
4
5
6
7
8
9


Box Pop-up Effect

CSS: Button Push Shadow Effect on Hover

“How to create a shadow effect when hovering on a box?”

DEMO: How It Looks

TRY HOVERING OVER THE BOX!

HTML

<div class="">TRY HOVERING OVER THE BOX!</div> 

CSS

.button-pop {
    border: 2px solid black;
    padding: 1rem; 
    width:200px;
    height:200px;
}
.button-pop:hover {
    position: relative;
    right: 5px;
    bottom: 5px;
    box-shadow: 7px 7px #111;
}

It’s pretty simple. Enjoy coding!

Font face

CSS: Use your desktop fonts to your website

“How to use .OTF (or other desktop) fonts to your website?”

If you would like to use your desktop fonts to your website, do this!

CSS

  1. Select and place fonts to the server.
  2. Copy and paste codes below to your stylesheet.
  3. Replace font-family: ‘FONT1‘ on both @font-face and p with your own font name.
  4. You may change normal to bold if necessary.
@font-face {
	font-family: 'FONT1';
	src: url("../fonts/YOUR-FONT-LOCATION.otf") format("opentype");
	font-weight: normal;
	font-style: normal;
}
p { 
	font-family: 'FONT1', sans-serif; 
}

How to Change the Order of Artboards on Adobe Illustrator

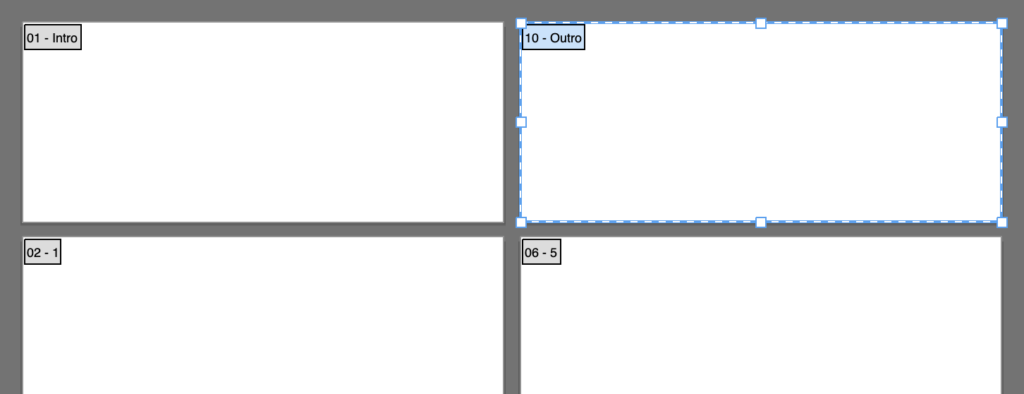
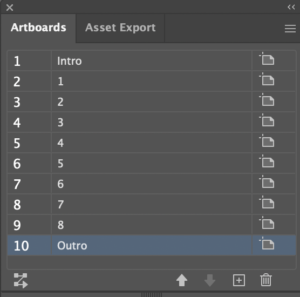
Adobe Illustrator can create multiple paged PDF using multiple artboards. If you need to rearrange the order of pages, here is how-to.

Artboards are like Canvas in Adobe Photoshop.

Artboards

The two-digit number starting on the left of each artboard is the order of the content in PDF. To change the order of artboards, open up the Artboard Palette and drag layers as you want.

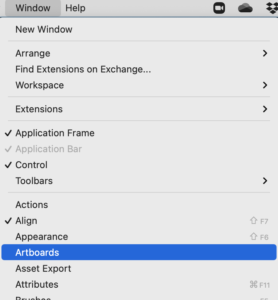
1 Open -> Window (on top menu bar) -> choose Artboards

how to open Artboard

2 Change the Order of Artboards by Dragging the Layers

Artboard Palette

Just need to save your document in PDF.

Chicken turn animation

Make Your Photos into a GIF Animation (Stop Motion) Using Photoshop

I took a bunch of snap shots with my Canon EOS 5D, a DSLR Camera. I thought this could be all put together and exported to a short GIF animation clip for my client’s Instagram.

1 Load Photo in Photoshop

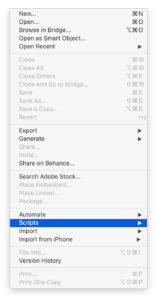
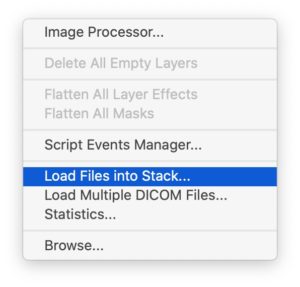
Go to File on the top left menu on Photoshop and select Scripts -> Load Files into Stack

scriptsLoad files into stack

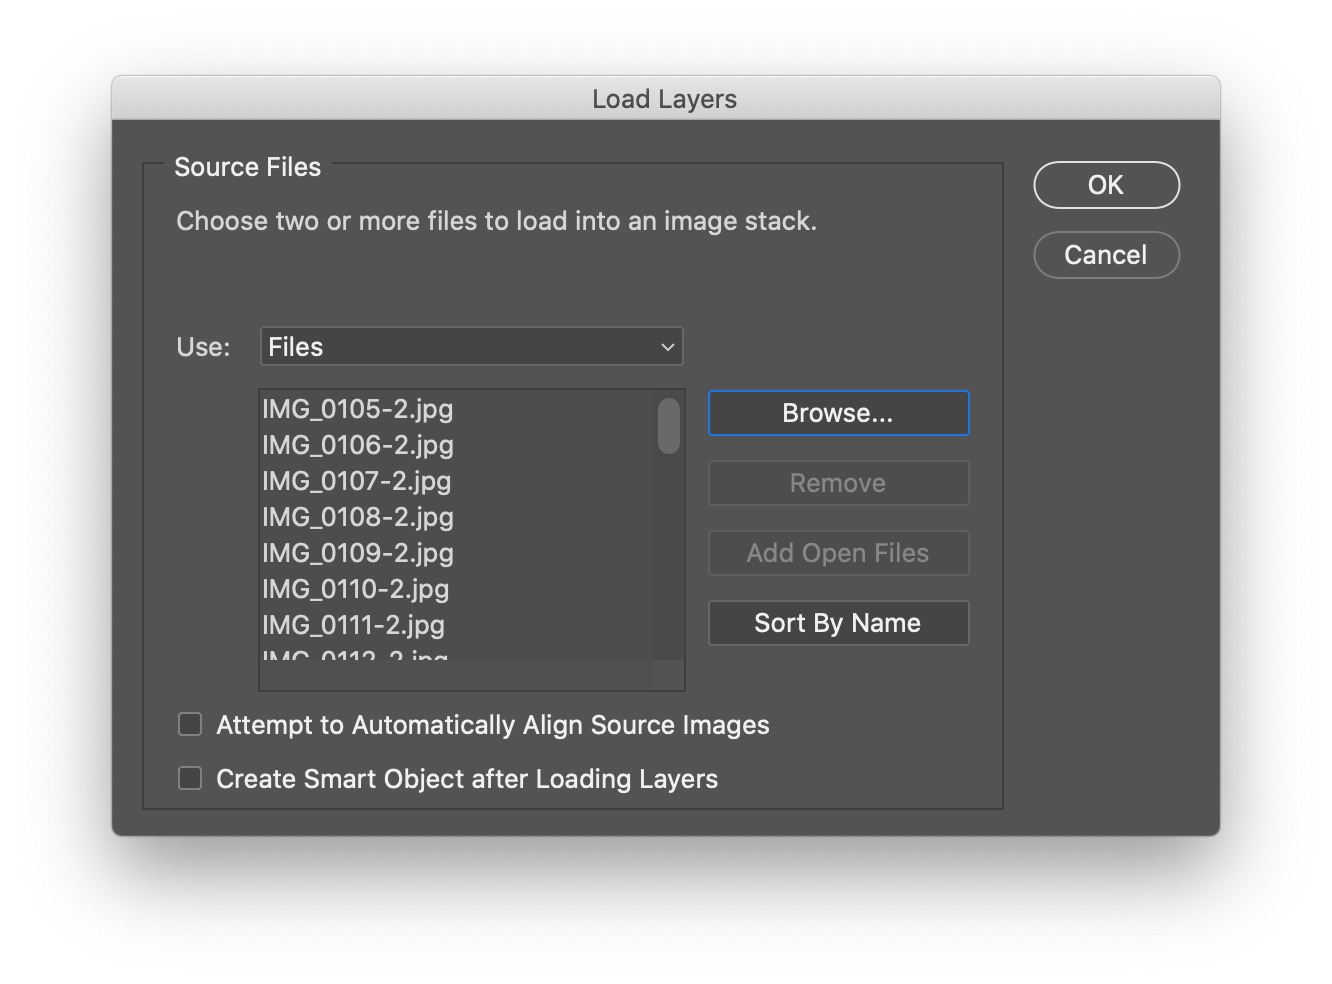
Click Browse and select your photos, hit Okay (You might need to sort your files in name so they can be played in order).

load layers

2 Make Timeline Frames

Open the Timeline palette from the Window menu.

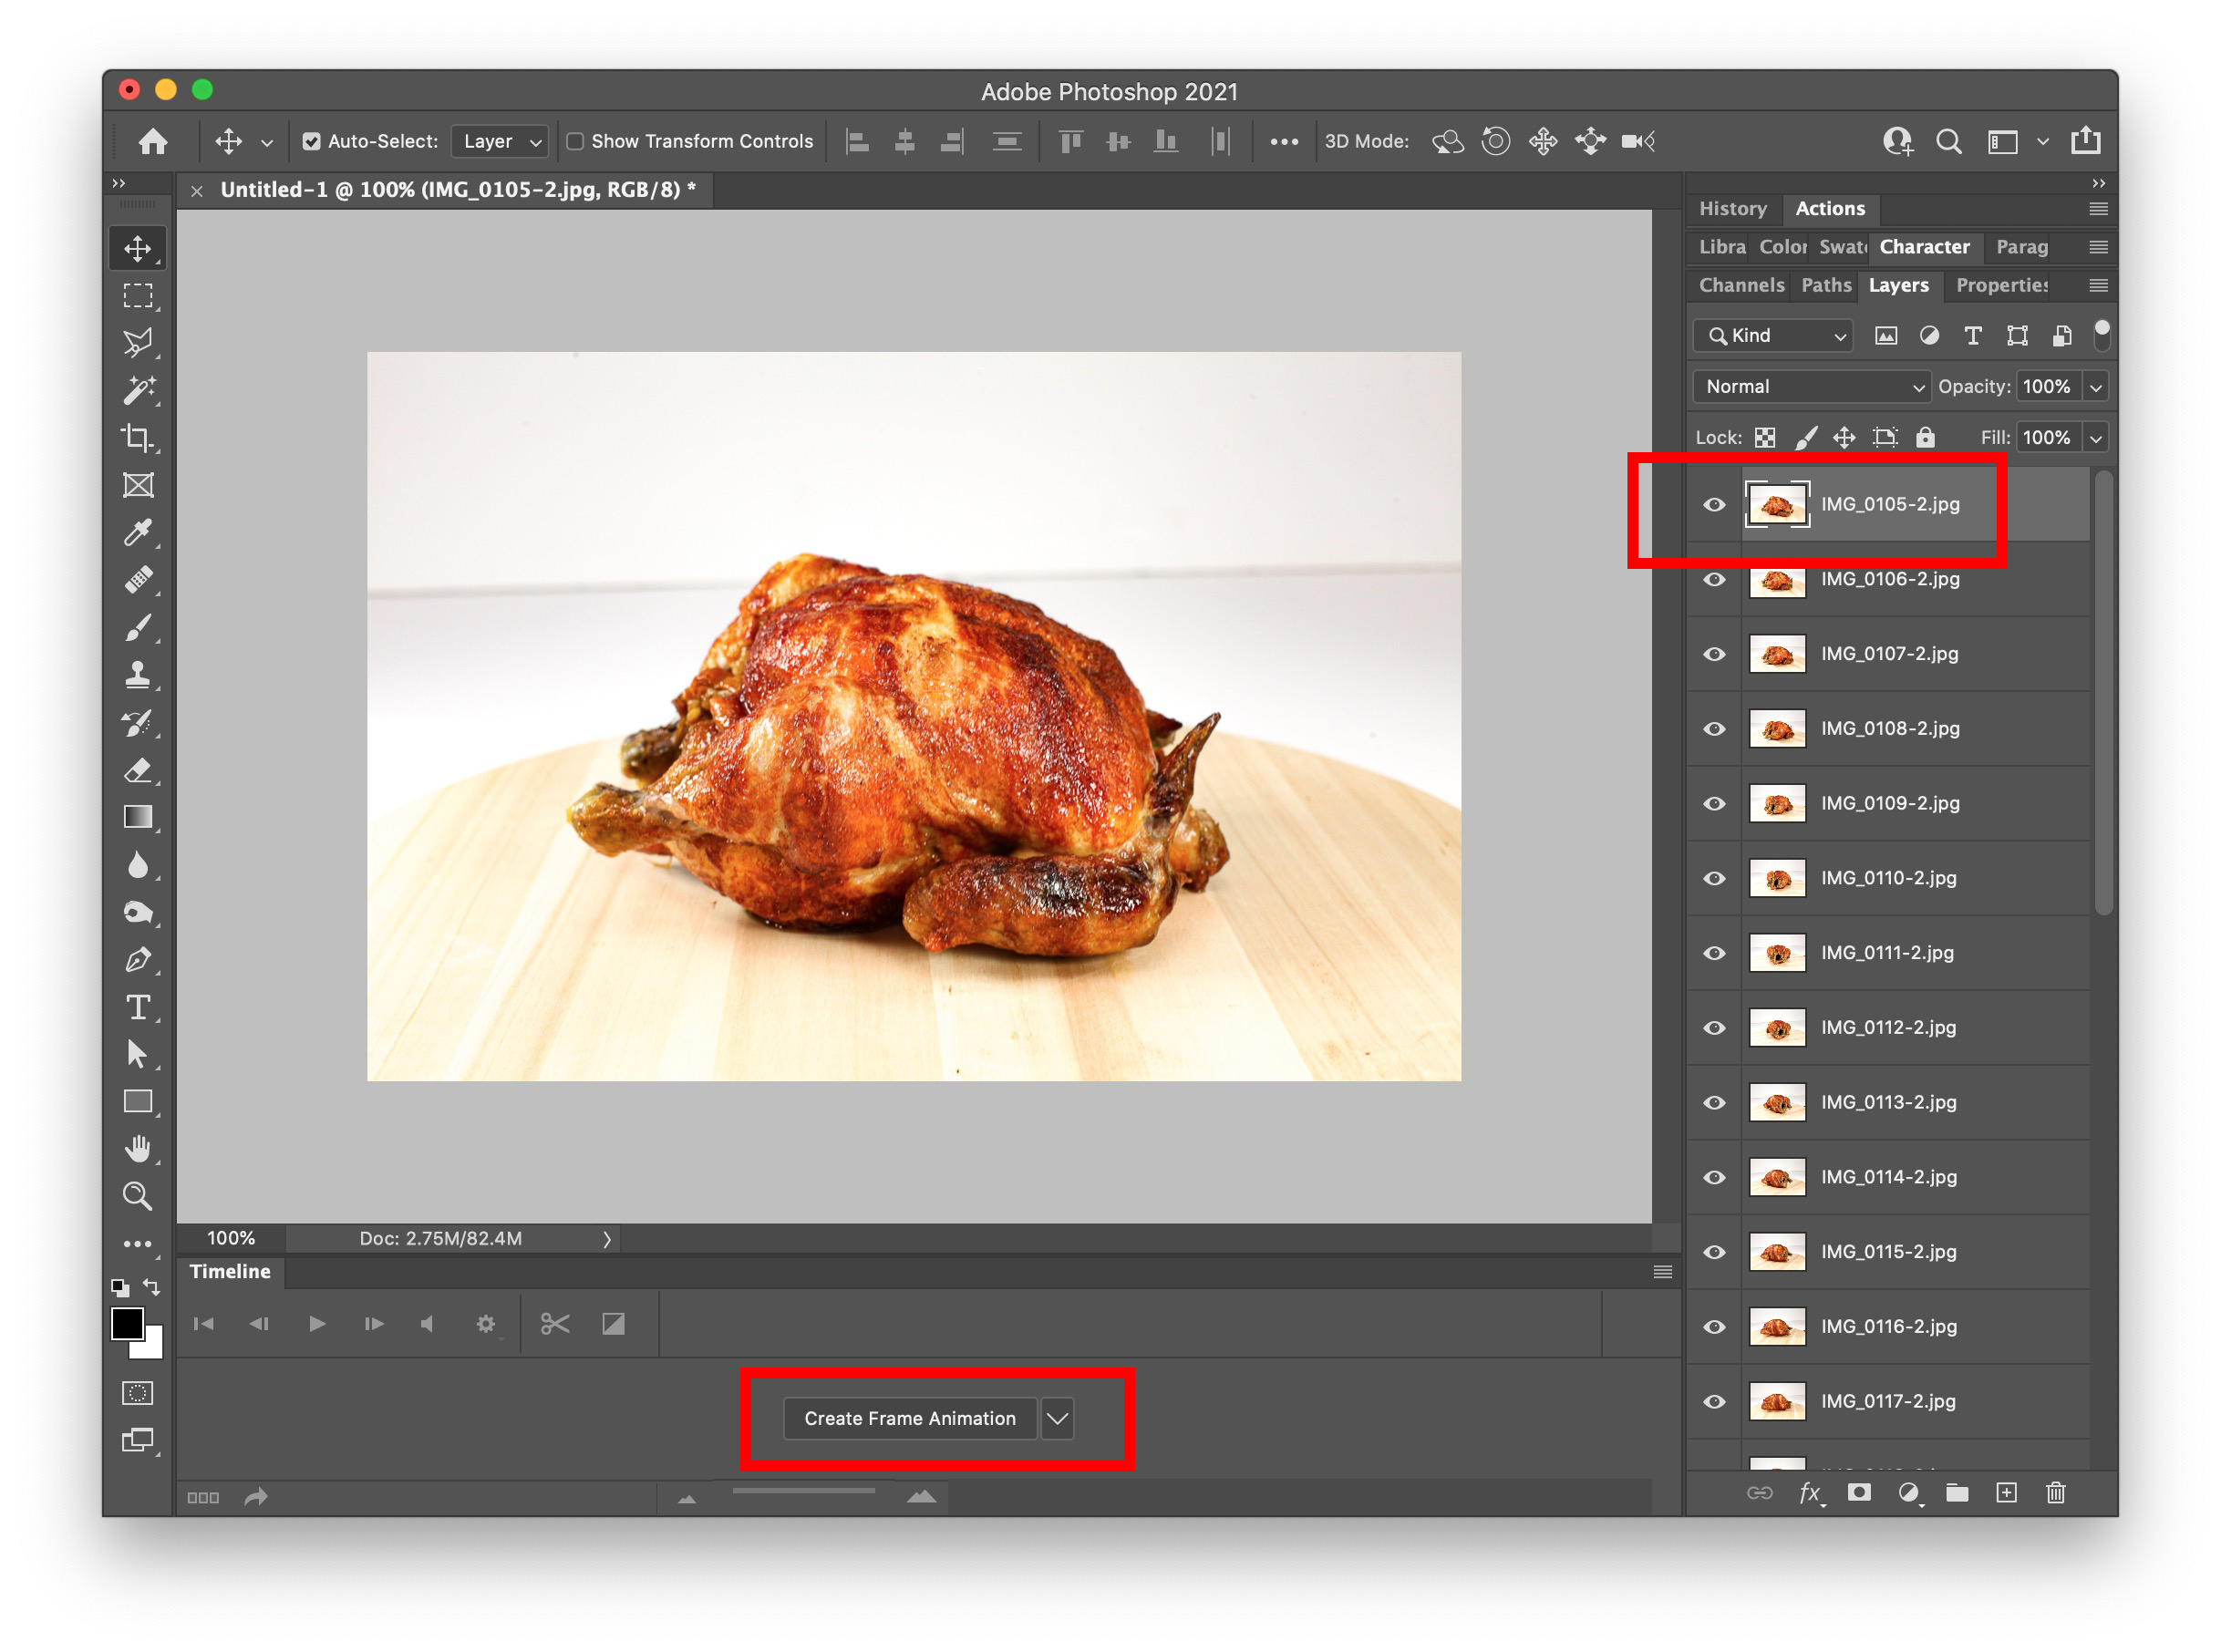
Select the first layer on the Layers palette, click on the Create Frame Animation button (You might have to use the Dropdown button to do this).
Create Frame Animation

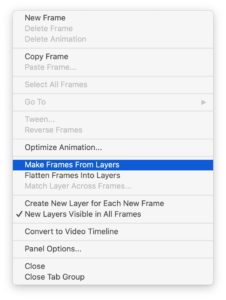
Go to the properties of the Timeline palette (3 lines icons at the top right), select the rest of the layers and select Make Frames from Layers.

Make Frames from Layers

You will see all layers have been converted into frames in timeline.

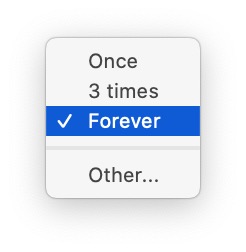
Double check the duration of the animation and leave it to Forever if you want the animation to be repeated and loop forever.
Forever menu

3 Export the file into GIF

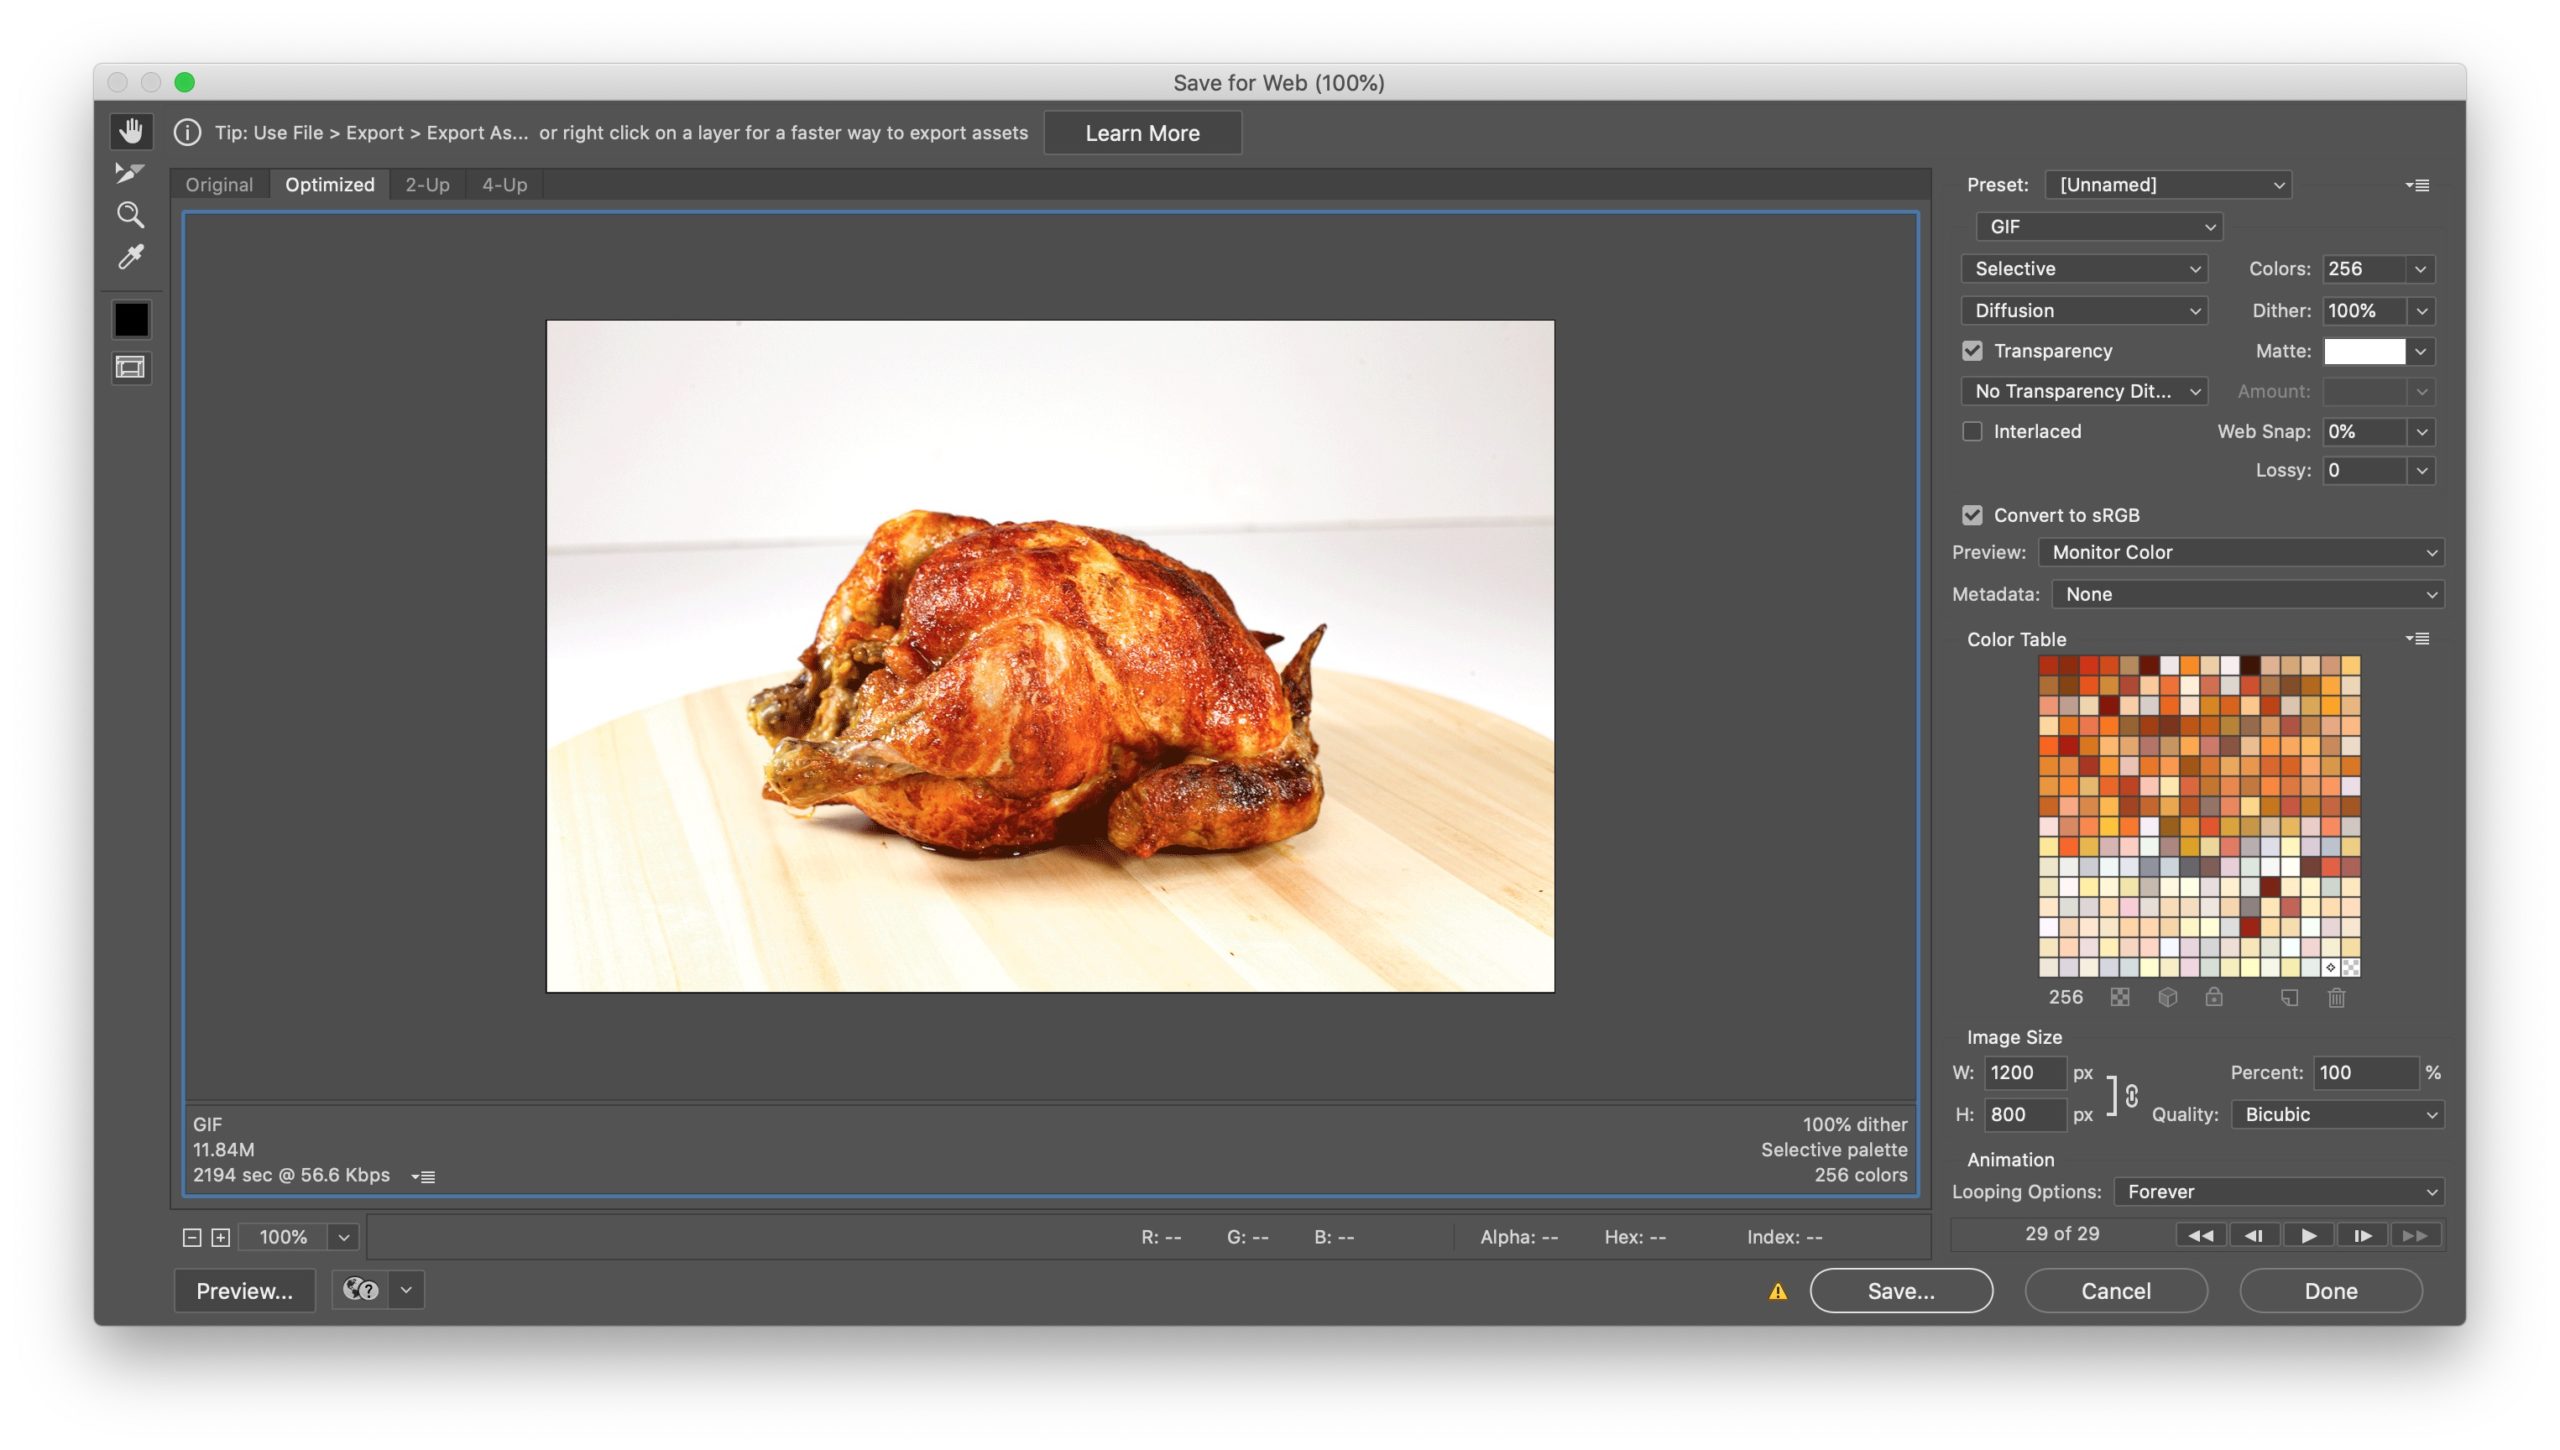
Export to GIF

Go to File -> Save for web (or Commend + Option + Shift + S) and select the image format into “GIF” and hit Save.

Now your wonderful GIF animation has been created. Enjoy sharing!

Crayons with different height

CSS: Crop Image Width or Height with CSS Only

Images can be cropped with a couple of CSS lines without using Photoshop or any image editing tools. This is useful when your multiple column thumbnail image height is different like below.

BEFORE

thumbnail image before

Because of the uneven height of the thumbnails the entire structure could be easily broken.

CSS

Copy the code below and paste into your CSS document.

img {
    height: 200px;
    object-fit: cover;
}

Try object-position: 10% 10%; if you want to move around the position of the image within the area.

AFTER

thumbnail image after

All 20-30 of your thumbnails will fit perfectly, and your layout won’t look wonky again. This method could be used on any single image on your webpage.

WooCommerce Hollow “Empty” Star Rating to “Full” Filled Stars

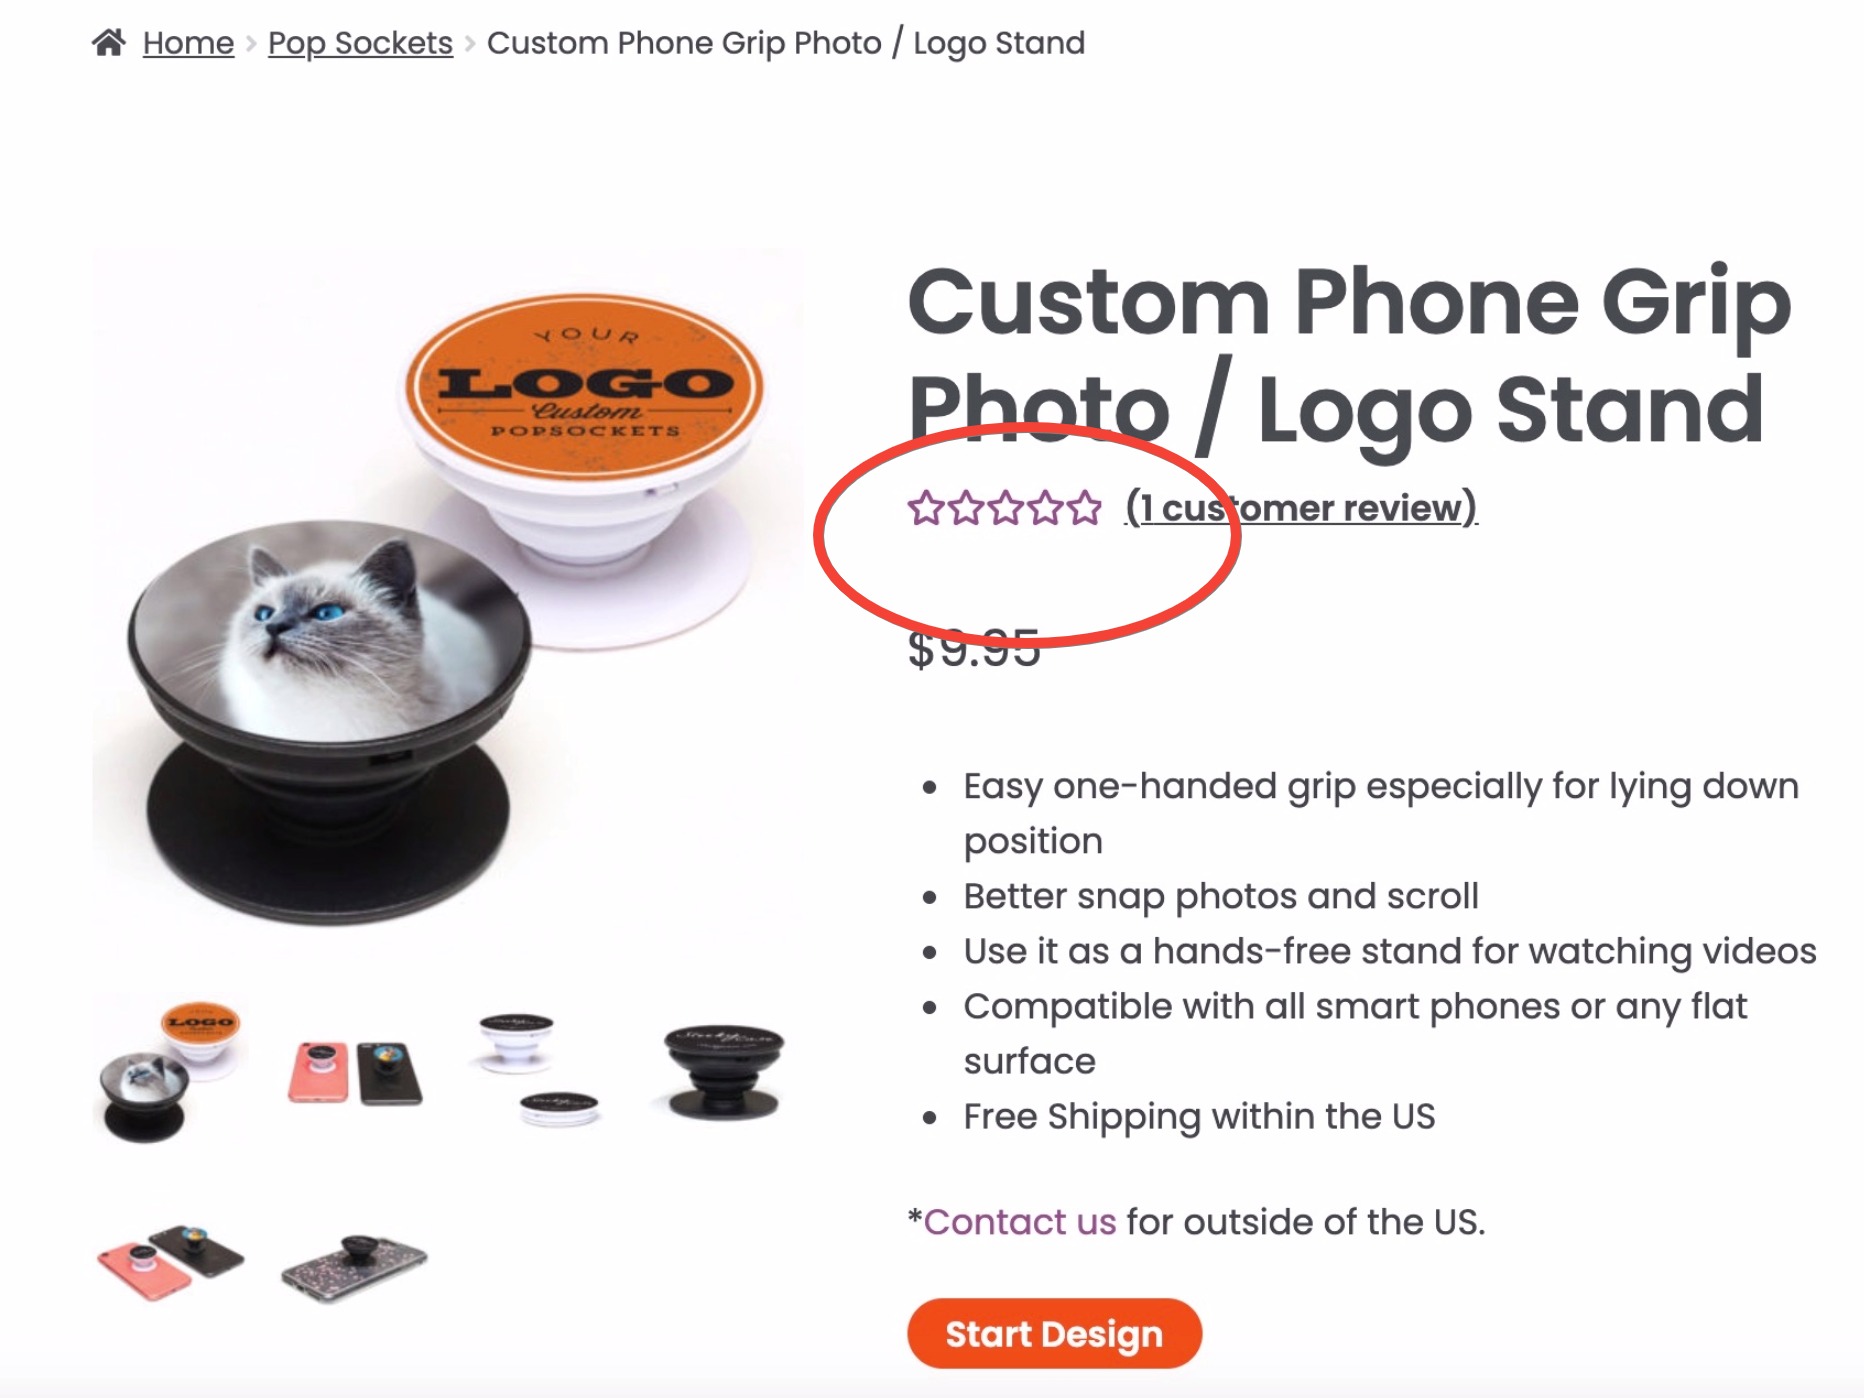
5 hollow stars looked my customers rated 0 star on my item not 5 stars. (But it’s 5 star rated though!) For users who sees hollow stars in WooCommerce, there must be mis-specifying font-family in your CSS.

SC-hollow-stars

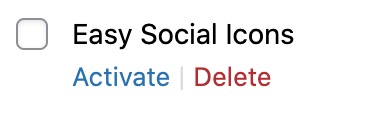
Check if you have installed the “Easy Social Icons” plugin that is activated with WooCommerce.

Easy Social Icons

Simply deactivate the plugin as it is conflicting the “Font Awesome 5 Free” font-family with WooCommerce. Once the Easy Social Icons plugin deactivated, you will see the full, filled star ratings on your item.

filled star rating

Google G Suite Thumbnail

Google Workspace / G Suite Setup for Your Own Domain Email

My new client just called me with an urgent voice, “My email is down. Please fix this as soon as possible.”

My client requested me to build his website, so I set up his old domain name to my hosting server for the work environment, and his email stopped working. He never mentioned about the email that was under his old domain (i.e. client@domain.com). I was in panic for a few minutes, but gladly, I was able to find out that his email is linked to G-Suite (now called Google Workspace).

Here I will show you how to change DNS setting for an email or entire emails under your own unique domain (i.e. you@yourowndomain.com). This setup can be found under your domain provider setup tab, and it’s usually called “Advanced DNS” or “Manage DNS”. Sometimes this can be called “Zone Editor” on your hosting provider setup tab, and this can be modified if your domain is linked to a hosting service.

Clear / Remove MX Record on your DNS

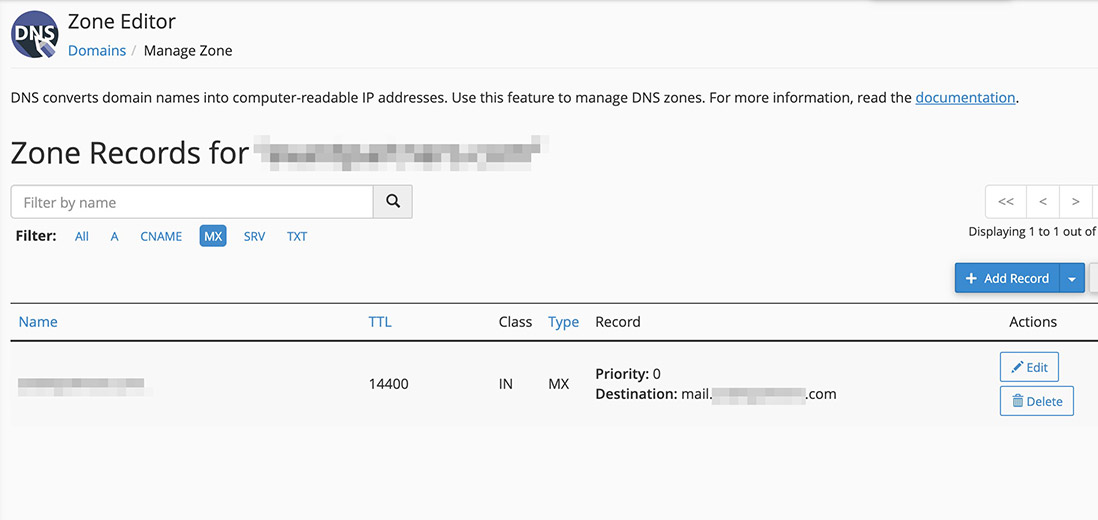
First, you need to see the existence of any MX Record (Mail Exchange records). If you find a single MX Record that are exist on your DNS, remove it.

Zone Editor Screen Shot 1

I removed a MX Record “Priority:0 with “mail.MYDOMAIN.com” from my cPanel. Make sure that is no MX Record on you DNS.

Add Google Workspace / G-Suite MX Record to your DNS

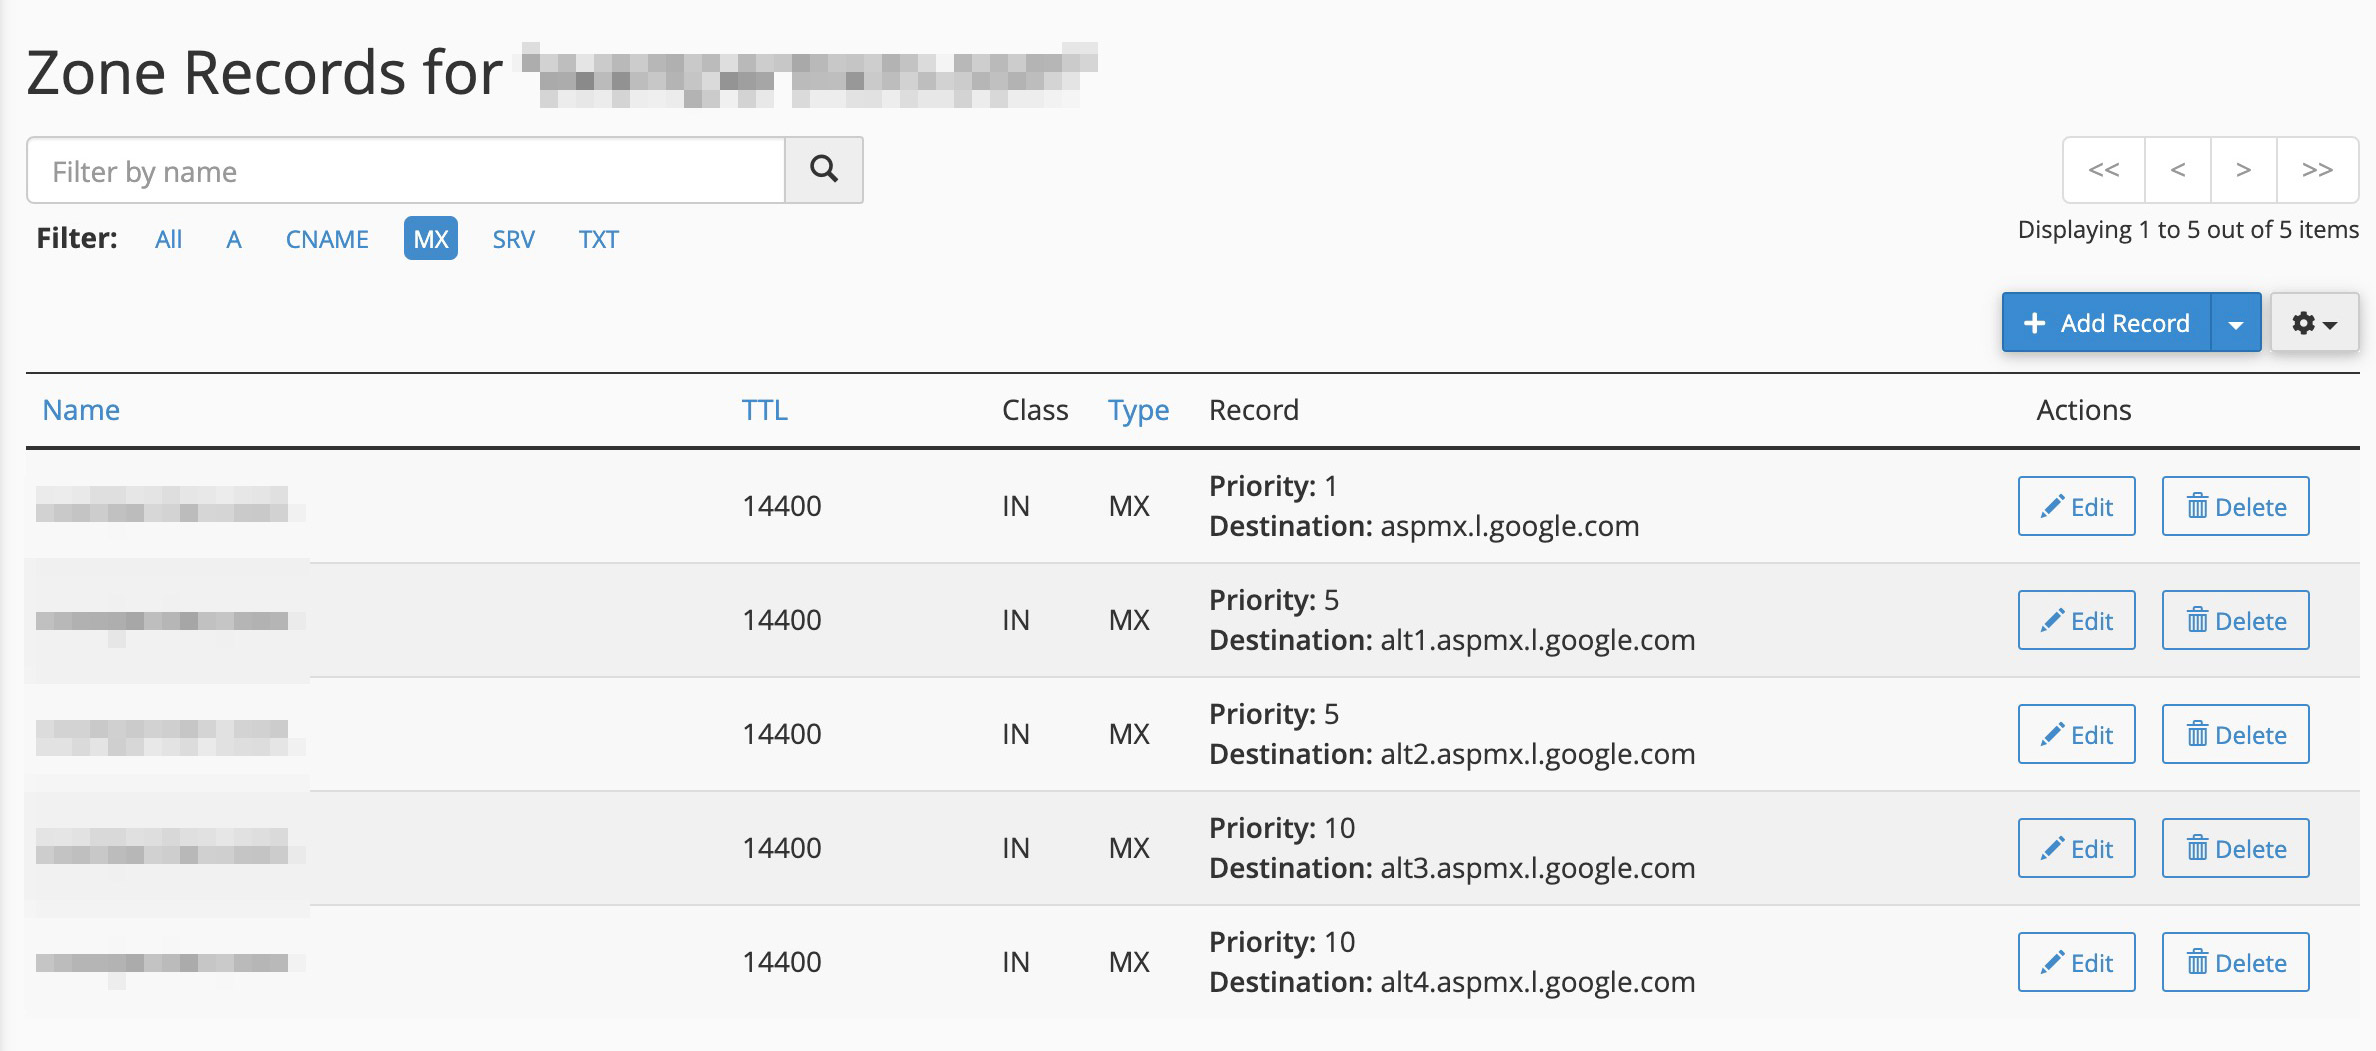
Add below 5 MX Record provided by Google Workspace / G Suite.

Name TTL Type Priority Destination
Blank or @ Default Value MX 1 aspmx.l.google.com
Blank or @ Default Value MX 5 alt1.aspmx.l.google.com
Blank or @ Default Value MX 5 alt2.aspmx.l.google.com
Blank or @ Default Value MX 10 alt3.aspmx.l.google.com
Blank or @ Default Value MX 10 alt4.aspmx.l.google.com

Example

Zone Editor Screen Shot 2

As soon as the records on DNS are saved, all of your emails from your own domain will be transferred through Google Workspace / G Suite and landed on your Gmail inbox.

Remove P tags

Use CSS to remove auto-generated empty <p> tags in WordPress

Can’t complain the great convenient functionality of auto-generating <p> tag in WordPress, but sometimes it’s pretty annoying as it breaks some lines unintentionally. Here’s how to remove only empty <p> tag with a simple CSS line.

CSS: Hide/Remove Empty <p> tags

p:empty {
  display: none;
}

Woocommerce Conflicts with Bootstrap 4 in WordPress

I can’t give up on either functionalities: Woocommerce and Bootstrap. A conflict occurs with the wonky looking layout when using Woocommerce and Bootstrap 4 together. See the breakdown when you are on the checkout page. Below a few CSS lines would resolve the wonkiness issue really quick. Now I can enjoy both!

CSS

.woocommerce .col-1, .woocommerce .col-2 { 
    max-width:none; 
}
.woocommerce-billing-fields .form-row, .woocommerce-shipping-fields .form-row,.woocommerce form .form-row { 
    display: block; 
}
.woocommerce .col2-set .col-1, .woocommerce-page .col2-set .col-1,.woocommerce .col2-set .col-2, .woocommerce-page .col2-set .col-2 { 
    max-width: unset; 
}
Bootstrap x Wordpress

Add Bootstrap to Your WordPress Website with a Plugin

There are a few ways to install Bootstrap 4 to your WordPress website for free. One of the popular choices is to activate a Bootstrap 4 pre-installed theme, but this can be little complicated or not efficient as you might want to use a woocommerce compatible theme or some themes of your favorite.

I recommend to use the “Simple Custom CSS and JS” plugin by Silkypress.com and add 3 lines to your html. By doing this, you have a freedom to choose any theme of your favorite and enjoy Bootstrap for free.

Let me show you how to add in steps.

  1. Go to the admin page of your WordPress website http://YOUR-DOMAIN.com/wp-admin
  2. Go to “Plugins” -> “Add New” -> search for “Simple Custom CSS and JS” plugin. Install the plugin and make it active.
  3. (You will see “Custom CSS & JS” on the sidebar), go to the plugin menu called Custom CSS & JS -> “Add Custom HTML”
  4. Name it as “Header”, check the radio buttons on Header and In Frontend.
  5. Add below CSS line into the code field and publish.
    <link rel="stylesheet" href="https://stackpath.bootstrapcdn.com/bootstrap/4.3.1/css/bootstrap.min.css" integrity="sha384-ggOyR0iXCbMQv3Xipma34MD+dH/1fQ784/j6cY/iJTQUOhcWr7x9JvoRxT2MZw1T" crossorigin="anonymous">
  6. Create another “Add Custom HTML” and name it “Footer”. Check the radio buttons on Footer and In Frontend
  7. Add below JS lines into the code field and publish.
    <script src="https://ajax.googleapis.com/ajax/libs/jquery/3.4.1/jquery.min.js"></script>
    <script src="https://stackpath.bootstrapcdn.com/bootstrap/4.3.1/js/bootstrap.min.js" integrity="sha384-JjSmVgyd0p3pXB1rRibZUAYoIIy6OrQ6VrjIEaFf/nJGzIxFDsf4x0xIM+B07jRM" crossorigin="anonymous"></script>

Now you are ready with Bootstrap 4 on your WordPress website. Enjoy!

Bootstrap Partial Collapse

Accordion Partial Collapse & Expand Demo Template for Bootstrap

Bootstrap has provided accordion “Collapse” JavaScript plugins for Bootstrap users, but has no explanation making the accordion partially expand and collapse.

Below is the demo/template to build your accordion partially expand and collapse within the given height. The HTML includes CDN (content delivery network) to connect Bootstrap/Jquery’s CSS and JavaScript files, so it’s ready to be used! Click to download below.

DEMO: How It Looks

HTML

<div class="accordion partialcollapse" id="partialcollapse">
  <div id="collapse-one" class="collapse" aria-labelledby="headingOne" data-parent="#partialcollapse">
    <h4>Accordion Title</h4>
    <p>Accordion content goes here</p>
  </div>
  <button class="btn btn-link" type="button" data-toggle="collapse" data-target="#collapse-one" aria-expanded="true" aria-controls="collapse-one"> </button>
</div>

CSS

.partialcollapse .collapse {
    display: block;
    height: 120px !important;
    overflow: hidden;
}
.partialcollapse .collapsing {
    height: inherit!important;
}
.partialcollapse .collapse.show {
    height: auto !important;
} 
.partialcollapse .collapse+button:after {
    content: '+ Show More';
}
.partialcollapse .show+button:after, .partialcollapse .collapsing+button:after {
    content: '- Show Less';
}
All in one HTML

All-in-one Bootstrap 4 / Jquery Responsive HTML Template

This is the All-in-one HTML Template to build your Bootstrap 4 (ver. 4.5.2) website. The HTML includes CDN (content delivery network) to connect Bootstrap/Jquery’s CSS and JavaScript files, so you literally need this single HTML to run.

HTML

<!DOCTYPE html>
<html lang="en">
<head>  
<meta charset="utf-8">
<meta http-equiv="X-UA-Compatible" content="IE=edge">
<meta name="viewport" content="width=device-width, initial-scale=1">
<meta name="robots" content="index, follow"/>
	
<!-- Bootstrap -->
<link href="https://stackpath.bootstrapcdn.com/bootstrap/4.5.2/css/bootstrap.min.css" rel="stylesheet">
    
<!-- HTML5 shim and Respond.js for IE8 support of HTML5 elements and media queries -->
<!-- WARNING: Respond.js doesn't work if you view the page via file:// -->
<!--[if lt IE 9]>
<script src="https://oss.maxcdn.com/html5shiv/3.7.2/html5shiv.min.js"></script>
<script src="https://oss.maxcdn.com/respond/1.4.2/respond.min.js"></script>
<![endif]-->
</head>
    
<body>
<p>Write your code here.</p>
 
<!-- jQuery (necessary for Bootstrap's JavaScript plugins) -->
<script src="https://code.jquery.com/jquery-3.5.1.js" integrity="sha256-QWo7LDvxbWT2tbbQ97B53yJnYU3WhH/C8ycbRAkjPDc=" crossorigin="anonymous"></script>
	
<!-- Include all compiled plugins (below), or include individual files as needed -->
<script src="https://stackpath.bootstrapcdn.com/bootstrap/4.5.2/js/bootstrap.min.js"></script>
 
</body>
</html>
Load Page Pop-Up Thumb

CSS Only: Pop-up Modal Lightbox on Page Load

I’ve shared a way to add a pop-up or modal lightbox with CSS only on my earlier post, Easy Modal Lightbox Pop-Up. I’ve received many request how to make this modal pop up on page load instead of using a button. So, here’s how-to:

HTML

Copy the code below and paste into your HTML document.

<div id="modal-1" class="modal animate-opacity">
   <div class="modal-content">
      <div class="modal-inner">
         <span onclick="document.getElementById('modal-1').style.display='none'" class="modal-close">&times;</span>
         <h4>Modal Headline</h4>
         <p>Modal description goes here.</p>
      </div> 
   </div>
</div>

CSS

Copy the code below and paste into your CSS document.

.modal {
	z-index: 10;
	display: block;
	padding-top: 100px;
	position: fixed;
	left: 0;
	top: 0;
	width: 100%;
	height: 100%;
	overflow: auto;
	background-color: rgb(0,0,0);
	background-color: rgba(0,0,0,0.5)
}
.modal-content {
	margin: auto;
	background-color: #fff;
	position: relative;
	padding: 0;
	outline: 0;
	max-width: 600px
}
.modal-inner { padding: 20px 30px; }
.modal-close {
	-webkit-touch-callout: none;
	-webkit-user-select: none;
	-khtml-user-select: none;
	-moz-user-select: none;
	-ms-user-select: none;
	user-select: none;
	position: absolute;
	right: 0;
	top: 0;
	background: #ccc;
	padding: 6px 10px;
}
.animate-opacity { animation: opac 0.8s }@keyframes opac{from{opacity:0} to{opacity:1}}

.animate-opacity is optional as it’s the animated effect when modal opens.

You can tweak the animation time. It’s currently 0.8 seconds opac 0.8s , but change the timing as your need.

Storefront Thumb

Remove ‘Built with Storefront & WooCommerce’ with CSS lines on WordPress Storefront Theme

Woocommerce offers one of a greatest E-Commerce template themes for free called, “Storefront“. From the Nav to checkout process, all required functionality in order to run an E-Commerce are ready for you to download and activate. But, one little thing is bugging at the bottom of the page, “Built with Storefront & WooCommerce.” line, however, it’s possible to get it out with a few lines of CSS.

Store front copyright

Remove and replace copyright information on Storefront theme

footer .site-infos { display:none; } 				
footer .footer-widgets { border: 0 !important;	}	
footer .footer-widgets::after {  content: "© ADD THIS FOR YOUR COPYRIGHT INFO" }

Add a Copyright Text / Info Using CSS on WordPress Websites

Let’s don’t bother spending hours to look for footer.php or widgets in WordPress to add your Copyright line on the footer of website. Here’s one easy method to add using CSS.
copyright

Add copyright text / info with CSS for WordPress/Bootstrap websites

footer > div:before {
    content: "© Copyright (YEAR). All rights reserved.";
    font-size: 14px;
    color: #777;
    text-align: center;
    display: block;
    margin: 20px auto;
}

(No Programming) Use JavaScript to Load Header and Footer Templates. Works Just Like PHP Include

I’ve looking for this for years, but it’s actually much simpler than I thought. You can build your HTML website with universal header and footer (so you don’t have to repeat update multiple files over and over again) by adding a simple JavaScript/Jquery line without using any programming PHP scripts.

HTML

<script src="https://code.jquery.com/jquery-1.10.2.js"></script>
<script>
$(function(){
$("#header-template").load("header.html");
$("#footer-template").load("footer.html");
});
</script>

<div id="header-template"><!--Your header.html placeholder--></div>

<!--Your content start here-->
Hello World!
<!--Your content end here-->

<div id="footer-template"><!--Your footer.html placeholder--></div>

Instruction

  1. Create a header.html and put all the header portion starting with <!DOCTYPE html>.
  2. Create a footer.html and put all the footer portion end with </html>.
  3. Create a index.html and copy and paste the HTML code (from the top of this article) into your HTML document.
  4. Build your own content by replacing the text “Hello World!” and save.
  5. Open the index.html and review yourself.

You can duplicate the index.html and rename it differently for any additional pages you wish to create. This JavaScript works on a server environment, so this will not be able to load header and footer if you are opening the files from your desktop which means you need to upload your files via FTP and access your HTMLs live.

Now, you’ve created a website without using any programming scripts.

Absolute centering

CSS / HTML: Make Absolute Center (Vertical & Horizontal)

For some reasons, making an article absolute center was pretty tricky with HTML.

Horizontal centering is mostly done by text-align:center or margin:auto tags in css. Vertical alignment has to do with positions or vertical-align:middle, and many times an image or other elements are not centering correctly.

Try this below, this is one easy way making your content elements absolute center in vertical and horizontal.

DEMO: Vertical & Horizontal Absolute Centering

Hello.
Your centered content is here!

CSS

Copy the code below and paste into your CSS document.

body {
	display: flex;
	justify-content: center;
	align-items: center;
        text-align:center;
}

Easy and fantastic!

Pop up thumbnail

CSS Only: Easy Modal Lightbox Pop-up (Animated)

Now you can add pop-ups or modal lightbox with CSS only (and really minor single line of JavaScript) on your html, wordpress or bootstrap website, so don’t be afraid.

DEMO: CSS Modal Lightbox

HTML

Copy the code below and paste into your HTML document.

<button onclick="document.getElementById('modal-1').style.display='block'">Click Here</button>

<div id="modal-1" class="modal animate-opacity">
   <div class="modal-content">
      <div class="modal-inner">
         <span onclick="document.getElementById('modal-1').style.display='none'" class="modal-close">&times;</span>
         <h4>Modal Headline</h4>
         <p>Modal description goes here.</p>
      </div> 
   </div>
</div>

You can add multiple modals. Copy the entire codes and replace all modal-1 into modal-2 and modal-3

CSS

Copy the code below and paste into your CSS document.

.modal {
	z-index: 10;
	display: none;
	padding-top: 100px;
	position: fixed;
	left: 0;
	top: 0;
	width: 100%;
	height: 100%;
	overflow: auto;
	background-color: rgb(0,0,0);
	background-color: rgba(0,0,0,0.5)
}
.modal-content {
	margin: auto;
	background-color: #fff;
	position: relative;
	padding: 0;
	outline: 0;
	max-width: 600px
}
.modal-inner { padding: 20px 30px; }
.modal-close {
	-webkit-touch-callout: none;
	-webkit-user-select: none;
	-khtml-user-select: none;
	-moz-user-select: none;
	-ms-user-select: none;
	user-select: none;
	position: absolute;
	right: 0;
	top: 0;
	background: #ccc;
	padding: 6px 10px;
}
.animate-opacity { animation: opac 0.8s }@keyframes opac{from{opacity:0} to{opacity:1}}

These 4 classes would do the job, and the last class, .animate-opacity is the animated effect when modal opens (so it’s optional).

You can tweak the animation time slower or faster by changing the speed time. It’s currently 0.8 seconds, opac 0.8s, but change it as you need it. Have fun!

Why FileZilla Upload Files Repeatedly Saying “File Transfer failed after transferring”?

If you are stuck uploading files in FileZilla that it repeats the progress bar but not happening anything, and saying “File Transfer failed after transferring XX bytes” in the status log, then one of the possible reasons could be the limit has been reached in your FTP. Most likely, the file(s) you were attempting to upload has exceeded file size (Quota) in FTP account/user. You can request the webmaster of the website (or do it yourself if you have access) to change the file limit to ‘unlimited’ as below.

Change FTP file size limit on cPanel

ftp

  1. Go to the server side and enter cPanel
  2. Find FTP Accounts
  3. Find your FTP account and increase the Quota (File size limit) ‘unlimited’ if possible.

How Create a HTML/CSS Ribbon. Simple and Light (None Jpg/Png Image)

Here’s a simple html/css line that could generate a ribbon background with text.

DEMO: CSS Ribbon for Your Website

My Ribbon

HTML

Copy the code below and paste into your HTML document.

<div class="ribbon">
    <span class="ribbon-text">My Ribbon</span>
</div>

CSS

Copy the code below and paste into your CSS document.

.ribbon {
    position: relative;
    background: blue;
    text-align: center;
    z-index: 1;
    width: 240px;
    height: 52px;
    margin: 0 auto;
}
.ribbon-text {
    position: relative;
    display: block;
    font-size: 2em;
    color: white;
 }
.ribbon:before {
    content: '';
    border: 26px solid blue;
    border-left-color: transparent;
    border-left-width: 14px;
    position: absolute;
    top: 0;
    left: -20px;
}
.ribbon:after {
    content: '';
    border: 26px solid blue;
    border-right-color: transparent;
    border-right-width: 21px;
    position: absolute;
    top: 0;
    right: -27px;
}

You can tweak around with different colors and size of the ribbon. Have fun!

Get a free SSL Certificate (Secure Socket Layer) – Change HTTP to HTTPS for your website domain

After Google label non-HTTPS sites as “not secure”, SSL(Secure Socket Layer), the domain with HTTPS is strongly encouraged by Google. SSL Certificate used to be quite pricy as it cost generally $80 – $200 annually, but as the demand increased, there is a way to obtain SSL certificate completely free!

Step-by-step Guide:

  1. Go to https://www.cloudflare.com/
  2. Create your account by signing up. Log in afterwards.
  3. “+Add Site” on top right. Screen Shot 2018-05-24 at 12.42.25 AM
  4. Add your site information.
  5. Hit “Next” on “We’re querying your DNS records”.
  6. Confirm the “Free” plan.
  7. It will show DNS query result for your site. Review and hit “Continue”
  8. Change your nameservers(DNS) as described. Screen Shot 2018-05-24 at 12.36.56 AM
  9. On Domain Summary, change “SSL: Full” to “Flexible” no need to hit “Save”. Screen Shot 2018-05-24 at 12.41.50 AM
  10. You are done with the DNS setting. Wait a few hours to 48 hours making sure test your site with adding “https://” in front of your domain url. Once it picks it up with “Not secure” message, then we are in good shape.

If you are using wordpress websites, install a plugin called, “Really Simple SSL”. To find “plugins” on the backend, find the “Plugins” from the left menu, -> “Add new” -> look for “Really Simple SSL”, install and activate the plugin. This plugin will help your website to redirect any old HTTP to HTTPS.

Force an Anchor Tag Not Clickable with CSS

Yes, it is possible to make your anchors not clickable with simple CSS lines on your website. I know sometimes you developers can’t change the core HTML codes and only have access to the CSS file. Below is the CSS that does the magic.

Make an Anchor Tag Nonclickable with CSS

a {
 pointer-events: none;
 cursor: default;
}
Vertical Align Center Thumbnail

CSS Vertical Align Center

Let’s  vertical align your design elements with CSS and HTML! Despite how popular people search for this method, vertical centering your contents seems not easy than you think for beginners. Below method could be the one of the simplest ways you can make it happen.

DEMO: How to Vertically Align Middle with CSS

Vertical Align Demo

Box One

Vertical Align Center

Box Two

Vertical Align Middle

Box Three

Vertical Align Center

HTML

Copy the code below and paste into your HTML document.

<div class="div-outer">
    <div class="div-inner">
    <h4>Box One</h4>
    <p>Vertical Align Center</p>
    </div>
</div>
<div class="div-outer">
    <div class="div-inner">
    <h4>Box One</h4>
    <p>Vertical Align Center</p>
</div>
</div>
<div class="div-outer">
    <div class="div-inner">
    <h4>Box One</h4>
    <p>Vertical Align Center</p>
    </div>
</div>

You can tweak around with different colors of the boxes or texts. Have fun!

CSS

Copy the code below and paste into your CSS document. You need to make the same min-height and line-height on the outer part of the div. In my case, I have 200px.

.div-outer {
    min-height: 200px;
    line-height: 200px;
}
.div-inner {
    display: inline-block;
    vertical-align: middle;
    line-height: normal;
}

In case if this css isn’t working, you can try as below.

.div-outer {
    height: 80vh;
    position: relative;
}
.div-inner {margin: 0;
    position: absolute;
    top: 50%;
    left: 50%;
    transform: translate(-50%, -50%);
    width: 100%;
}

You can tweak around with different colors of the boxes or texts. Have fun!

JavaScript Redirect

Simple JavaScript Redirect Code for HTML

Here’s the one of the simplest ways to redirect your site’s traffic.

Redirect to Different URL

Copy the code below and paste it to your blank html.

<script language="javascript">
window.location.href="http://YOUR-REDIRECT-PAGE"
</script>

*Replace YOUR-REDIRECT-PAGE with your new URL.

HTTPS thumbnail

Resolved! Loading Your Google Fonts Over https (SSL) Sites

I couldn’t believe how amazingly simple it was! I was searching for days and nights how to make my google fonts properly load over on my WordPress https (SSL) site.

Here’s the basic story. I’m running an e-Commerce store with a Secure Sockets Layer installed on the domain. I created the logo with “La Belle Aurore” font from Google. When customers pay for their purchase, they have to land on the cart page showing https. My logo won’t be properly showing when my customer uses IE (Internet Explorer 11) browsers or my Safari from iPhones, so I really had resolve this issue.

I’ve seen some people trying to resolve the issue by creating weird code in the .htaccess file or tweaking the .function file in WordPress theme. I’ve tried it, but none of them actually worked for me.

Ta-Dah! It was simpler than I thought. I deleted the http: part on my CSS file, and it worked like magic! So DO “//fonts.googleapis.com/css?family=XXX”, NOT “http://fonts.googleapis.com/css?family=XXX”

@import url(//fonts.googleapis.com/css?family=NAME_OF_YOUR_FONT_FAMILY);

I used “La Belle Aurore” font on my site, so here’s what I have. @import url(//fonts.googleapis.com/css?family=La+Belle+Aurore); I hope this method save your time as well. Good luck!

Table Width CSS Thumb

CSS: A Simple Way to Set the Table Column Width

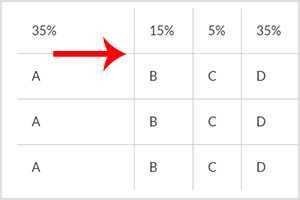
Here’s a very simple way to size your table width with a few lines of CSS instead of giving inline values to it. This method is much easier for creating responsive tables.

DEMO: How It Looks

35% 15% 5% 35% 10%
A B C D E
A B C D E
A B C D E

CSS

Copy the code below and paste into your CSS document.

table tr td { padding:20px }
table td:nth-child(1) { width:35%; }
table td:nth-child(2) { width:15%; }
table td:nth-child(3) { width:5%; }
table td:nth-child(4) { width:35%; }
table td:nth-child(5) { width:10%; }

HTML

Copy the code below and paste into your HTML document.

<table class="table" border="0" cellspacing="0" cellpadding="0">
  <tr>
    <td>35%</td>
    <td>15%</td>
    <td>5%</td>
    <td>35%</td>
    <td>10%</td>
  </tr>
  <tr>
    <td>A</td>
    <td>B</td>
    <td>C</td>
    <td>D</td>
    <td>E</td>
  </tr>
  <tr>
    <td>A</td>
    <td>B</td>
    <td>C</td>
    <td>D</td>
    <td>E</td>
  </tr>
  <tr>
    <td>A</td>
    <td>B</td>
    <td>C</td>
    <td>D</td>
    <td>E</td>
  </tr>
</table>

You can copy both CSS and HTML codes to your file and tweak around as you like!

Circled Numbers

Circled Number Lists (HTML/CSS)

Get Custom Phone Case Now!

You can make a circle around your Ordered List, <ol> as below without using image formats like JPG or PNG, so this way you can reduce the developing and loading time for your site.

DEMO: How It Looks

Circle Around Numbers in Steps (HTML & CSS)

  1. This is the sample draft for circled number bullet points for ordered lists. This sentence is just for a place holder. This is the sample draft for circled number bullet points for ordered lists. This sentence is just for a place holder.
  2. This is the sample draft for circled number bullet points for ordered lists. This sentence is just for a place holder. This is the sample draft for circled number bullet points for ordered lists. This sentence is just for a place holder.
  3. This is the sample draft for circled number bullet points for ordered lists. This sentence is just for a place holder. This is the sample draft for circled number bullet points for ordered lists. This sentence is just for a place holder.
  4. This is the sample draft for circled number bullet points for ordered lists. This sentence is just for a place holder. This is the sample draft for circled number bullet points for ordered lists. This sentence is just for a place holder.
  5. This is the sample draft for circled number bullet points for ordered lists. This sentence is just for a place holder. This is the sample draft for circled number bullet points for ordered lists. This sentence is just for a place holder.

CSS

Copy the code below and paste into your CSS document.

ol {
    counter-reset:item; 
    margin:0; 
    padding-left:0; 
}
ol>li {
    counter-increment:item; 
    list-style:none inside; 
    margin: 40px 0;
    overflow: hidden;
    font-size: 16px !important;
    line-height: 1.3;
}
ol>li:before {
    content:counter(item) ;
    margin-right: 20px;
    padding: 8px;
    display: block;
    -webkit-border-radius: 50%;
    -moz-border-radius: 50%;
    border-radius: 50%;
    width: 65px;
    background: #fe862c;
    color: #fff;
    text-align: center; 
    font: 56px 'Lato', Helvetica, Arial, sans-serif;
    font-weight: 100;
    float: left;
}

HTML

Copy the code below and paste into your HTML document.

<ol>
<li>Lorem ipsum dolor sit amet, felis dui nam, vivamus turpis bibendum et massa.</li>
<li>At augue, erat dui odio. Duis lectus, laoreet et, dolor nascetur tellus tellus sit etiam, massa leo dolor. Magna mi vitae et, lectus pellentesque, nec magna et ante, vehicula torquent venenatis tempor eget, elementum condimentum. </li>
<li>Integer porttitor donec, justo in, in pede, et leo ornare viverra erat ac. Dui diam, a sed purus, porta penatibus. Magna in, congue quam pulvinar cras malesuada condimentum nunc, vestibulum ut dolor tortor fusce nibh sollicitudin.</li>
<li>Vitae in, a pulvinar velit laoreet, tristique nascetur sapien. Placerat nunc a integer tincidunt sem, vivamus turpis, erat pulvinar interdum rhoncus nonummy vitae, etiam eleifend arcu non cras a commodo.</li>
<li>Quis mus donec, volutpat placerat nam et eros quam enim, id tincidunt aliquam libero odio, suspendisse a quam tristique ligula.</li>
</ol>

You can copy both CSS and HTML codes to your file and tweak around as you like. Enjoy coding!

mailchimp

Quick Start Guide to MailChimp for WordPress

This post will be a quick start guide to MailChimp for WordPress plugin. You might use it to collect massive email data from the visitors of your website in order to send a blast of email for your personal or commercial needs. For beginners, MailChimp is a great place to start with your email campaign where that is available to “send 12,000 emails to 2,000 subscribers for free”.

  • 1

    Download the MailChimp for WordPress Plugin. https://wordpress.org/plugins/mailchimp-for-wp/ or go to your WordPress Admin -> Plugins -> Add New -> (Search for) MailChimp for WordPress -> Download & Activate.

  • 2

    Sign up MailChimp website for free. http://mailchimp.com/

  • 3

    Create and name your list. Go to the ‘List’ menu on the sidebar. Create a list.

  • 4

    Go to your name at the top of the sidebar and select ‘Account’.

  • 5

    Create API Key. On the top menu click ‘Extras’ -> API keys -> ‘Create A Key’

  • 6

    Copy the API Key you just created and Paste it onto your ‘MailChimp for WP’ (your WordPress Admin -> MailChimp for WordPress -> MailChimp Settings) then ‘Save Changes’

  • 7

    Check and make sure you see ‘CONNECTED’ sign on ‘MailChimp API Settings’. Click on the button -‘Renew MailChimp lists’

  • 8

    Go to the admin -> ‘MailChimp for WP’ -> ‘Checkboxes’ and check on the ‘MailChimp Lists’ box and save.

  • 9

    Go to the admin -> ‘MailChimp for WP’ -> ‘Forms’and check on the ‘Lists this form subscribes to’ box and save.

  • 10

    On the ‘Form’ setting page, copy the form shortcode below ‘Form mark-up’ and paste into any posts or pages you want to show your subscriber form, or you can use a MailChimp form widget to subscribe emails. (For widget users, go to the admin -> drag and drop ‘MailChimp Sign-Up Form’ to your widget sidebar.

  • Screen Shot 2014-10-13 at 12.37.18 AM

  • 11

    Test your email. Once you actually test subscribing with your email, you would get a successful message “Thank you, your sign-up request was successful! Please check your e-mail inbox.”, but if miss any steps from above, you might see a message “oops. Something went wrong. Please try again later.”
Enjoy the MailChimp for WordPress plugin / widget!

Responsive

Responsive Google Adsense is Easy!

We are facing a big transition in web design. In recent days, majority of well developed websites are made in responsive websites. Responsive design is the development responding to the environment based on screen size of a device. That being said the content elements must evolve to meet the technology as millions of bloggers are using Google Adsense technology to monetize their content.

Below is the HOW-TO guide to tweak the current Google Adsense code with the new responsive Google Adsense banners on your site. You don’t need to have a deep understanding of it’s frame work. Here’s an easy way to make it happen.

Our DEMO is here. Just look at the header section of this site. Do you see a wide horizontal banner (728 px x 90 px)? Try resize the browser to make it smaller and reload the page. Try even smaller like you are using a mobile and reload the page. Do you see the size of the ad is changing as it’s responding?

Let’s first take a look at your current Google Adsense Code below. You can get this code from Google Adsense Site → My ads (top menu) → “Get Code” from one of your ad unit.

Make sure you select “asynchronous” code type from the drop down menu.

<script async src="//pagead2.googlesyndication.com/pagead/js/adsbygoogle.js"></script>
<!-- NAME OF YOUR AD -->
<ins class="adsbygoogle"
     style="display:inline-block;width:728px;height:90px"
     data-ad-client="ca-pub-8255226778912403"
     data-ad-slot="1054112722"></ins>
<script>
(adsbygoogle = window.adsbygoogle || []).push({});
</script>

1. You simply add a <div> around it.
2. Named the class to responsive-ad on the <div>
3. Added the class responsive-ad to <ins>. So it’s now adsbygoogle responsive-ad.
4. Changed the style to display:block
5. You must replace data-ad-client numbers and data-ad-slot numbers with yours..
6. Added data-format="auto" before closing </ins> tag.
7. Add <style> tags. You can tweak it whatever you want.

<div class="responsive-ad">	
<script async src="//pagead2.googlesyndication.com/pagead/js/adsbygoogle.js"></script>
<!-- NAME OF YOUR AD -->
<ins class="adsbygoogle responsive-ad"
     style="display:block"
     data-ad-client="ca-pub-XXXXXXXXXXXXXXXX"
     data-ad-slot="XXXXXXXXXX"
     data-format="auto"></ins>
<script>
(adsbygoogle = window.adsbygoogle || []).push({});
</script>
</div>

<style type="text/css">
.responsive-ad { width: 320px; height: 50px; margin: 0 auto; }
@media (min-width:480px) { .responsive-ad { width: 468px; height: 60px; } }
@media (min-width:768px) { .responsive-ad { width: 728px; height: 90px; } }
</style>

The <style> above has set a minimum of 768px (and up) for desktops, a minimum of 480px (and up but below 768px) for tablet, and 320px (and up but below 480px) for mobile. You may feel free to change the numbers of min-width: as your site structure.

Enjoy your blogging and monetizing with the new Responsive Google Adsense!

parallax smooth scrolling

Download: Simple Parallax Smooth Scrolling Website Template

With new technologies of HTML5, CSS3 and JavaScript, parallax scrolling is one of the hottest trends in web design industry. Floating with different speed of scrolling background elements could make a website stronger in storytelling. It’s easy to find parallax resources online, but it’s hard to find a function with smooth scrolling effect.

parallax-smooth-scrolling

Here’s the parallax website with “SMOOTH” scrolling effect for you to download. The website is made of HTML5/CSS/JavaScript. It’s free to use for your website, but it only works on Google Chrome. For other browsers everything works perfectly except for the smooth scrolling effect.

trash

How to Remove or Uninstall Plugins like Phantasm in Adobe Illustrator?

Get Custom Phone Case Now!

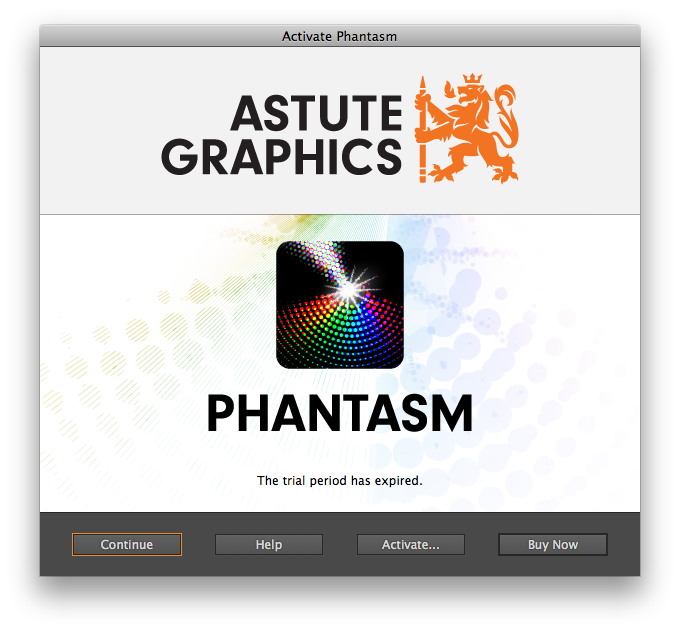
Plugins are great for Adobe Illustrator. There are many open shared plugins and it’s free to use. But sometimes a plugin has a trial period for 15 to 30 days, and it asks you to pay for the software and you just don’t want to purchase it, like Astute Graphics in my case (It’s a great plugin and would recommend to use, but for me, I found a way to change group of hue adjustments with my Adobe Illustrator CC built-in function so I no longer needed the plugin). When the trial period has expired, a pop-up window shows up every time when I open Adobe Illustrator, like this, and it’s a bit annoying:

Astute Graphics Phantasm

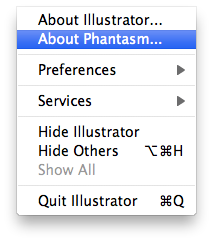
After you’ve select the ‘continue’ button, you can check to see the Phantasm plugin has been installed to your system by going to the top menu ‘illustor’ -> ‘About Phantasm’.

About Phantasm

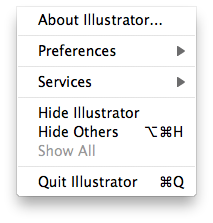
Let’s close the Adobe illustrator by go to the top menu ‘Illustrator’ -> ‘Quit Illustrator’.

Okay, here’s what you should do to remove/uninstall the plugin:

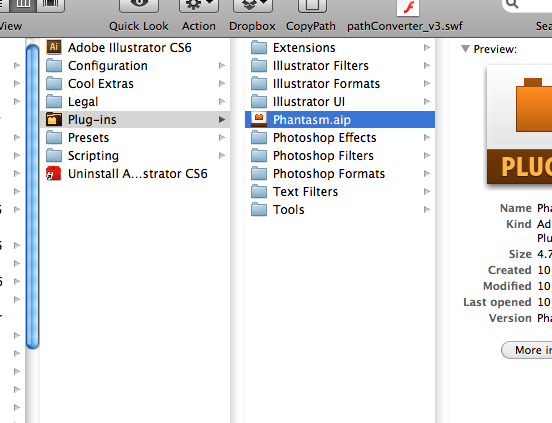
1. Go to Applications folder: Finder -> Go -> Applications (or Shift + Commend + A)

Trash the Plugin

2. Go to Adobe Illustrator -> Plug-ins -> Trash ‘Phantasm.aip’ the plugin.

Done!

Top menu

Go and open Adobe Illustrator and check if the plugin has been removed completely by going to the top menu ‘illustor’ (you won’t see ‘About Phantasm’ anymore).