Category Archives: Google and SEO

Google G Suite Thumbnail

Google Workspace / G Suite Setup for Your Own Domain Email

My new client just called me with an urgent voice, “My email is down. Please fix this as soon as possible.”

My client requested me to build his website, so I set up his old domain name to my hosting server for the work environment, and his email stopped working. He never mentioned about the email that was under his old domain (i.e. client@domain.com). I was in panic for a few minutes, but gladly, I was able to find out that his email is linked to G-Suite (now called Google Workspace).

Here I will show you how to change DNS setting for an email or entire emails under your own unique domain (i.e. you@yourowndomain.com). This setup can be found under your domain provider setup tab, and it’s usually called “Advanced DNS” or “Manage DNS”. Sometimes this can be called “Zone Editor” on your hosting provider setup tab, and this can be modified if your domain is linked to a hosting service.

Clear / Remove MX Record on your DNS

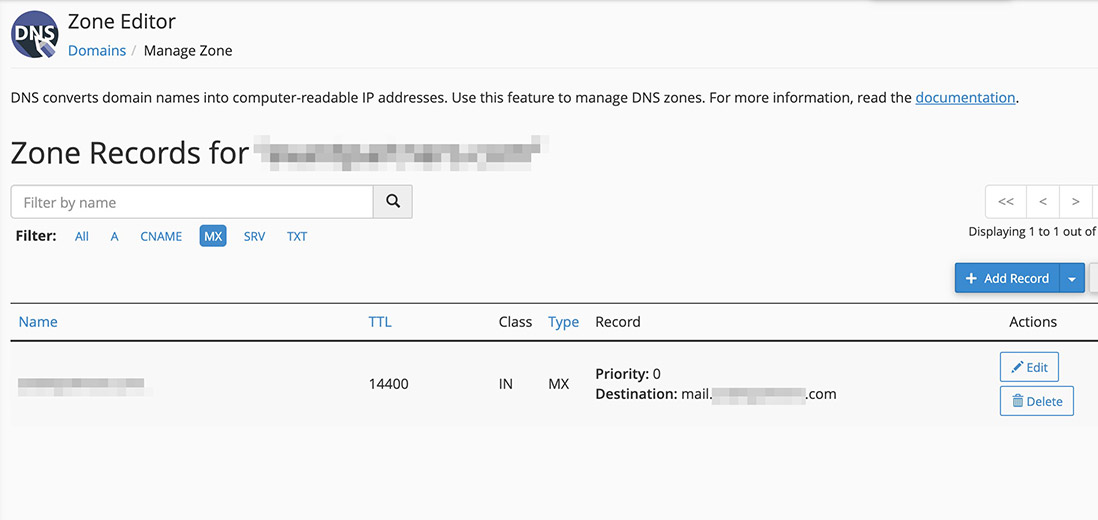
First, you need to see the existence of any MX Record (Mail Exchange records). If you find a single MX Record that are exist on your DNS, remove it.

Zone Editor Screen Shot 1

I removed a MX Record “Priority:0 with “mail.MYDOMAIN.com” from my cPanel. Make sure that is no MX Record on you DNS.

Add Google Workspace / G-Suite MX Record to your DNS

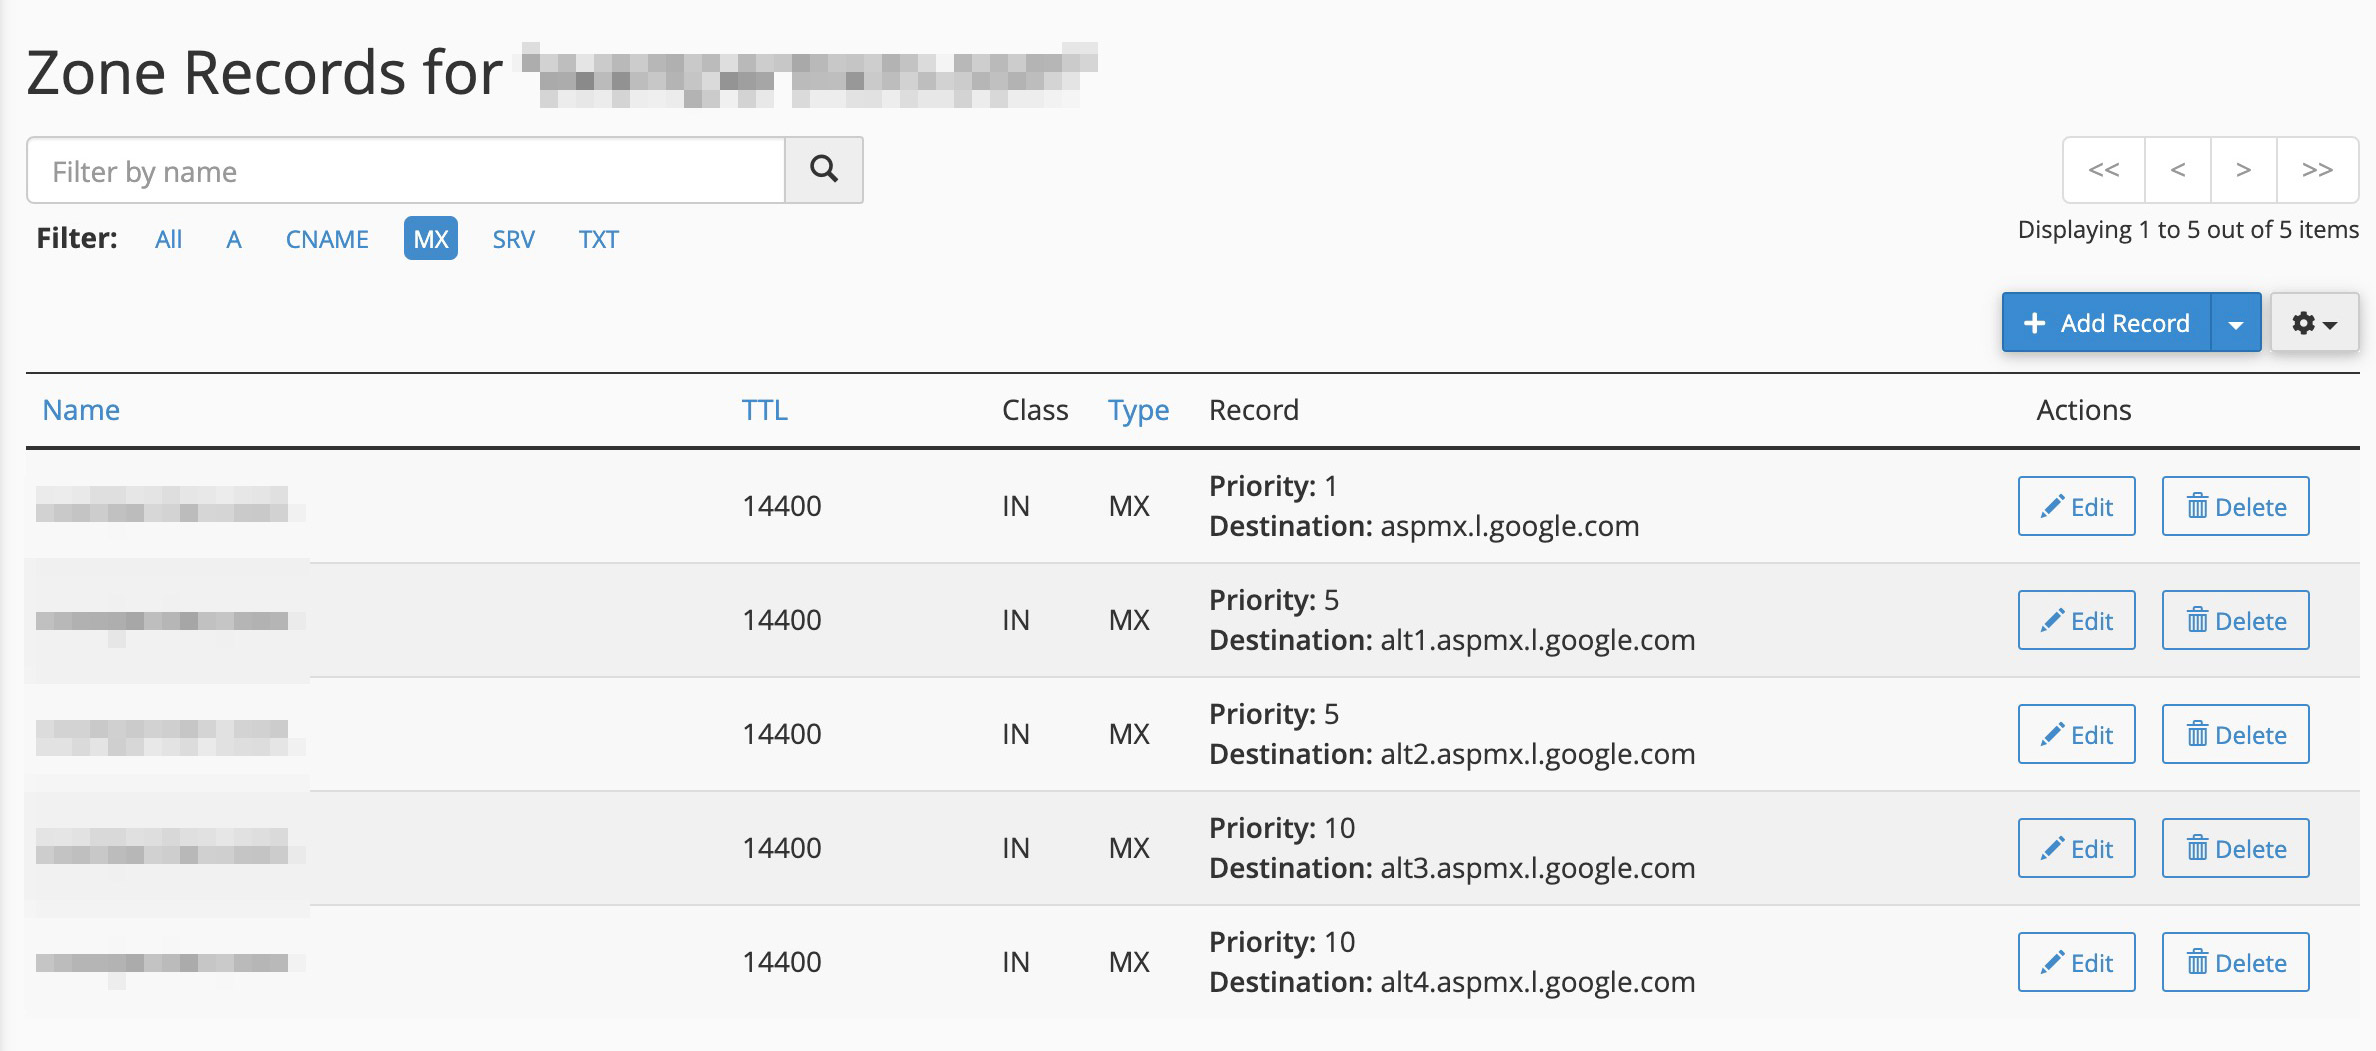
Add below 5 MX Record provided by Google Workspace / G Suite.

Name TTL Type Priority Destination
Blank or @ Default Value MX 1 aspmx.l.google.com
Blank or @ Default Value MX 5 alt1.aspmx.l.google.com
Blank or @ Default Value MX 5 alt2.aspmx.l.google.com
Blank or @ Default Value MX 10 alt3.aspmx.l.google.com
Blank or @ Default Value MX 10 alt4.aspmx.l.google.com

Example

Zone Editor Screen Shot 2

As soon as the records on DNS are saved, all of your emails from your own domain will be transferred through Google Workspace / G Suite and landed on your Gmail inbox.

HTTPS thumbnail

Resolved! Loading Your Google Fonts Over https (SSL) Sites

I couldn’t believe how amazingly simple it was! I was searching for days and nights how to make my google fonts properly load over on my WordPress https (SSL) site.

Here’s the basic story. I’m running an e-Commerce store with a Secure Sockets Layer installed on the domain. I created the logo with “La Belle Aurore” font from Google. When customers pay for their purchase, they have to land on the cart page showing https. My logo won’t be properly showing when my customer uses IE (Internet Explorer 11) browsers or my Safari from iPhones, so I really had resolve this issue.

I’ve seen some people trying to resolve the issue by creating weird code in the .htaccess file or tweaking the .function file in WordPress theme. I’ve tried it, but none of them actually worked for me.

Ta-Dah! It was simpler than I thought. I deleted the http: part on my CSS file, and it worked like magic! So DO “//fonts.googleapis.com/css?family=XXX”, NOT “http://fonts.googleapis.com/css?family=XXX”

@import url(//fonts.googleapis.com/css?family=NAME_OF_YOUR_FONT_FAMILY);

I used “La Belle Aurore” font on my site, so here’s what I have. @import url(//fonts.googleapis.com/css?family=La+Belle+Aurore); I hope this method save your time as well. Good luck!

Responsive

Responsive Google Adsense is Easy!

We are facing a big transition in web design. In recent days, majority of well developed websites are made in responsive websites. Responsive design is the development responding to the environment based on screen size of a device. That being said the content elements must evolve to meet the technology as millions of bloggers are using Google Adsense technology to monetize their content.

Below is the HOW-TO guide to tweak the current Google Adsense code with the new responsive Google Adsense banners on your site. You don’t need to have a deep understanding of it’s frame work. Here’s an easy way to make it happen.

Our DEMO is here. Just look at the header section of this site. Do you see a wide horizontal banner (728 px x 90 px)? Try resize the browser to make it smaller and reload the page. Try even smaller like you are using a mobile and reload the page. Do you see the size of the ad is changing as it’s responding?

Let’s first take a look at your current Google Adsense Code below. You can get this code from Google Adsense Site → My ads (top menu) → “Get Code” from one of your ad unit.

Make sure you select “asynchronous” code type from the drop down menu.

<script async src="//pagead2.googlesyndication.com/pagead/js/adsbygoogle.js"></script>
<!-- NAME OF YOUR AD -->
<ins class="adsbygoogle"
     style="display:inline-block;width:728px;height:90px"
     data-ad-client="ca-pub-8255226778912403"
     data-ad-slot="1054112722"></ins>
<script>
(adsbygoogle = window.adsbygoogle || []).push({});
</script>

1. You simply add a <div> around it.
2. Named the class to responsive-ad on the <div>
3. Added the class responsive-ad to <ins>. So it’s now adsbygoogle responsive-ad.
4. Changed the style to display:block
5. You must replace data-ad-client numbers and data-ad-slot numbers with yours..
6. Added data-format="auto" before closing </ins> tag.
7. Add <style> tags. You can tweak it whatever you want.

<div class="responsive-ad">	
<script async src="//pagead2.googlesyndication.com/pagead/js/adsbygoogle.js"></script>
<!-- NAME OF YOUR AD -->
<ins class="adsbygoogle responsive-ad"
     style="display:block"
     data-ad-client="ca-pub-XXXXXXXXXXXXXXXX"
     data-ad-slot="XXXXXXXXXX"
     data-format="auto"></ins>
<script>
(adsbygoogle = window.adsbygoogle || []).push({});
</script>
</div>

<style type="text/css">
.responsive-ad { width: 320px; height: 50px; margin: 0 auto; }
@media (min-width:480px) { .responsive-ad { width: 468px; height: 60px; } }
@media (min-width:768px) { .responsive-ad { width: 728px; height: 90px; } }
</style>

The <style> above has set a minimum of 768px (and up) for desktops, a minimum of 480px (and up but below 768px) for tablet, and 320px (and up but below 480px) for mobile. You may feel free to change the numbers of min-width: as your site structure.

Enjoy your blogging and monetizing with the new Responsive Google Adsense!

globe

Google, Yahoo and All Major Search Engine Tips

Inputting “KEYWORDS” into the search engine box would be your first attempt while finding what you are looking for in the world wide web. There are a few tips that make your searching even faster adding some indicated codes to your search input box:

[“”] DOUBLE QUOTATION

Finding Exact Word with Order: wrap double quotation marks (“”) to your search words. In example, “cool free photoshop brushes” would only find cool free photoshop brushes NOT best free photoshop brushes or awesome free photoshop brushes.

[-] Negative/Minus CODE

Words You Want to Exclude: Add a negative/minus code immediately before the world you want to exclude without space. In example, abstract background image -jpg would find you all abstract related background images but not in jpg extension. (JPEG will shown in the search results)

[filetype:]

A Specific File Type Search: Input “filetype:(with colon)” in front of the file type name such as “jpg” or “pdf” to search that exact file type with the keywords. In example, “filetype:pdf design” would find you all PDF files that related to the word DESIGN.

[site:]

To Find Within a Site: Input “site:(with colon)” before any website such as “iiiji.com” follow by the keywords would let you find the subject within the website you’ve indicated. In example, “site:iiiji.com tutorial” would find articles about TUTORIAL within the site iiiji.com.

[*]

A Placeholder: The code “*” in between keywords be treated as a placeholder, so “Freelance * Design” will find you Freelance Graphic Design, , Freelance UI/UX Design, and so on.

[OR]

To Find Either One of Several Words: If you want to search for something either one of its kinds such as “design award 2010 OR 2011” will get you a result within these two years of resources. (OR must be ALL-CAP)