Category Archives: Uncategorized

Shopify Add Description

Display Product Description On Shopify Cart Page

Shopify cart page won’t have description blurb in default. Below is how to add the description blurb on the cart page.

Display Product Description on Shopify Cart Page

Tested on “Dawn Theme”

<div class="cart-item__product__description">{{ item.product.description }}</div>

Add the code to the main-cart-items.liquid file.

Display Inventory Quantity “X items available in stock” On Shopify Product Page

Shopify product page is not so friendly about exceeding the number of quantity in stock. The notification pops up, but users won’t know how much they can actually add more. you-cant-add-more

Display Inventory Quantity on Shopify Product Page

Tested on “Dawn Theme”

<div class="quantity_available">{% if product.variants.first.inventory_management == "shopify" and product.variants.first.inventory_quantity > 0 %}
{{ product.variants.first.inventory_quantity }} items available in stock.
{% endif %}</div>

Add this code right above this code from main-product.liquid file.

{%- when 'popup' -%}

items-available

The “8 items available in stock.” is now displayed above the Add to cart button.

Boostrap Change Animation

How to Change Bootstrap Carousel Slider Animation to Fade Out Effect or Remove the Sliding Effect

The sliding effect is the default animation for Bootstrap Carousel. Below code is how a general Bootstrap Carousel Slider would look like.

<div id="carousel" class="carousel slide" data-ride="carousel">
  <div class="carousel-inner">
    <div class="carousel-item active">
      <img src="https://blog.identitydesign.us/img/bg1.jpg">
    </div>
    <div class="carousel-item">
      <img src="https://blog.identitydesign.us/img/bg2.jpg">
    </div>
    <div class="carousel-item">
      <img src="https://blog.identitydesign.us/img/bg3.jpg">
    </div>
  </div>
</div>

Change Sliding Animation to a “Fade” Effect

Add a class name, carousel-face right after slide. You can also add data-interval="3000" to control the speed of the animation. 1000 is 1 second, and 3000 is 3 seconds. You can replace ‘3000’ with your desired slider speed.

<div id="carousel" class="carousel slide carousel-fade" data-ride="carousel" data-interval="3000">

Remove the Sliding Effect Completely

You can completely remove the sliding effect on your carousel. Simply remove slide from the class of div.

<div id="carousel" class="carousel" data-ride="carousel">
Thumbnail Reviews

Star Rating Symbol Icons Show Broken or Square Boxes on Woocommerce Review

Very strange? I just made the reviews functionality active on my WordPress Woocommerce website, and I see the icons are broken with square boxes (some says “SSSSS”). There should be some CSS conflicts where the icon fonts were not properly loaded. So, I’ve came up overwriting some CSS styling including a new font-family to the page, and it’s working!

p.stars a:before, p.stars a:hover, p.stars a:visited, p.stars a:focus, p.stars a:hover~a:before, p.stars:hover a:before, p.stars.selected a:not(.active):before, p.stars.selected a.active:before, p.stars.selected a.active~a:before {
    font-family: 'star';
    content: '';
    line-height: 1.4 !important;
}
Thumbnail of JavaScript

Make Clickable Link with JavaScript instead of HTML Anchor

Sometimes you just can’t edit the HTML but still need to make the div clickable. Here’s how with using JavaScript. *Jquery needs to be installed.

<script> 
$('.YOUR-CLASS-NAME').each(function() {
var link = $(this).html();
$(this).contents().wrap('<a href="YOUR-URL-LINK"></a>');
});
</script>

You need to replace .YOUR-CLASS-NAME with your div’s class and replace "YOUR-URL-LINK" with your destination link. Pretty simple, heh?

Bootstrap TIme Interval

How to Change Bootstrap Carousel Slider Transition Speed Time Interval

Commemorate an important event!

Bootstrap is one of the most popular, powerful and light HTML/CSS/JavaScript Responsive framework for developers, and it’s also available for WordPress as well. To use the Bootstrap carousel slider below is setting to change slider time interval (transition speed of slider images). Don’t get confused with changing the core JavaScript or CSS files.

Bootstrap Carousel Slider Time Interval Setting

Default Bootstrap Carousel Slider Snippet

<div id="myCarousel" class="carousel slide" data-ride="carousel"> 
 <!-- Indicators -->
 <ol class="carousel-indicators">
 <li data-target="#myCarousel" data-slide-to="0" class="active"></li>
 <li data-target="#myCarousel" data-slide-to="1"></li>
 <li data-target="#myCarousel" data-slide-to="2"></li>
 <li data-target="#myCarousel" data-slide-to="3"></li>
 </ol>
 
 <!-- Wrapper for slides -->
 <div class="carousel-inner" role="listbox">
 <div class="item active"> <img src="img_chania.jpg" alt="Chania"> </div>
 <div class="item"> <img src="img_chania2.jpg" alt="Chania"> </div>
 <div class="item"> <img src="img_flower.jpg" alt="Flower"> </div>
 <div class="item"> <img src="img_flower2.jpg" alt="Flower"> </div>
 </div>
 
 <!-- Left and right controls --> 
 <a class="left carousel-control" href="#myCarousel" role="button" data-slide="prev"> 
 <span class="glyphicon glyphicon-chevron-left" aria-hidden="true"></span>
 <span class="sr-only">Previous</span>
 </a>
 <a class="right carousel-control" href="#myCarousel" role="button" data-slide="next">
 <span class="glyphicon glyphicon-chevron-right" aria-hidden="true"></span>
 <span class="sr-only">Next</span>
 </a> 
</div>

Add the ‘data-interval’ on the first line of code

<div id="myCarousel" class="carousel slide" data-ride="carousel" data-interval="3000"></div>

1000 is 1 second, and 3000 is 3 seconds. You can replace ‘3000’ with your desired slider speed.

Change Slider Animation Time in CSS

The default slider animation time, which is called ‘transition’ property, is 0.6 seconds. You can also slow down or make the animation time faster in css.
Animation time

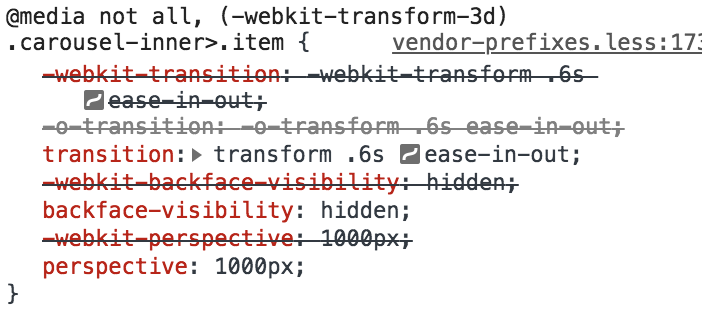
On you own css, add the followeing lines if you want to change the animation time. To make the animation slower, increase the time by 1.2 seconds for example:

.carousel-inner>.item {
    -webkit-transition: -webkit-transform 1.2s ease-in-out !important;
    -o-transition: -o-transform 1.2s ease-in-out !important;
    transition: transform 1.2s ease-in-out !important;
}
Vertical Align Center Thumbnail

CSS Vertical Align Center

Let’s  vertical align your design elements with CSS and HTML! Despite how popular people search for this method, vertical centering your contents seems not easy than you think for beginners. Below method could be the one of the simplest ways you can make it happen.

DEMO: How to Vertically Align Middle with CSS

Vertical Align Demo

Box One

Vertical Align Center

Box Two

Vertical Align Middle

Box Three

Vertical Align Center

HTML

Copy the code below and paste into your HTML document.

<div class="div-outer">
    <div class="div-inner">
    <h4>Box One</h4>
    <p>Vertical Align Center</p>
    </div>
</div>
<div class="div-outer">
    <div class="div-inner">
    <h4>Box One</h4>
    <p>Vertical Align Center</p>
</div>
</div>
<div class="div-outer">
    <div class="div-inner">
    <h4>Box One</h4>
    <p>Vertical Align Center</p>
    </div>
</div>

You can tweak around with different colors of the boxes or texts. Have fun!

CSS

Copy the code below and paste into your CSS document. You need to make the same min-height and line-height on the outer part of the div. In my case, I have 200px.

.div-outer {
    min-height: 200px;
    line-height: 200px;
}
.div-inner {
    display: inline-block;
    vertical-align: middle;
    line-height: normal;
}

In case if this css isn’t working, you can try as below.

.div-outer {
    height: 80vh;
    position: relative;
}
.div-inner {margin: 0;
    position: absolute;
    top: 50%;
    left: 50%;
    transform: translate(-50%, -50%);
    width: 100%;
}

You can tweak around with different colors of the boxes or texts. Have fun!

Table Width CSS Thumb

CSS: A Simple Way to Set the Table Column Width

Here’s a very simple way to size your table width with a few lines of CSS instead of giving inline values to it. This method is much easier for creating responsive tables.

DEMO: How It Looks

35% 15% 5% 35% 10%
A B C D E
A B C D E
A B C D E

CSS

Copy the code below and paste into your CSS document.

table tr td { padding:20px }
table td:nth-child(1) { width:35%; }
table td:nth-child(2) { width:15%; }
table td:nth-child(3) { width:5%; }
table td:nth-child(4) { width:35%; }
table td:nth-child(5) { width:10%; }

HTML

Copy the code below and paste into your HTML document.

<table class="table" border="0" cellspacing="0" cellpadding="0">
  <tr>
    <td>35%</td>
    <td>15%</td>
    <td>5%</td>
    <td>35%</td>
    <td>10%</td>
  </tr>
  <tr>
    <td>A</td>
    <td>B</td>
    <td>C</td>
    <td>D</td>
    <td>E</td>
  </tr>
  <tr>
    <td>A</td>
    <td>B</td>
    <td>C</td>
    <td>D</td>
    <td>E</td>
  </tr>
  <tr>
    <td>A</td>
    <td>B</td>
    <td>C</td>
    <td>D</td>
    <td>E</td>
  </tr>
</table>

You can copy both CSS and HTML codes to your file and tweak around as you like!

Joomla to Wordpress

Migrating Joomla to WordPress

Here’s the a way to migrate Joomla users to WordPress users. I’ve used Joomla for some years and I still thinking it’s a great Content Management System. But however, I’m so much liking using WordPress for my site building I definitely needed to bring users from Joomla to WordPress. If you have hundreds of articles and migrating one from another it’s pain but still possible and manually doable, but when migrating users data, it just can’t.

I’ve tried to follow other tutorials, but for some reason it didn’t work out for me. So I’ve done some other testings and finally it worked out! Now, let me introduce to how to migrate Joomla users to WordPress users. The versions I’ve used is Joomla 1.5 to WordPress 3. Here’s how as simple as:

1. On your Joomla site, export users to a CSV file.

To export Joomla users data, use ‘ARRA User Export Import’ plugin.

  • Install plugin and go to the plugin page (Admin – Components – ARRA User Export Import)
    Joomla Components
  • Click on ‘User Export’, mark the following check boxes, and “Export”!
    ARRA User Export Import
  • You’ll get a “CSV” file.

2. Tweak the CSV file before import to your WordPress site.

  • You can open the file with Dreamweaver, Microsoft Excel, or one of the text editors you already have.
  • Just need to change very top row.
    Modify from Text EditorEdit text as the following table (Top to Bottom) and save.

    first name last name username email password usertype
    first_name last_name user_login user_email joomlapass role

    *Sometimes Microsoft Excel won’t save it right. I recommend Dreamweaver.

3. Import the CSV file to your WordPress site.

  • To install plugin, on your wordpress site, go to Admin – Plugins – Add new.
    Wordpress Plugin
  • Search for ‘Import Users from CSV’,
    Import Users from CSV
    ‘Install Now’, and ‘Activate Plugin’.
    Activate Plugin
  • Go to ‘Users’ – ‘Import from CSV’
    Import From CSV
  • Drag your updated ‘.CSV’ file to the ‘Choose File’ filed, “Import”!
    Import users from a CSV file
  • Check your ‘Users’ – ‘All Users” page to see everything looks right!
    Check Users page