Tag Archives: codes

Remove Proudly Powered by Wordpress Thumbnail

Remove Proudly powered by WordPress Theme and Replace with Your Own © Copyright Information

WordPress Theme users, let’s remove “Proudly powered by WordPress” from the footer of your website. It’s pretty simple. A line of CSS would do the job.

Remove “Proudly powered by WordPress” on Twenty Sixteen, Twenty Seventeen, Twenty Nineteen, Twenty Twenty-One Theme

Open Up the CSS Editor:
(Go to the Backend page -> Appearance -> Editor)

footer .site-info { 
 display: none !important; 
}
footer.site-footer:after {
 content: "© YOUR WEBSITE NAME";
}

Replace YOUR WEBSITE NAME as you like.

footer.site-footer:after {
 content: "© YOUR WEBSITE NAME";
 margin: auto;
}

If you want to center align the Copyright line, add margin:auto like below:

Remove “Powered by WordPress” on Twenty Twenty Theme

Open Up the CSS Editor:
(Go to the Backend page -> Appearance -> Editor)

.powered-by-wordpress {
    display: none;
}

Remove “Proudly Powered by WordPress” on Twenty Twenty-Two Theme

Open Up the CSS Editor:
(Go to the Backend page -> Appearance -> Editor)

.has-text-align-right {
    display: none;
}

Now it’s all good!

Storefront

Remove “Storefront designed by WooThemes” on Woocommerce Storefront Theme

Get Custom Phone Case Now!

Woocommerce offers a well designed free template for everyone called, the Storefront. By adding the CSS codes below, you can remove the credits, “Storefront designed by WooThemes” without editing or deleting a line of the core programmings. So instead of deleting anything, you are just hiding the text actually. So it’s a risk free, easy and fast!

Remove “Storefront designed by WooThemes” Credits

Place the CSS line on the WordPress backend where CSS is located:
(Go to the Backend page -> Appearance -> Editor)

footer .site-info { 
 display: none !important; 
}
footer .col-full:after { 
 content: "© YOUR COMPANY NAME";
 font-size: 15px;
 color: #777;
 line-height: 140%;
 text-align: center;
 display: block;
 margin: 20px auto;
}

Now you’ll see the line, “Storefront designed by WooThemes” is gone. Feel free to edit the font-size and color of your own.

Thumbnail of JavaScript

Make Clickable Link with JavaScript instead of HTML Anchor

Sometimes you just can’t edit the HTML but still need to make the div clickable. Here’s how with using JavaScript. *Jquery needs to be installed.

<script> 
$('.YOUR-CLASS-NAME').each(function() {
var link = $(this).html();
$(this).contents().wrap('<a href="YOUR-URL-LINK"></a>');
});
</script>

You need to replace .YOUR-CLASS-NAME with your div’s class and replace "YOUR-URL-LINK" with your destination link. Pretty simple, heh?

Vertical Align Center Thumbnail

CSS Vertical Align Center

Let’s  vertical align your design elements with CSS and HTML! Despite how popular people search for this method, vertical centering your contents seems not easy than you think for beginners. Below method could be the one of the simplest ways you can make it happen.

DEMO: How to Vertically Align Middle with CSS

Vertical Align Demo

Box One

Vertical Align Center

Box Two

Vertical Align Middle

Box Three

Vertical Align Center

HTML

Copy the code below and paste into your HTML document.

<div class="div-outer">
    <div class="div-inner">
    <h4>Box One</h4>
    <p>Vertical Align Center</p>
    </div>
</div>
<div class="div-outer">
    <div class="div-inner">
    <h4>Box One</h4>
    <p>Vertical Align Center</p>
</div>
</div>
<div class="div-outer">
    <div class="div-inner">
    <h4>Box One</h4>
    <p>Vertical Align Center</p>
    </div>
</div>

You can tweak around with different colors of the boxes or texts. Have fun!

CSS

Copy the code below and paste into your CSS document. You need to make the same min-height and line-height on the outer part of the div. In my case, I have 200px.

.div-outer {
    min-height: 200px;
    line-height: 200px;
}
.div-inner {
    display: inline-block;
    vertical-align: middle;
    line-height: normal;
}

In case if this css isn’t working, you can try as below.

.div-outer {
    height: 80vh;
    position: relative;
}
.div-inner {margin: 0;
    position: absolute;
    top: 50%;
    left: 50%;
    transform: translate(-50%, -50%);
    width: 100%;
}

You can tweak around with different colors of the boxes or texts. Have fun!

JavaScript Redirect

Simple JavaScript Redirect Code for HTML

Here’s the one of the simplest ways to redirect your site’s traffic.

Redirect to Different URL

Copy the code below and paste it to your blank html.

<script language="javascript">
window.location.href="http://YOUR-REDIRECT-PAGE"
</script>

*Replace YOUR-REDIRECT-PAGE with your new URL.

Storefront

Remove Product Description and Reviews Tabs in Woocommerce Storefront Theme

Wocommerce offers the tabs: “Product Description”, “Reviews and/or “Additional Information” in the product detail page. Let’s find a way to remove or disable the tabs while you are using in the “Storefront” theme.

Remove “Product Description”, “Reviews” and “Additional Information” Tabs

Go to the backend -> Appearance -> Editor -> Find “storefront-functions.php” on the right. Input below code in the very bottom. “Update File” after adding the codes.

add_filter( 'woocommerce_product_tabs', 'woo_remove_product_tabs', 98 );

function woo_remove_product_tabs( $tabs ) {

unset( $tabs['description'] ); // Remove the description tab
unset( $tabs['reviews'] ); // Remove the reviews tab
unset( $tabs['additional_information'] ); // Remove the additional information tab

return $tabs;

}

If you wish to keep one or two of the three tabs, just remove the corresponding line from the codes. Enjoy woocommerce!

HTTPS thumbnail

Resolved! Loading Your Google Fonts Over https (SSL) Sites

I couldn’t believe how amazingly simple it was! I was searching for days and nights how to make my google fonts properly load over on my WordPress https (SSL) site.

Here’s the basic story. I’m running an e-Commerce store with a Secure Sockets Layer installed on the domain. I created the logo with “La Belle Aurore” font from Google. When customers pay for their purchase, they have to land on the cart page showing https. My logo won’t be properly showing when my customer uses IE (Internet Explorer 11) browsers or my Safari from iPhones, so I really had resolve this issue.

I’ve seen some people trying to resolve the issue by creating weird code in the .htaccess file or tweaking the .function file in WordPress theme. I’ve tried it, but none of them actually worked for me.

Ta-Dah! It was simpler than I thought. I deleted the http: part on my CSS file, and it worked like magic! So DO “//fonts.googleapis.com/css?family=XXX”, NOT “http://fonts.googleapis.com/css?family=XXX”

@import url(//fonts.googleapis.com/css?family=NAME_OF_YOUR_FONT_FAMILY);

I used “La Belle Aurore” font on my site, so here’s what I have. @import url(//fonts.googleapis.com/css?family=La+Belle+Aurore); I hope this method save your time as well. Good luck!

Table Width CSS Thumb

CSS: A Simple Way to Set the Table Column Width

Here’s a very simple way to size your table width with a few lines of CSS instead of giving inline values to it. This method is much easier for creating responsive tables.

DEMO: How It Looks

35% 15% 5% 35% 10%
A B C D E
A B C D E
A B C D E

CSS

Copy the code below and paste into your CSS document.

table tr td { padding:20px }
table td:nth-child(1) { width:35%; }
table td:nth-child(2) { width:15%; }
table td:nth-child(3) { width:5%; }
table td:nth-child(4) { width:35%; }
table td:nth-child(5) { width:10%; }

HTML

Copy the code below and paste into your HTML document.

<table class="table" border="0" cellspacing="0" cellpadding="0">
  <tr>
    <td>35%</td>
    <td>15%</td>
    <td>5%</td>
    <td>35%</td>
    <td>10%</td>
  </tr>
  <tr>
    <td>A</td>
    <td>B</td>
    <td>C</td>
    <td>D</td>
    <td>E</td>
  </tr>
  <tr>
    <td>A</td>
    <td>B</td>
    <td>C</td>
    <td>D</td>
    <td>E</td>
  </tr>
  <tr>
    <td>A</td>
    <td>B</td>
    <td>C</td>
    <td>D</td>
    <td>E</td>
  </tr>
</table>

You can copy both CSS and HTML codes to your file and tweak around as you like!

Circled Numbers

Circled Number Lists (HTML/CSS)

Get Custom Phone Case Now!

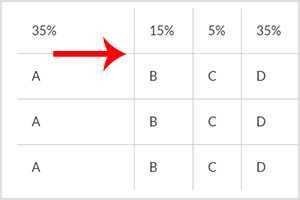
You can make a circle around your Ordered List, <ol> as below without using image formats like JPG or PNG, so this way you can reduce the developing and loading time for your site.

DEMO: How It Looks

Circle Around Numbers in Steps (HTML & CSS)

  1. This is the sample draft for circled number bullet points for ordered lists. This sentence is just for a place holder. This is the sample draft for circled number bullet points for ordered lists. This sentence is just for a place holder.
  2. This is the sample draft for circled number bullet points for ordered lists. This sentence is just for a place holder. This is the sample draft for circled number bullet points for ordered lists. This sentence is just for a place holder.
  3. This is the sample draft for circled number bullet points for ordered lists. This sentence is just for a place holder. This is the sample draft for circled number bullet points for ordered lists. This sentence is just for a place holder.
  4. This is the sample draft for circled number bullet points for ordered lists. This sentence is just for a place holder. This is the sample draft for circled number bullet points for ordered lists. This sentence is just for a place holder.
  5. This is the sample draft for circled number bullet points for ordered lists. This sentence is just for a place holder. This is the sample draft for circled number bullet points for ordered lists. This sentence is just for a place holder.

CSS

Copy the code below and paste into your CSS document.

ol {
    counter-reset:item; 
    margin:0; 
    padding-left:0; 
}
ol>li {
    counter-increment:item; 
    list-style:none inside; 
    margin: 40px 0;
    overflow: hidden;
    font-size: 16px !important;
    line-height: 1.3;
}
ol>li:before {
    content:counter(item) ;
    margin-right: 20px;
    padding: 8px;
    display: block;
    -webkit-border-radius: 50%;
    -moz-border-radius: 50%;
    border-radius: 50%;
    width: 65px;
    background: #fe862c;
    color: #fff;
    text-align: center; 
    font: 56px 'Lato', Helvetica, Arial, sans-serif;
    font-weight: 100;
    float: left;
}

HTML

Copy the code below and paste into your HTML document.

<ol>
<li>Lorem ipsum dolor sit amet, felis dui nam, vivamus turpis bibendum et massa.</li>
<li>At augue, erat dui odio. Duis lectus, laoreet et, dolor nascetur tellus tellus sit etiam, massa leo dolor. Magna mi vitae et, lectus pellentesque, nec magna et ante, vehicula torquent venenatis tempor eget, elementum condimentum. </li>
<li>Integer porttitor donec, justo in, in pede, et leo ornare viverra erat ac. Dui diam, a sed purus, porta penatibus. Magna in, congue quam pulvinar cras malesuada condimentum nunc, vestibulum ut dolor tortor fusce nibh sollicitudin.</li>
<li>Vitae in, a pulvinar velit laoreet, tristique nascetur sapien. Placerat nunc a integer tincidunt sem, vivamus turpis, erat pulvinar interdum rhoncus nonummy vitae, etiam eleifend arcu non cras a commodo.</li>
<li>Quis mus donec, volutpat placerat nam et eros quam enim, id tincidunt aliquam libero odio, suspendisse a quam tristique ligula.</li>
</ol>

You can copy both CSS and HTML codes to your file and tweak around as you like. Enjoy coding!

Freebies: Christmas Responsive Email Template for Business (HTML/CSS)

Christmas Promotional Email Template (HTML/CSS) by Identity Design was designed in Responsive HTML and CSS. The main banner and the Call-To-Action button are compressed in PSD so it’s fully customizable. This Responsive HTML/CSS Email template with PSD is available for a free download.

Christmas Responsive Email Template

Terms
  • All iiiji.com freebies can be used for both personal and commercial use.
  • You may not redistribute or resell iiiji.com freebies in any shape or form.
Weird Code

WordPress Appearing Strange Weird Characters / Codes

Get Custom Phone Case Now!

This was pretty shocking moments when seeing the weird strange codes on my WordPress website. I was looking all over to resolve the issue and it worked for me. This could has happened because you have upload your plugin directly through FTP and didn’t go through the backend and install it proper way.

Which I did to make all this mess. I uploaded my files directly through FTP.

weirdcodes

I had back ups files, but these weird strange characters were showing up on top of every pages I go even I replaced it with my backed up files.

If you see the similar things showing, just de-activate the plugin that causing the issue, or you can delete the plugin folder directly from your FTP. And here’s what you should do next, re-install the plugin through the WordPress backend (admin) panel. It worked like a charm.

You might still see after, but don’t go crazy. There is a good chance your browser’s cache might need to be refreshed. Hit “Reload” the browser or Shift + “Reload” and it should work fine.