Author Archives: admin

zoom plastic letter toy

CSS Only Animation: Zoom on Hover

In today’s quick tip, we’ll dive into creating a dynamic ‘zoom on hover’ effect that adds an interactive touch to images on your web pages. By incorporating the provided CSS, your images will elegantly scale up when hovered over. This effect, achieved with minimal code, is a fantastic way to enhance your website’s visual appeal and engage your visitors.

DEMO: Zoom on Hover

HTML

<img class="zoom-in" src="YOUR-IMAGE-PATH"/>

CSS

.zoom-in { transition:transform .2s; }
.zoom-in:hover { transform: scale(1.2); }
Abstract background with swap icon

CSS Only Animation: Image Swapping on Hover (Logo Swap)

Explore how to enhance your website’s interactivity with this simple guide on implementing a logo or image swap effect upon mouse hover. Ideal for web designers and developers, this tutorial includes step-by-step instructions, complete with HTML and CSS code snippets, to seamlessly integrate this dynamic visual cue into your web project. Perfect for adding that extra flair to logos or images on your site, learn how to create a more engaging user experience with ease.

DEMO: Swapping Logo/Image on Hover of Mouse

my-first-logomy-second-logo

HTML

<div class="swap">
	<a href="https://wedesignorange.com">
		<img class="main" src="YOUR-MAIN-IMAGE" />
		<img class="hover" src="YOUR-SWAPPING-IMAGE" />
	</a>
</div>

CSS

.swap { height: 200px; width: 200px; position: relative; }
.swap img {
	position: absolute;
	top: 0;
	right: 0;
	left: 0;
	bottom: 0;
	transition: opacity .9s;
	width: 100%;
	height: 100%;
	object-fit: contain;
}
.swap img.hover, .swap:hover img.main { opacity:0; }
.swap img.hover:hover { opacity:1; }
image scrolling

CSS Animation: Image Scrolling on Hover

In the ever-evolving world of web design, adding interactive and visually appealing elements to your website can greatly enhance the user experience. One exciting way to achieve this is by learning how to create an image scrolling effect on hover with CSS animation. With just a few lines of code, you can transform a static image into an engaging and dynamic component that draws the viewer’s attention. So, let’s dive in and discover how to make your website come to life with CSS image scrolling on hover!

DEMO: Mouse over to see the scrolling animation

sleekycase.com website

HTML

<div class="container"> 
	<img src="YOUR-IMAGE"> 
</div>

CSS

img { 
	object-fit: cover;
	object-position: top;
	transition: ease-in-out 4s;
	width: 450px;
	height: 300px;
}
img:hover {
	object-position: bottom;
}
stop sign

How to Add Deny Access to the .htaccess File

The .htaccess file is an important configuration file for websites that use the Apache web server. It allows you to control various aspects of your website, such as redirections, password protection, and caching. However, because the .htaccess file is so powerful, it is also a target for hackers and other malicious actors who may try to exploit it to gain access to your website or server.

One way to protect your .htaccess file is to add a “deny from all” rule to it. This will prevent anyone from accessing the file directly, including hackers who may be trying to modify it.

Here’s how to add a deny access rule to your .htaccess file:

1. Access your website’s .htaccess file

First, you’ll need to access your website’s .htaccess file. You can do this by connecting to your website’s server via FTP or SSH, and navigating to the directory where your website’s files are stored. The .htaccess file should be located in the root directory of your website.

2. Add the deny access rule

Next, open the .htaccess file in a text editor and add the following line at the top of the file:

#deny access to .htaccess
<Files .htaccess>
Order allow,deny
Deny from all
</Files>

This rule specifies that access to the .htaccess file should be denied for all users.

3. Save the changes

Save the changes to your .htaccess file and upload it back to your website’s server.

By adding a deny access rule to your .htaccess file, you can help protect your website from malicious attacks and unauthorized access. However, it’s important to remember that this is just one of many security measures that you should take to protect your website. Be sure to keep your software and plugins up-to-date, use strong passwords, and implement other security best practices to keep your website secure.

Renew SSL icon

Renewing an Expired SSL Certificate with AutoSSL in cPanel: A Quick Guide

An SSL (Secure Sockets Layer) certificate is a digital certificate that encrypts data and ensures secure communication between a web server and a client browser. It’s essential to renew your SSL certificate before it expires to maintain a secure connection on your website. If your website is hosted on a cPanel server, you can renew your SSL certificate using the AutoSSL feature in just a few simple steps. In this blog post, we will guide you through the process of renewing an expired SSL certificate with AutoSSL in cPanel.

Step 1: Log in to your cPanel account

The first step is to log in to your cPanel account. You can do this by accessing the cPanel login URL provided by your web hosting company and entering your cPanel username and password.

Step 2: Go to SSL/TLS Status page

Once you’re logged in, go to the SSL/TLS Status page. You can find it by using the search bar or by scrolling down to the Security section of the cPanel dashboard.

Step 3: Renew the SSL certificate

On the SSL/TLS Status page, you will see a list of all the SSL certificates installed on your server, including any that have expired. Check on all expired domain names and click the “Run AutoSSL” button. Wait for a few minutes until the “Success” sign appears. If it doesn’t work, you can try uninstalling the SSL certificate by clicking on SSL/TLS Status – “View Certificate” or SSL/TLS – “Manage SSL sites.” Then click “Uninstall.” Go back to the SSL/TLS Status page and reinstall the SSL certificate with “Run AutoSSL” again.

Optional for WordPress users: Add “Really Simple SSL” plugin and activate HTTPS for your domain.

If you’re using WordPress, you can add the “Really Simple SSL” plugin and activate HTTPS for your domain. The plugin will automatically detect your SSL certificate and configure your website to use HTTPS. This will ensure that all pages on your website are secure and encrypted. To add the plugin, go to the WordPress plugin directory and search for “Really Simple SSL.” Install and activate the plugin, and then follow the prompts to activate HTTPS for your domain.

And that’s it! By following these simple steps, you can renew an expired SSL certificate and maintain a secure connection on your website.

Hamburger Menu Icon

HTML-CSS-JS: Simple Hamburger Menu Expandable

“How to create an expandable hamburger menu?”

DEMO: How It Looks

HTML

<header class="header">
  <div class="header__menu menu">
    <div class="menu__icon"> <span></span> </div>
    <nav class="menu__body">
      <ul class="menu__list">
        <li> <a data-goto="#home" href="" class="menu__link">Home</a></li>
        <li> <a data-goto="#section-1" href="" class="menu__link">Section 1</a></li>
        <li> <a data-goto="#section-2" href="" class="menu__link">Section 2</a></li>
        <li> <a data-goto="#section-3" href="" class="menu__link">Section 3</a></li>
      </ul>
    </nav>
  </div>
</header>

CSS

body {
	background-color: black; font-family:sans-serif; 
}
header a {
	color: #111 !important;
	text-decoration: none!important;
	font-weight: 200;
	font-size: 2.2rem;
	line-height: 1.2;
	display: block;
}
.header__menu {
	position: fixed;
	top: 34px;
	right: 30px;
	z-index: 10;
}
.menu__icon {
	z-index: 5;
	display: block;
	position: relative;
	width: 50px;
	height: 22px;
	cursor: pointer;
}
.menu__icon span, .menu__icon::before, .menu__icon::after {
	left: 0;
	position: absolute;
	height: 20%;
	width: 100%;
	transition: all 0.3s ease 0s;
	background-color: white;
}
.menu__icon::before, .menu__icon::after {
	content: '';
}
.menu__icon::before {
	top: 0;
}
.menu__icon::after {
	bottom: 0;
}
.menu__icon span {
	top: 50%;
	transform: scale(1) translate(0, -50%);
}
.menu__icon._active span {
	transform: scale(0) translate(0, -50%);
}
.menu__icon._active::before {
	top: 50%;
	transform: rotate(-45deg) translate(0, -50%);
}
.menu__icon._active::after {
	bottom: 50%;
	transform: rotate(45deg) translate(0, 50%);
}
.menu__body {
	position: fixed;
	top: 0;
	right: -99%;
	width: 34%;
	height: 100%;
	background-color: rgba(255, 255, 255, 0.8);
	padding: 100px 30px 30px 30px;
	transition: right 0.3s ease 0s;
	overflow: auto;
}
.menu__body._active {
	right: 0;
}
.menu__list > li {
	flex-wrap: wrap;
	margin-bottom: 30px;
}
.menu__body ul {
	padding-left: 1rem;
	list-style: none;
}

JavaScript

Link the below external Javascript into the bottom of your HTML.

<script type="text/javascript" src="https://blog.identitydesign.us/js/hamburger.js"></script>

With having the hamburger menu on your navigation, your website could look more sophisticated and clean.

AOS-Customization-Thumb

Customize Animations on AOS (Animated On Scroll) Library

“How to customize animations on AOS Library?”

AOS Library (by michalsnik) is a great way to trigger animation while scroll for your website design. Here’s how to customize animations using AOS library.

Add CSS to your website header

<link rel="stylesheet" href="https://unpkg.com/aos@next/dist/aos.css" />

Add JS at the end of body tag

<script src="https://unpkg.com/aos@next/dist/aos.js"></script>  
<script type="text/javascript">
AOS.init({   
});
</script> 

HTML

<div class="box" data-aos="my-animation-1">1</div>
<div class="box" data-aos="my-animation-2">2</div>
<div class="box" data-aos="my-animation-3">3</div>
<div class="box" data-aos="my-animation-1">4</div>
<div class="box" data-aos="my-animation-2">5</div>
<div class="box" data-aos="my-animation-3">6</div>
<div class="box" data-aos="my-animation-1">7</div>
<div class="box" data-aos="my-animation-2">8</div>
<div class="box" data-aos="my-animation-3">9</div> 

CSS

/* Default Style of Boxes */
.box {
  width: 250px;
  height: 250px;
  margin: 2rem auto; 
  text-align: center;
  display: flex;
  justify-content: center;
  align-items: center;
  font-family:sans-serif;
  font-size: 5rem;
  color: #FFF;
}
 
/* Before of Animation 1 */
[data-aos="my-animation-1"] {
  transform: rotate(0deg);
  background: black;
  opacity: 0; 
}
/* After of Animation 1 */ 
[data-aos="my-animation-1"].aos-animate {
  transform: rotate(360deg); 
  opacity: 1; 
}
	
/* Before of Animation 2 */
[data-aos="my-animation-2"] {
  background: black;
  transition-property: background; 
}
/* After of Animation 2 */
[data-aos="my-animation-2"].aos-animate {
  background: cyan; 
}
	
/* Before of Animation 3 */
[data-aos="my-animation-3"] {
  transform: translateX(-100%);
  opacity: 0; 
}
/* After of Animation 3 */
[data-aos="my-animation-3"].aos-animate {
  transform: translateX(0%); 
  background: purple;
  opacity: 1; 
}

DEMO: How It Looks

1
2
3
4
5
6
7
8
9


Box Pop-up Effect

CSS: Button Push Shadow Effect on Hover

“How to create a shadow effect when hovering on a box?”

DEMO: How It Looks

TRY HOVERING OVER THE BOX!

HTML

<div class="">TRY HOVERING OVER THE BOX!</div> 

CSS

.button-pop {
    border: 2px solid black;
    padding: 1rem; 
    width:200px;
    height:200px;
}
.button-pop:hover {
    position: relative;
    right: 5px;
    bottom: 5px;
    box-shadow: 7px 7px #111;
}

It’s pretty simple. Enjoy coding!

Font face

CSS: Use your desktop fonts to your website

“How to use .OTF (or other desktop) fonts to your website?”

If you would like to use your desktop fonts to your website, do this!

CSS

  1. Select and place fonts to the server.
  2. Copy and paste codes below to your stylesheet.
  3. Replace font-family: ‘FONT1‘ on both @font-face and p with your own font name.
  4. You may change normal to bold if necessary.
@font-face {
	font-family: 'FONT1';
	src: url("../fonts/YOUR-FONT-LOCATION.otf") format("opentype");
	font-weight: normal;
	font-style: normal;
}
p { 
	font-family: 'FONT1', sans-serif; 
}

How to Add a Sitemap of a WordPress Website

Adding a sitemap for search engines is vital when launching a website unless you want to keep it secret. There are many ways to add a website’s sitemap, but using Yoast SEO plugin could be the easiest way to do it.

1. DOWNLOAD YOAST SEO PLUGIN

  1. Go to Plugins -> Add New and search for the Yoast SEO plugin.
  2. Download and activate it.

2. ENABLE XML SITEMAPS AND GET THE SITEMAP URL

  1. Go to Yoast SEO from the left menu -> General
  2. Enable “On” mode on the XML sitemaps.XML sitemaps
  3. Click on See the XML.
  4. Copy the sitemap url. sitemap url

3. SUBMIT A SITEMAP ON GOOGLE SEARCH CONSOLE

  1. Add a new property (if you haven’t already) for the website you wish to submit the sitemap to on Google Search Console.
  2. Go to Sitemaps from the left menu.
  3. Add a new sitemap by pasting the sitemap URL from step 2 and click on Submit.
  4. *The Status might show Couldn't fetch, but it will update. Couldn't fetch
YARPP Sidebar

YARPP for WordPress: How to remove the “You May Also Like” header on the sidebar widget area

YARPP (Yet Another Related Posts Plugin) is one of the greatest plugins in WordPress that provides related posts automatically using an algorithm, but there are a few things that can’t be easily fixed through its settings.

How to remove the “You May Also Like” header on the sidebar widget YARPP Plugin for WordPress?

I’ve tried many options in the settings, but they didn’t seem to work. Try using the CSS code below to remove it easily.

CSS

Copy the code below and paste it into your CSS document.

.yarpp-related-widget h3 { display:none; }

Tada!

YARPP posts

How to remove the “Related Posts” on YARPP Plugin for WordPress

YARPP(Yet Another Related Posts Plugin) is a one of the greatest plugins in WordPress that provides related posts automatically with algorithm, but there are a few things can’t be easily fixable on its setting.

How to remove the “Related Posts” on YARPP?

I’ve tried many options on their settings to remove the Related Posts on the bottom of a page, but it seems not working. Try below CSS line to remove it with ease.

CSS

Copy the code below and paste into your CSS document.

.yarpp-related-website { display:none; }

Tada!

How to Duplicate/Migrate WordPress Website – Duplicator

Work effective and save time if you are a web developer using WordPress. Duplicate your existing work and use as a template. Get Duplicator and install/active the plugin and follow the instruction below. We have 3 main steps to get all duplicate/migration process done.

1. BACKUP FILES & DOWNLOAD

  1. Get Duplicator plugin
  2. Duplicator -> Create new
  3. Next -> Build
  4. Download Installer.php and ...Archive.zip file

2. DATABASE CREATION ON NEW SERVER

  1. Create Database from MySQL® Databases in cPanel.
  2. Name your database. Add _wp at the end of the database name
  3. Add a user, _user at the end of the database name
  4. Add the user to the database you created. Finally add All Privileges to the user.

3. UPLOAD BACKED UP FILES TO NEW SERVER

  1. Access cPanel on new hosting server. Go to cPanel -> File Manager. Select public_html or very root folder of your WordPress files -> upload your saved Installer and Archive files. (*You can also use FTP (Filezilla) to upload these files. )
  2. Open a web browser -> http://YOUR-DOMAIN.com/installer.php
  3. Select the checkbox, “I have read and accept all terms & notices*”
  4. Select Remove all data and input your Database, User and Password and hit Test Database. If looks good, hit Next.
  5. Click Next for step 4, Login the site with Site Login.
300x200 Contact 7

WordPress Contact Form 7 Submit Button Not Working (Nonstop Wheel Spinning)

Despite the popularity of its name, “Contact form 7” with millions of active installations, numerous plugin users have called out the error when hitting the submit button on the form. The error seems to be occurred by change of environment such as migration of the website. Here’s the solution how this can be resolved.

  • Go to the WP Admin (Backend) -> Plugins -> Plugin File Editor.
  • Select plugin to edit dropdown to select Contact Form 7 and select the file, wp-contact-form-7.php
  • On line 30 (the number can be different) after ‘WPCF7_LOAD_JS’, change true to false

Change of code in “Contact form 7” plugin

if ( ! defined( 'WPCF7_LOAD_JS' ) ) {
	define( 'WPCF7_LOAD_JS', false );
}
Shopify Add Description

Display Product Description On Shopify Cart Page

Shopify cart page won’t have description blurb in default. Below is how to add the description blurb on the cart page.

Display Product Description on Shopify Cart Page

Tested on “Dawn Theme”

<div class="cart-item__product__description">{{ item.product.description }}</div>

Add the code to the main-cart-items.liquid file.

Display Inventory Quantity “X items available in stock” On Shopify Product Page

Shopify product page is not so friendly about exceeding the number of quantity in stock. The notification pops up, but users won’t know how much they can actually add more. you-cant-add-more

Display Inventory Quantity on Shopify Product Page

Tested on “Dawn Theme”

<div class="quantity_available">{% if product.variants.first.inventory_management == "shopify" and product.variants.first.inventory_quantity > 0 %}
{{ product.variants.first.inventory_quantity }} items available in stock.
{% endif %}</div>

Add this code right above this code from main-product.liquid file.

{%- when 'popup' -%}

items-available

The “8 items available in stock.” is now displayed above the Add to cart button.

Kebab Display Menu Template

Freebies: Kebab Kabob Display Menu Template (PSD)

Kebab Display Menu Template

The “Kebab” or “Kabob” Mediterranean food display menu template in Photoshop (PSD) by Identity Design is designed in high resolution and ready to use. It’s layered in PSD and available for a free download.

Terms
  • All Identity Design Freebies can be used for both personal and commercial use.
  • You may not redistribute or resell Identity Design Freebies in any shape or form.
bookmark

Web Developer / Designer Bookmarks

Get Inspired!

Behance

behance

Trendy portfolios. Showcase. Adobe.

dribbble

dribbble

World designers. Top creatives.

awwwards

awwards

Awards of design.

Cyrillic Design

cyrillic

Awards of design.

Qode Interactive

qode interactive

High quality WordPress Templates.

Pinterest

pinterest

Image sharing. Social Media.

Design Resources

Unsplash

unsplash

Freely-usable photo library.

Freepik

freepik

Powerful vector library.

Creative Market

Creative Market

6 free goods. Every week.

Pixelbuddha

pixelbuddha

Free & premium resources.

Google Fonts

Google Fonts

Free web fonts. Downloadable.

Material Icons

Material Icons

Free web icons from Google.

Bensound

bensound

Royalty free music.

Tools

Pingdom Website Speed Test

pingdom

Analyze web. Speed test.

Whois Lookup

Whois Lookup

Find IP. DNS

Custom Shape Dividers

customshape

Custom dividers for web. SVG

Cool Backgrounds

coolbackgrounds

Customize backgrounds in PNG. Abstract. Lines. Gradient.

themer

themer

Generates colors

Web Fundamentals

Web Fundamentals

Web skills learning. HTML, CSS, JavaScript and browser

Car Cover Website Template

Freebies: Car Cover Website Mock Up Template (PSD)

Car Cover Website Template

The Car Cover Website Design mockup in Photoshop (PSD) by Identity Design is designed in high quality 2400 pixel in width. This clean & sophisticated design is ready to use on your own design before it’s cut up in HTML. It’s layered in PSD and available for a free download.

Terms
  • All Identity Design Freebies can be used for both personal and commercial use.
  • You may not redistribute or resell Identity Design Freebies in any shape or form.

WooCommerce Astra: How to Disable Cart Bubble on Hover of the Cart Menu

I’ve been searching how to remove/hide the cart bubble on hover of the cart icon on header in Astra / WooCommerce combination.

This can’t be modified via Appearance -> Customize setting. Instead, I was able to hide the element with a simple CSS line as below:

.ast-site-header-cart:hover .widget_shopping_cart, .woocommerce .ast-site-header-cart:hover .widget_shopping_cart{ display:none; }

Feel free to comment me if this doesn’t work for you.

How to Change the Order of Artboards on Adobe Illustrator

Adobe Illustrator can create multiple paged PDF using multiple artboards. If you need to rearrange the order of pages, here is how-to.

Artboards are like Canvas in Adobe Photoshop.

Artboards

The two-digit number starting on the left of each artboard is the order of the content in PDF. To change the order of artboards, open up the Artboard Palette and drag layers as you want.

1 Open -> Window (on top menu bar) -> choose Artboards

how to open Artboard

2 Change the Order of Artboards by Dragging the Layers

Artboard Palette

Just need to save your document in PDF.

Chicken turn animation

Make Your Photos into a GIF Animation (Stop Motion) Using Photoshop

I took a bunch of snap shots with my Canon EOS 5D, a DSLR Camera. I thought this could be all put together and exported to a short GIF animation clip for my client’s Instagram.

1 Load Photo in Photoshop

Go to File on the top left menu on Photoshop and select Scripts -> Load Files into Stack

scriptsLoad files into stack

Click Browse and select your photos, hit Okay (You might need to sort your files in name so they can be played in order).

load layers

2 Make Timeline Frames

Open the Timeline palette from the Window menu.

Select the first layer on the Layers palette, click on the Create Frame Animation button (You might have to use the Dropdown button to do this).
Create Frame Animation

Go to the properties of the Timeline palette (3 lines icons at the top right), select the rest of the layers and select Make Frames from Layers.

Make Frames from Layers

You will see all layers have been converted into frames in timeline.

Double check the duration of the animation and leave it to Forever if you want the animation to be repeated and loop forever.
Forever menu

3 Export the file into GIF

Export to GIF

Go to File -> Save for web (or Commend + Option + Shift + S) and select the image format into “GIF” and hit Save.

Now your wonderful GIF animation has been created. Enjoy sharing!

Boostrap Change Animation

How to Change Bootstrap Carousel Slider Animation to Fade Out Effect or Remove the Sliding Effect

The sliding effect is the default animation for Bootstrap Carousel. Below code is how a general Bootstrap Carousel Slider would look like.

<div id="carousel" class="carousel slide" data-ride="carousel">
  <div class="carousel-inner">
    <div class="carousel-item active">
      <img src="https://blog.identitydesign.us/img/bg1.jpg">
    </div>
    <div class="carousel-item">
      <img src="https://blog.identitydesign.us/img/bg2.jpg">
    </div>
    <div class="carousel-item">
      <img src="https://blog.identitydesign.us/img/bg3.jpg">
    </div>
  </div>
</div>

Change Sliding Animation to a “Fade” Effect

Add a class name, carousel-face right after slide. You can also add data-interval="3000" to control the speed of the animation. 1000 is 1 second, and 3000 is 3 seconds. You can replace ‘3000’ with your desired slider speed.

<div id="carousel" class="carousel slide carousel-fade" data-ride="carousel" data-interval="3000">

Remove the Sliding Effect Completely

You can completely remove the sliding effect on your carousel. Simply remove slide from the class of div.

<div id="carousel" class="carousel" data-ride="carousel">
You don't have access

Solved: Adobe Creative Cloud Access to Manage Apps Permission Issue

After the upgrade to new MacOS, I got the message, “You don’t have access to manage apps” from Adobe Creative Cloud, and it won’t let me install or manage any Adobe softwares.

For Mac users, go to the Library -> Application Support -> Adobe -> OOBE -> Configs and copy ServiceConfig.xml to you desktop (You will not be able to edit the file in the folder so you need to make a copy to your desktop). From your desktop, I chose Adobe Dreamweaver to opened the file.
service-config

Edit ServiceConfig.xml

You’ll see a short line of code with two individual false contents. Change both to true.

<config><panel><name>AppsPanel</name><visible>true</visible></panel><feature><name>SelfServeInstalls</name><enabled>true</enabled></feature></config>

Once done, drag your ServiceConfig.xml back to the Configs to overwrite the file.

Restart the Adobe Creative Cloud Widget


Quit and restart Creative Cloud. You may need to restart your computer if you don’t see the change.

Creative Cloud is now working

Ta-Da! Creative Cloud is now back on track!

Wordpress Multisite

Make Your WordPress into a Multisite (Create a Network)

WordPress website can be turned into a Multisite which a feature that enables you to manage a network of websites from one place. This feature is really useful for creating numbers of sub-sites like in franchise business where you share the basic information in one place but needs multiple WooCommerce sites to collect payments and get notification separately.

1. Deactivate all plugins

Wordpress deactivate plugins

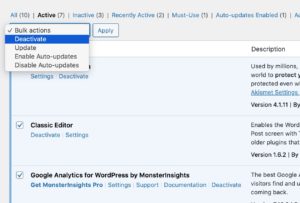
This is first thing you would have to do. Go to the WP Admin (Backend) -> Pluggins -> deactivate all your active plugins.

2. Edit WP-CONFIG.PHP

Add define code

Open wp-config.php file using FTP or cPanel -> File Manager.

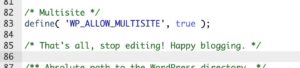
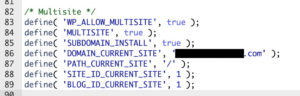
Find /* That's all, stop editing! Happy blogging. */ line in wp-config.php file (it’s on very end of the file)

/* Multisite */
define( 'WP_ALLOW_MULTISITE', true );

Copy the code and paste above, “That’s all…” in wp-config.php.

3. Create a Network on Your WordPress

network setup

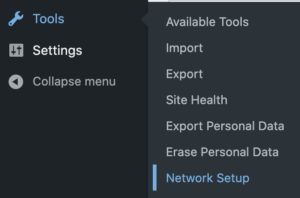
Once you are done with the process #1 and #2, the Network Setup menu should appear on your WordPress Admin page -> Settings -> Network Setup.

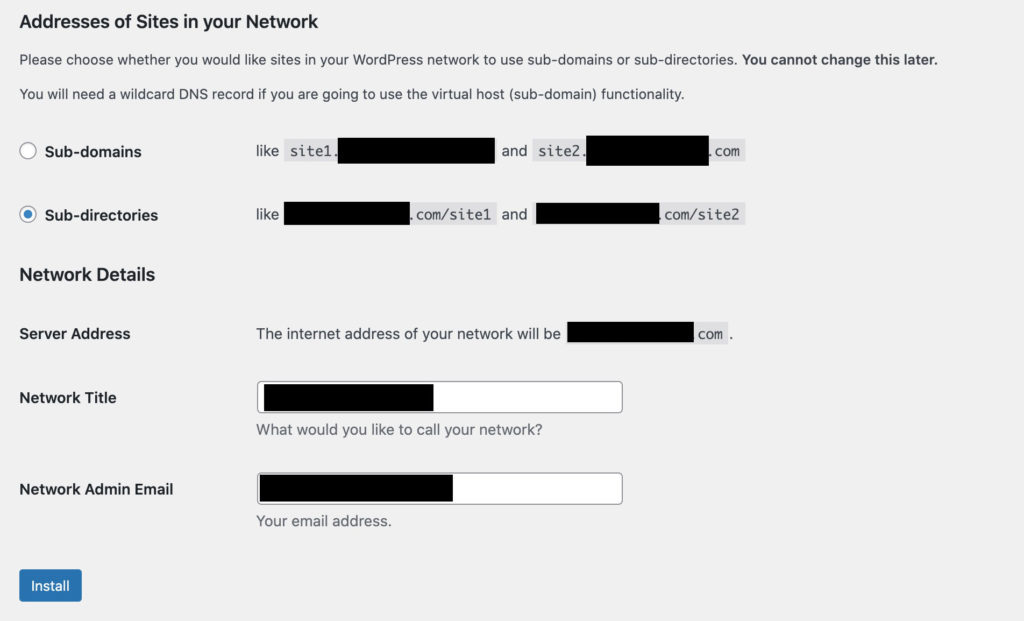
Very careful on either choosing Sub-domains or Sub-directories method in your WordPress network as you can’t go back once selected. I prefer the Sub-directories method as it’s much easier, and I like my sub-sites URL go after the slash /.

addresses site in your wordpress

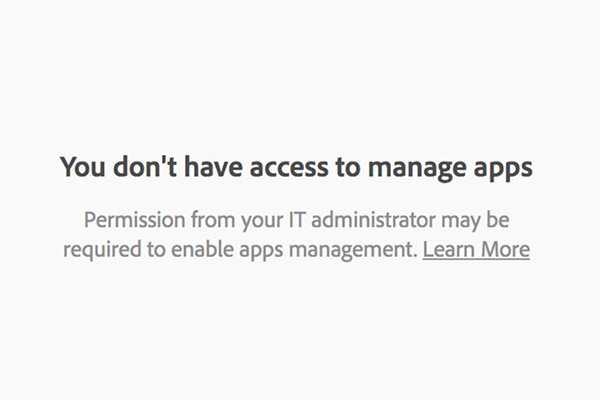
What if the Sub-directory installation is not available?

subdomain installation

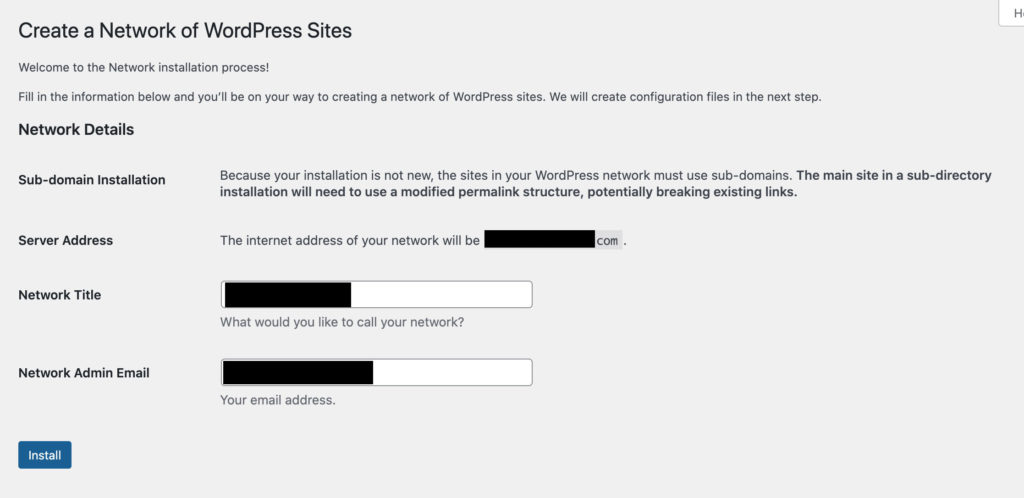
I once had a hard time couldn’t figure out why sub-directory installation can’t be selected. But, it’s very simple as deleting some files. Once you see this message, just remove all your existing posts and pages from WP Admin. Empty upload folder if necessary, and come back to this page again. You’ll now able to select the Sub-directory installation.

4. Add Additional Codes to your WP-CONFIG.PHP

After you hit the Install button, WordPress will guide you what to add on your wp-config.php file with some additional lines. In my case, I had to add the following.

additional codes to wp-config

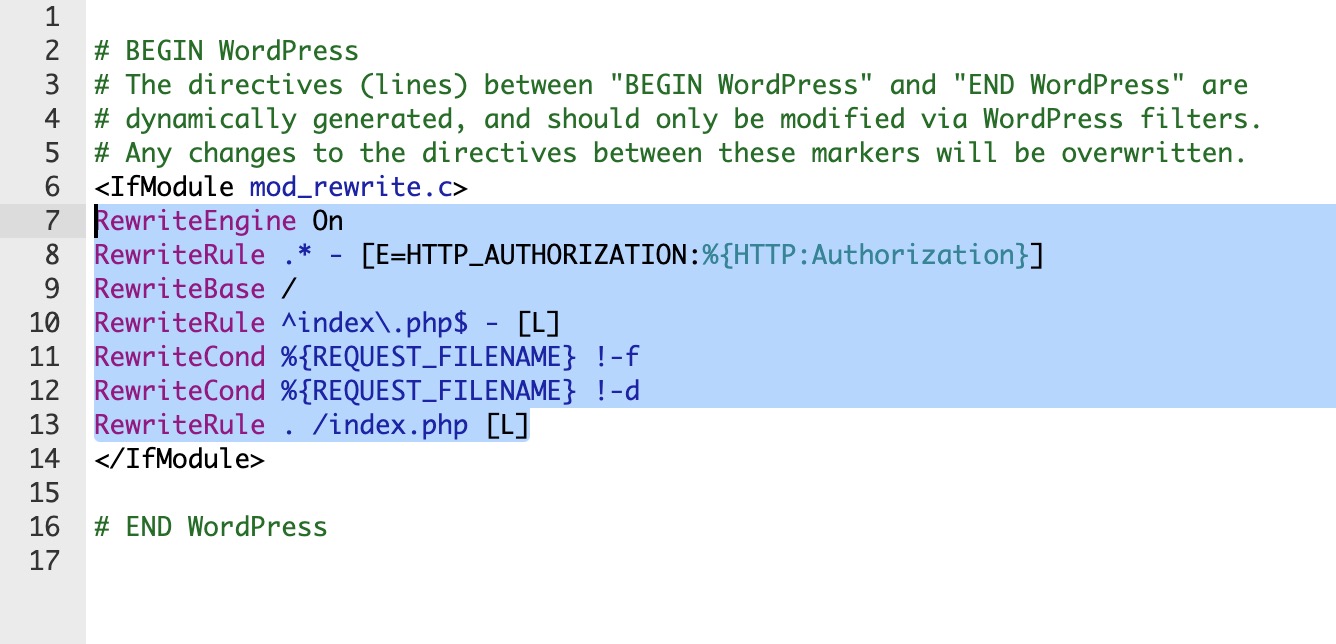
5. Add Additional Codes to your .HTACCESS

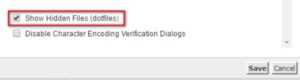
This step should also kindly described with #4. Open up the .htaccess file using FTP or cPanel -> File Manager. If you use cPanel’s File Manager, there is a chance .htaccess file be hidden. Go to the Settings menu and make “Show Hidden Files” active.

show hidden files

Paste the code you received from the WordPress Network Setup page. I only removed and replaced the highlighted lines as below.

htaccess replacement

Now, your WordPress site turned into a Multisite. Enjoy!

Youtube Thumbnail

CSS: Make Perfect Responsive YouTube Embedded Iframed Videos

YouTubes are great way to embed videos for websites, and it’s really easy to get code to place on your website. Right-click on the video you wish to embed, select “Copy embed code” from the drop-down menus. Paste the code into the HTML fields and BAM! your video just added to the page.

The video might look great with your desktop screen, but depends on your device screens sizes with dimensions, the video might have black empty spaces on top and bottom of the videos. How do I fix this?

Make Youtube Video Responsive for All Screen Sizes without Leaving Black Areas

Add a wrap .iframe-wrap around the iframe code you embedded.

HTML

<div class="iframe-wrap">
  <iframe width="708" height="398" src="https://www.youtube.com/embed/c9RzZpV460k" title="YouTube video player" frameborder="0" allow="accelerometer; autoplay; clipboard-write; encrypted-media; gyroscope; picture-in-picture" allowfullscreen></iframe>
</div>

CSS

Copy the code below and paste into your CSS document.

.iframe-wrap {
    position: relative;
    padding-bottom: 50%; /**YOU MIGHT HAVE TO ADJUST TO FIT PERFECTLY**/
}
iframe {
    position: absolute;
    width: 100%
    height: 100%;
}

As commented in the .iframe-wrap, you might have to adjust to fit perfectly. It normally fits well between 50% to 60%. Enjoy coding!

Crayons with different height

CSS: Crop Image Width or Height with CSS Only

Images can be cropped with a couple of CSS lines without using Photoshop or any image editing tools. This is useful when your multiple column thumbnail image height is different like below.

BEFORE

thumbnail image before

Because of the uneven height of the thumbnails the entire structure could be easily broken.

CSS

Copy the code below and paste into your CSS document.

img {
    height: 200px;
    object-fit: cover;
}

Try object-position: 10% 10%; if you want to move around the position of the image within the area.

AFTER

thumbnail image after

All 20-30 of your thumbnails will fit perfectly, and your layout won’t look wonky again. This method could be used on any single image on your webpage.

WooCommerce Hollow “Empty” Star Rating to “Full” Filled Stars

5 hollow stars looked my customers rated 0 star on my item not 5 stars. (But it’s 5 star rated though!) For users who sees hollow stars in WooCommerce, there must be mis-specifying font-family in your CSS.

SC-hollow-stars

Check if you have installed the “Easy Social Icons” plugin that is activated with WooCommerce.

Easy Social Icons

Simply deactivate the plugin as it is conflicting the “Font Awesome 5 Free” font-family with WooCommerce. Once the Easy Social Icons plugin deactivated, you will see the full, filled star ratings on your item.

filled star rating

Google G Suite Thumbnail

Google Workspace / G Suite Setup for Your Own Domain Email

My new client just called me with an urgent voice, “My email is down. Please fix this as soon as possible.”

My client requested me to build his website, so I set up his old domain name to my hosting server for the work environment, and his email stopped working. He never mentioned about the email that was under his old domain (i.e. client@domain.com). I was in panic for a few minutes, but gladly, I was able to find out that his email is linked to G-Suite (now called Google Workspace).

Here I will show you how to change DNS setting for an email or entire emails under your own unique domain (i.e. you@yourowndomain.com). This setup can be found under your domain provider setup tab, and it’s usually called “Advanced DNS” or “Manage DNS”. Sometimes this can be called “Zone Editor” on your hosting provider setup tab, and this can be modified if your domain is linked to a hosting service.

Clear / Remove MX Record on your DNS

First, you need to see the existence of any MX Record (Mail Exchange records). If you find a single MX Record that are exist on your DNS, remove it.

Zone Editor Screen Shot 1

I removed a MX Record “Priority:0 with “mail.MYDOMAIN.com” from my cPanel. Make sure that is no MX Record on you DNS.

Add Google Workspace / G-Suite MX Record to your DNS

Add below 5 MX Record provided by Google Workspace / G Suite.

Name TTL Type Priority Destination
Blank or @ Default Value MX 1 aspmx.l.google.com
Blank or @ Default Value MX 5 alt1.aspmx.l.google.com
Blank or @ Default Value MX 5 alt2.aspmx.l.google.com
Blank or @ Default Value MX 10 alt3.aspmx.l.google.com
Blank or @ Default Value MX 10 alt4.aspmx.l.google.com

Example

Zone Editor Screen Shot 2

As soon as the records on DNS are saved, all of your emails from your own domain will be transferred through Google Workspace / G Suite and landed on your Gmail inbox.

Deceptive Site

Malware/Virus: Fix and Remove “WP-VCD” from my WordPress

My Wordfence (a security plugin for WordPress) alarmed with the “Critical Problems” flag due to the result of the malware / virus scan from my website. I had a similar incident before, and it was a nightmare for me to fix and retrieve the suspended website back to normal.

The Malware Files

  • wp-content/themes/Divi/functions.php
  • wp-core.php
  • unzipper.php
  • wp-includes/wp-vcd.php
  • wp-includes/wp-tmp.php
  • wp-includes/wp-feed.php

The hacker used “wp-” for naming the files, so it’s hard to determine if these are core WordPress files.

However, I was able to know before Google suspend my website away with the red screen, “Deceptive Site ahead”.

This malware is called, “WP-VCD”. It could create random administrator users to control my settings, and in a worse case, my whole hosting server can be infected.

The Solution

The solution was simple. I was able to just trash/remove below files straight from the file manager on my hosting server (The root directory called, “public_html”).

  • wp-core.php
  • unzipper.php
  • wp-includes/wp-vcd.php
  • wp-includes/wp-tmp.php
  • wp-includes/wp-feed.php

However, the infected “functions.php” file was a bit tricky. The malware attack was placed on the existed theme file so can’t just remove it. You would have to edit the “functions.php” file to fix 100%. But, don’t panic. I will carefully show you what to edit from the file.

Use FTP program like Filezilla, or go to the Cpanel -> File Manager -> Root Directory – “wp-content” -> themes -> (your theme) -> functions.php. Open up the file, and remove the first set of PHP snippets code like below. In my case, remove the very first line of file to the line 184 until you see the ending PHP bracket ?>.

REMOVE THE BLUE HIGHLIGHTED CODE

One side note is always back up each files before you permanently terminate in case you have to go back, and do it as soon as possible before Google red flag on your precious webpage.

cPanel: Change / Increase Maximum Upload File Size

Don’t let any large sized file holding you back from uploading!

Here is my story. I was transferring my website from a server to a server. I was exporting one database and one large compressed website file for the “Duplicator” plugin in WordPress. The database file went-in pretty quickly through the File Upload tool, but my compressed file did not as it was over 600 MB in file size.

You can change the maximum size of an uploaded file in cPanel. Go to your cPanel, find the MultiPHP INI Editor from the menu. MultiPHP INI Editor Icon

You will face a bunch of lists on the table.
Upload file size limit table Scroll to find upload_max_filesize and change the value to your desired upload file size. I put mine as 512M. Ta-Da!

Remove P tags

Use CSS to remove auto-generated empty <p> tags in WordPress

Can’t complain the great convenient functionality of auto-generating <p> tag in WordPress, but sometimes it’s pretty annoying as it breaks some lines unintentionally. Here’s how to remove only empty <p> tag with a simple CSS line.

CSS: Hide/Remove Empty <p> tags

p:empty {
  display: none;
}

Woocommerce Conflicts with Bootstrap 4 in WordPress

I can’t give up on either functionalities: Woocommerce and Bootstrap. A conflict occurs with the wonky looking layout when using Woocommerce and Bootstrap 4 together. See the breakdown when you are on the checkout page. Below a few CSS lines would resolve the wonkiness issue really quick. Now I can enjoy both!

CSS

.woocommerce .col-1, .woocommerce .col-2 { 
    max-width:none; 
}
.woocommerce-billing-fields .form-row, .woocommerce-shipping-fields .form-row,.woocommerce form .form-row { 
    display: block; 
}
.woocommerce .col2-set .col-1, .woocommerce-page .col2-set .col-1,.woocommerce .col2-set .col-2, .woocommerce-page .col2-set .col-2 { 
    max-width: unset; 
}
Bootstrap x Wordpress

Add Bootstrap to Your WordPress Website with a Plugin

There are a few ways to install Bootstrap 4 to your WordPress website for free. One of the popular choices is to activate a Bootstrap 4 pre-installed theme, but this can be little complicated or not efficient as you might want to use a woocommerce compatible theme or some themes of your favorite.

I recommend to use the “Simple Custom CSS and JS” plugin by Silkypress.com and add 3 lines to your html. By doing this, you have a freedom to choose any theme of your favorite and enjoy Bootstrap for free.

Let me show you how to add in steps.

  1. Go to the admin page of your WordPress website http://YOUR-DOMAIN.com/wp-admin
  2. Go to “Plugins” -> “Add New” -> search for “Simple Custom CSS and JS” plugin. Install the plugin and make it active.
  3. (You will see “Custom CSS & JS” on the sidebar), go to the plugin menu called Custom CSS & JS -> “Add Custom HTML”
  4. Name it as “Header”, check the radio buttons on Header and In Frontend.
  5. Add below CSS line into the code field and publish.
    <link rel="stylesheet" href="https://stackpath.bootstrapcdn.com/bootstrap/4.3.1/css/bootstrap.min.css" integrity="sha384-ggOyR0iXCbMQv3Xipma34MD+dH/1fQ784/j6cY/iJTQUOhcWr7x9JvoRxT2MZw1T" crossorigin="anonymous">
  6. Create another “Add Custom HTML” and name it “Footer”. Check the radio buttons on Footer and In Frontend
  7. Add below JS lines into the code field and publish.
    <script src="https://ajax.googleapis.com/ajax/libs/jquery/3.4.1/jquery.min.js"></script>
    <script src="https://stackpath.bootstrapcdn.com/bootstrap/4.3.1/js/bootstrap.min.js" integrity="sha384-JjSmVgyd0p3pXB1rRibZUAYoIIy6OrQ6VrjIEaFf/nJGzIxFDsf4x0xIM+B07jRM" crossorigin="anonymous"></script>

Now you are ready with Bootstrap 4 on your WordPress website. Enjoy!

Bootstrap Partial Collapse

Accordion Partial Collapse & Expand Demo Template for Bootstrap

Bootstrap has provided accordion “Collapse” JavaScript plugins for Bootstrap users, but has no explanation making the accordion partially expand and collapse.

Below is the demo/template to build your accordion partially expand and collapse within the given height. The HTML includes CDN (content delivery network) to connect Bootstrap/Jquery’s CSS and JavaScript files, so it’s ready to be used! Click to download below.

DEMO: How It Looks

HTML

<div class="accordion partialcollapse" id="partialcollapse">
  <div id="collapse-one" class="collapse" aria-labelledby="headingOne" data-parent="#partialcollapse">
    <h4>Accordion Title</h4>
    <p>Accordion content goes here</p>
  </div>
  <button class="btn btn-link" type="button" data-toggle="collapse" data-target="#collapse-one" aria-expanded="true" aria-controls="collapse-one"> </button>
</div>

CSS

.partialcollapse .collapse {
    display: block;
    height: 120px !important;
    overflow: hidden;
}
.partialcollapse .collapsing {
    height: inherit!important;
}
.partialcollapse .collapse.show {
    height: auto !important;
} 
.partialcollapse .collapse+button:after {
    content: '+ Show More';
}
.partialcollapse .show+button:after, .partialcollapse .collapsing+button:after {
    content: '- Show Less';
}
All in one HTML

All-in-one Bootstrap 4 / Jquery Responsive HTML Template

This is the All-in-one HTML Template to build your Bootstrap 4 (ver. 4.5.2) website. The HTML includes CDN (content delivery network) to connect Bootstrap/Jquery’s CSS and JavaScript files, so you literally need this single HTML to run.

HTML

<!DOCTYPE html>
<html lang="en">
<head>  
<meta charset="utf-8">
<meta http-equiv="X-UA-Compatible" content="IE=edge">
<meta name="viewport" content="width=device-width, initial-scale=1">
<meta name="robots" content="index, follow"/>
	
<!-- Bootstrap -->
<link href="https://stackpath.bootstrapcdn.com/bootstrap/4.5.2/css/bootstrap.min.css" rel="stylesheet">
    
<!-- HTML5 shim and Respond.js for IE8 support of HTML5 elements and media queries -->
<!-- WARNING: Respond.js doesn't work if you view the page via file:// -->
<!--[if lt IE 9]>
<script src="https://oss.maxcdn.com/html5shiv/3.7.2/html5shiv.min.js"></script>
<script src="https://oss.maxcdn.com/respond/1.4.2/respond.min.js"></script>
<![endif]-->
</head>
    
<body>
<p>Write your code here.</p>
 
<!-- jQuery (necessary for Bootstrap's JavaScript plugins) -->
<script src="https://code.jquery.com/jquery-3.5.1.js" integrity="sha256-QWo7LDvxbWT2tbbQ97B53yJnYU3WhH/C8ycbRAkjPDc=" crossorigin="anonymous"></script>
	
<!-- Include all compiled plugins (below), or include individual files as needed -->
<script src="https://stackpath.bootstrapcdn.com/bootstrap/4.5.2/js/bootstrap.min.js"></script>
 
</body>
</html>
Cpanel and WHM

(Resolved) Fix PHP / MultiPHP Version Upgrade Error in WHM/Cpanel

Upgrading your PHP version might be a requirement, when upgrading your WordPress to the latest version or any related plugins. My firewall tool recommended me to upgrade my WordPress, which I did, and I saw this warning message (below) with the website being down. I was proceeding PHP upgrade from version 5.6 to 7.4 using the MultiPHP Manager in Cpanel.

Warning: Use of undefined constant WP_CONTENT_DIR – assumed ‘WP_CONTENT_DIR’ (this will throw an Error in a future version of PHP) in /home/XXXXX/public_html/wp-includes/load.php on line 115

Let me get to the point straight. The error was occurred by the auto-generated PHP handler (ver 7.4) from .htaccess that was conflicting with another PHP handler (ver 5.6) that was running simultaneously in the server.

My old PHP handler looks like this:

# Use PHP56 as default
AddHandler application/x-httpd-php56 .php
<IfModule mod_suphp.c>
    suPHP_ConfigPath /opt/php56/lib
</IfModule>

My new PHP handler looks like this:

# php -- BEGIN cPanel-generated handler, do not edit
# Set the “ea-php74” package as the default “PHP” programming language.
<IfModule mime_module>
  AddHandler application/x-httpd-ea-php74 .php .php7 .phtml
</IfModule>
# php -- END cPanel-generated handler, do not edit

In my case, the upgrade from the MultiPHP Manager was generating the 7.4 PHP handler in the public_html folder, and my old PHP version 5.6 handler was already existed in the folder above public_html which is above the root directory. That was the reason it was causing the error. You can’t run multiple PHP handlers for a single website.

My solution was to simply remove (or rename if you don’t want to delete the file) the .htaccess file (PHP 5.6) from one level above the root directory. Now it works like a charm!

Use Dropbox as Website Server Hosting FTP

Looking for a free FTP server? Use Dropbox as your web hosting server for free. First, you have to download and install Dropbox to your computer. Save your file you wish to host for your website in the dropbox folder. Right click and hit “Share”.


Hit “Create Link” and then “Link Settings”. Change “Team Members” to “Anyone with Link” under “Who has access” field. Save your setting, “Copy Link”, and now you are ready to provide the image or other resource url to the website.

All given Dropbox links are ended with ?dl=0. Change it to ?raw=1, and it will be live and your Dropbox will be working as a FTP server.

Example

<img src="https://www.dropbox.com/s/gjgkjqlecf6ek9c/design-custom-j316.jpg?dl=0" /> 

Change above dropbox link as below.

<img src="https://www.dropbox.com/s/gjgkjqlecf6ek9c/design-custom-j316.jpg?raw=1" />
whm

Temporarily Disable / Make a Website Offline in WHM

Did you still not get paid yet? Are you going to end it up disabling your client’s website temporarily in WHM? Take one of your or multiple website down using a feature called “Manage Account Suspension” under “Account Functions”.

Managed Suspension

Temporarily Disabling a Website in Steps

  1. Select the website you wish to disable temporarily
  2. Click “Suspend”.
  3. If you wish to unsuspend the website, go to “List Suspended Accounts” under “Account Information” and click “Unsuspend”.

Suspended Accounts

Bootstrap TIme Interval

Bootstrap Uneven Column Heights Issue in Layout Grid System

Bootstrap columns could go wrong and look uneven when columns have different heights. Use float: left to clear out the float properties and to stack blocks to the closest side.

.col-lg-3:nth-child(5n) { clear: left; }

If you have multiple blocks (for instance, 4-column layout) use float: left pseudo-element to apply the class every 5th element 5n.