Category Archives: How-To

WordPress

A Simple Way to Hide Featured Image inside Post with CSS

Here’s a very simple way to hide your featured image inside your post area, and it does NOT affect your actual featured image on your site’s front-page or the thumbnail image from the list. You are not deleting anything but simply hiding!

This post was originally for the theme “TwentyTwelve”, however, as many people have asked about other recent themes, I have organized the codes for the default WordPress themes from “Twenty Twelve” to “Twenty Sixteen”.

For Twenty Twelve

Copy the code below and paste into your CSS document.

.attachment-post-thumbnail { display:none; }

For Twenty Thirteen

Copy the code below and paste into your CSS document.

.entry-thumbnail { display:none; }

For Twenty Fourteen

Copy the code below and paste into your CSS document.

.post-thumbnail { display:none; }
.site-content .hentry.has-post-thumbnail:first-child { margin-top: 48px; }

For “Twenty Fourteen” theme, the margin of the top header gets weird after hiding the featured image. Adding the second line, margin-top: 48px will fix the issue.

For Twenty Thirteen

Copy the code below and paste into your CSS document.

.post-thumbnail { display:none; }
.hentry.has-post-thumbnail { padding-top: 8.3333%; }

For “Twenty Fourteen” theme, the margin of the top header gets weird after hiding the featured image. Adding the second line, padding-top: 8.3333% will fix the issue.

For Twenty Sixteen

Copy the code below and paste into your CSS document.

.post-thumbnail { display:none; }

For any questions, please leave a comment. Enjoy blogging!

PSD Hatched Slash Diagonal Pattern

Download PSD: Photoshop Hatched Slash Diagonal Pattern

Hatched/slash pattern makes slick feel to your art work. Here’s an easy way of doing it in Photoshop.

  1. Create a “New” canvas (go to “File” -> “New”). Set 6 pixels on both “Width” and “Height”.
  2. Open “Layer” palette (go to “Window” -> “Layer”). Delete existing background layer so it’s now “Transparency”.
  3. Blow the view all the way up to 3200% by select Magnifying Glass Icon from the “Tools”. Draw a line diagonally with “Pencil” tool (Like below).

Dotted Line

Feel free to customize yourself with making different colors, directions, and even different sizes like 3 x 3 pixel or 2 x 2 pixel. You can also download PSD here:

Download PSD

Application

  1. Lets continue with what we have, or simply open the PSD above.
  2. Go to “Edit” -> “Define Pattern” to and name your pattern as you like. Now, we are done with defining the pattern. Let’s apply the pattern to the image.
  3. Place a background less image by “File” -> “Place” and select your image. I’ve placed a chocolate donut png image.

Background Less Donut Image

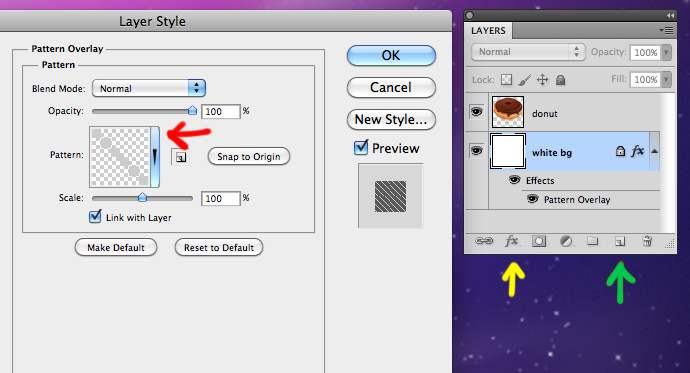
  1. Create a new layer (green arrow on right), fill a color as you like (I chose WHITE), and drag to place the layer below the “donut” layer.

Layer Style

  1. Let’s add a layer style to the background layer (Mine is “white bg”) by click on the “fx” button (the yellow arrow) shown above. Then, on the “Layer Style” window, click “Pattern” button (the red arrow) and choose your Hatched / Slash / Diagonal Pattern you made.

FINAL WORK:

Final Hatched Donut Image

globe

Google, Yahoo and All Major Search Engine Tips

Inputting “KEYWORDS” into the search engine box would be your first attempt while finding what you are looking for in the world wide web. There are a few tips that make your searching even faster adding some indicated codes to your search input box:

[“”] DOUBLE QUOTATION

Finding Exact Word with Order: wrap double quotation marks (“”) to your search words. In example, “cool free photoshop brushes” would only find cool free photoshop brushes NOT best free photoshop brushes or awesome free photoshop brushes.

[-] Negative/Minus CODE

Words You Want to Exclude: Add a negative/minus code immediately before the world you want to exclude without space. In example, abstract background image -jpg would find you all abstract related background images but not in jpg extension. (JPEG will shown in the search results)

[filetype:]

A Specific File Type Search: Input “filetype:(with colon)” in front of the file type name such as “jpg” or “pdf” to search that exact file type with the keywords. In example, “filetype:pdf design” would find you all PDF files that related to the word DESIGN.

[site:]

To Find Within a Site: Input “site:(with colon)” before any website such as “iiiji.com” follow by the keywords would let you find the subject within the website you’ve indicated. In example, “site:iiiji.com tutorial” would find articles about TUTORIAL within the site iiiji.com.

[*]

A Placeholder: The code “*” in between keywords be treated as a placeholder, so “Freelance * Design” will find you Freelance Graphic Design, , Freelance UI/UX Design, and so on.

[OR]

To Find Either One of Several Words: If you want to search for something either one of its kinds such as “design award 2010 OR 2011” will get you a result within these two years of resources. (OR must be ALL-CAP)

Joomla to Wordpress

Migrating Joomla to WordPress

Here’s the a way to migrate Joomla users to WordPress users. I’ve used Joomla for some years and I still thinking it’s a great Content Management System. But however, I’m so much liking using WordPress for my site building I definitely needed to bring users from Joomla to WordPress. If you have hundreds of articles and migrating one from another it’s pain but still possible and manually doable, but when migrating users data, it just can’t.

I’ve tried to follow other tutorials, but for some reason it didn’t work out for me. So I’ve done some other testings and finally it worked out! Now, let me introduce to how to migrate Joomla users to WordPress users. The versions I’ve used is Joomla 1.5 to WordPress 3. Here’s how as simple as:

1. On your Joomla site, export users to a CSV file.

To export Joomla users data, use ‘ARRA User Export Import’ plugin.

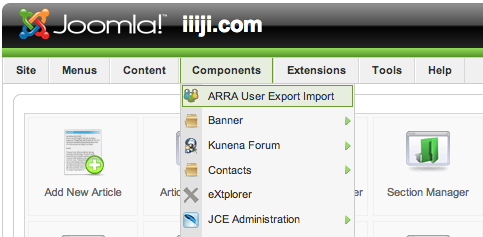
  • Install plugin and go to the plugin page (Admin – Components – ARRA User Export Import)
    Joomla Components
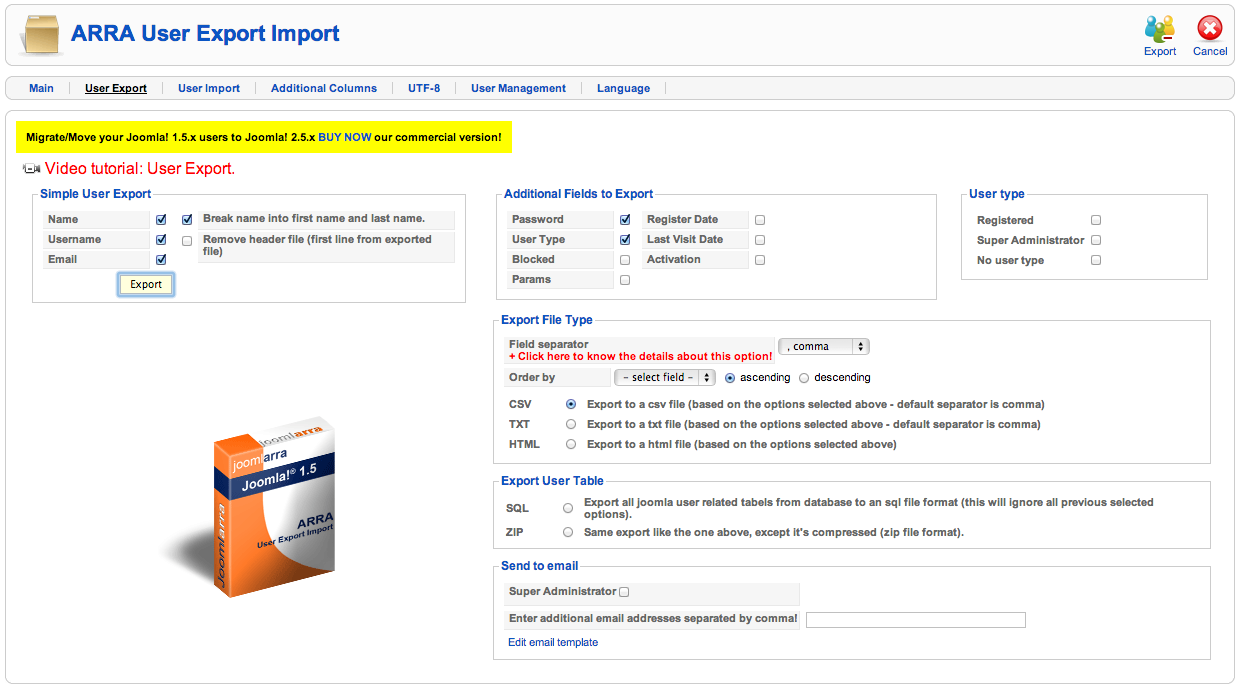
  • Click on ‘User Export’, mark the following check boxes, and “Export”!
    ARRA User Export Import
  • You’ll get a “CSV” file.

2. Tweak the CSV file before import to your WordPress site.

  • You can open the file with Dreamweaver, Microsoft Excel, or one of the text editors you already have.
  • Just need to change very top row.
    Modify from Text EditorEdit text as the following table (Top to Bottom) and save.

    first name last name username email password usertype
    first_name last_name user_login user_email joomlapass role

    *Sometimes Microsoft Excel won’t save it right. I recommend Dreamweaver.

3. Import the CSV file to your WordPress site.

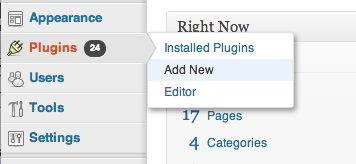
  • To install plugin, on your wordpress site, go to Admin – Plugins – Add new.
    Wordpress Plugin
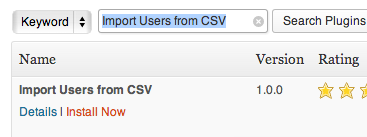
  • Search for ‘Import Users from CSV’,
    Import Users from CSV
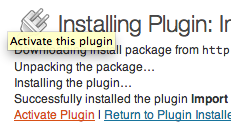
    ‘Install Now’, and ‘Activate Plugin’.
    Activate Plugin
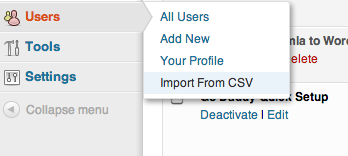
  • Go to ‘Users’ – ‘Import from CSV’
    Import From CSV
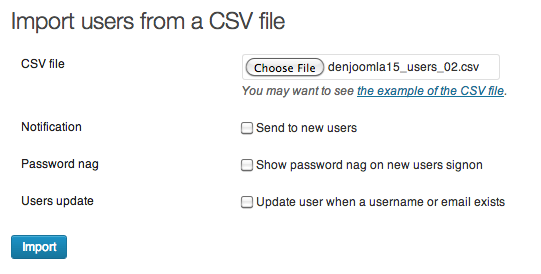
  • Drag your updated ‘.CSV’ file to the ‘Choose File’ filed, “Import”!
    Import users from a CSV file
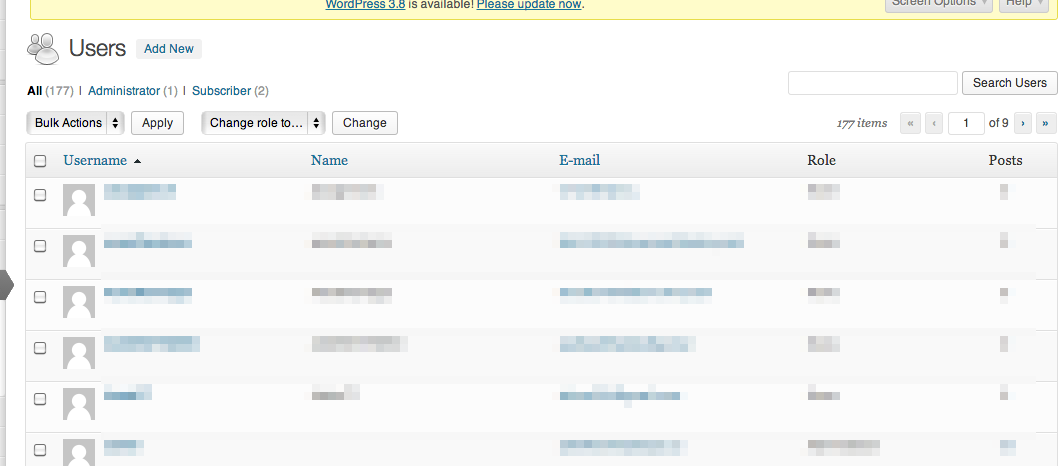
  • Check your ‘Users’ – ‘All Users” page to see everything looks right!
    Check Users page